

Project Journals
create a diary for your project and show us your progress, with up to 100 photos!
|
deltadave dave plumley unionville TN (69 posts) Registered: 10/24/2010 08:21PM Main British Car: 1953 MG TD Chevy 350 |
53 V8 TD
Owner: Dave Plumley
City: Unionville TN Car Model:1953 TD Engine: Chevy Engine: 1974 Corvette 350 minor mods Cooling:custom unit from Brice Thomas Radiator Exhaust: homemade headers into 2 1/2" pipes with round turbo mufflers Transmission: 1985 Camaro five speed with Astro van 11' clutch, Jeep pedal and master cyl with Nissan slave cyl Rear Axle:1964 Corvette narrowed to fit TD foot print Front Susp.:1965 narrowed Corvair with stock MG rack & pinion Rear Susp.:1964 Corvette Brakes: (master) Jeep Cherokee cylinder and pedal assembly, stock MG pedal pads used (front) Corvair with Scarebird conversion to S10 disc (rear) stock 64 Corvette drum Wheels/Tires: Chevy 7x15 Ralley wheels 195/60 front & 225/60 rear Body Mods:relocated turn signals to headlights, body work and custom blue PPG paint by Fenders & Flames of Corning NY Interior:stock recovered by Capabilities Inc. of Elmira NY,installed by me. Dynamat and Lowes carpet done by me. Dash guages and sterring wheel redone by me Electrical:ez wire harness with TPI gauges After over thirty years in a garage in Buffalo New York the little TD was rescued in 2006 by Rich Almeter. This is how it was found. The engine was toast and the passenger door and seat bottom were missing. There were a lot of parts in boxes, but most were junk. Rich dismantled the car, but had too many projects going to start an other one. I already had a custom truck and a hot rod Willys, but couldn't resist owning a V8 TD. I purchased the car in July of 2009 and sold the Willys. Rich bolted most of it together so it could be moved. My brother and I trailered it to my home in south central New York near Watkins Glen, These two pics are the day it arrived. I started taking her apart and test fit a 74 Corvette 350 to the frame many times before it and the T5 trans were bolted down. The car spent the winter in many pieces in my garage, while I solved some problems. Way back in 1968 Thom Gingher of Buffalo transplanted the Corvette rear and Corvair front suspensions in the MG frame. The story goes that Thom drove the car around the Buffalo area and raced it in some modified SCCA class at Watkins Glen from 68 to to 71 when the engine blew up. I lived a few miles from Watkins Glen before moving to TN, but never got to the museum to conferm the story. Some of the work left a bit to be desired, so I refined and upgraded some parts of the conversion. The rear upper shock mounts were relocated and the forward rubber mount was replace by a solid one. The fromt brakes converted to disc and new shocks and steering shaft with rubber isolation joint installed. The frame is prety much done so on goes a coat of POR 15 epoxy paint. 
The engine is painted, trans is bolted up and droped in the frame. 

Purchased a product called Hyper Fiber. It's fiberglass cloth with wire imbedded in it, so it will hold a shape. The best thing about the stuff is curing is done with UV rays. I used it to make the transmission cover. Covered the trans with bubble wrap to give 3/4" of clearence and formed the Hyper Fiber over the trans and onto the floors. Pushed the frame out in the sun and ten minutes later the cover was done. The stuff is a little pricey but, I usualy waste half the cloth and resin I buy anyway. 


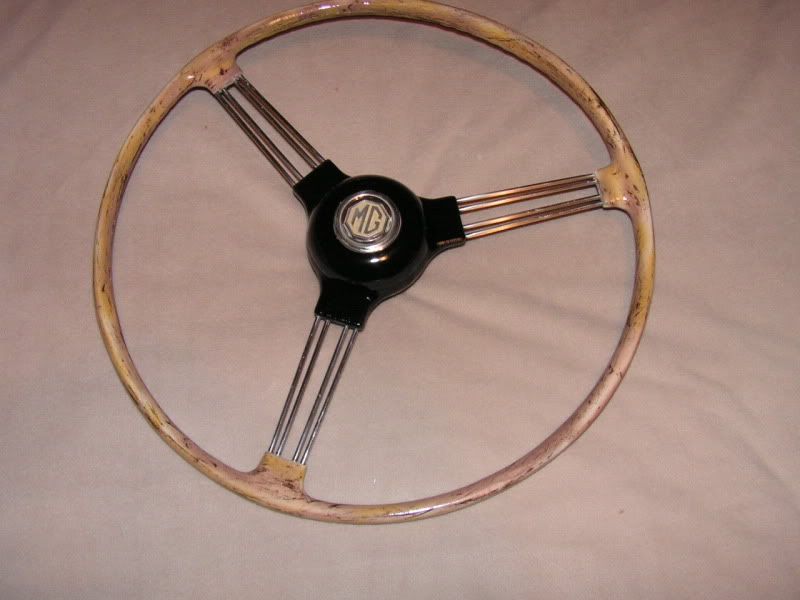
My steering wheel was a mess with very little plastic left after fifty seven years. I couldn'd afford $500 for a Brooklands wheel, so I decided to atempt a restore with PC7 epoxy. Removed all the broken plastic and built up many layers of epoxy. It's a slow process because each layer has to cure before the next goes on. I made several sanding tools and found my wifes foam nail boards work great. After the wheel was done, I did a wood grain airbrush paint and clear coated it. I have less than $15 in the restore with a nice wood grain look. 

The MG frame is so narrow I had to shorten the clutch throw-out lever. I decided to use a Nissan truck slave cylinder because they are small, have two mounting bosses perpendicular to the bore for easy mounting, and they sell for $15 on EBAY. As small as the slave is, I still needed to remove a small piece of the frame for clearance around the bleeder. I made a bracket from heavy angle iron that used two of the bell housing mounting bolts for installation. The assembly went together as planned and works great. 


Called TPI and ordered a 5" electric speedo, tach, sending units and the four small standard gauges. Got to work on the dash after a cleaning and a little armorall. Got the body back from the paint shop and started the reassembly process. It sure was easyer to take apart than put back together getting the wiring done(not my favorate job)and installing the insulation and interior. bought a small gel cell 7"x 6 3/4"x 3 3/4" that fits in the original tool box and upgraded to a costom radiator from Brice Thomas radiator. The spring in the Corvette rear was a mess, so I found a composit one on EBAY and cut if off to fit the narrowed rear unit, works great. Well everything is done and I've had her on some test drives. The front brake lines leaked and had to be redone and the engine had a low oil pressure problem that was cured with a new pump and went back to a stock pan. I also installed an engine oil cooler. The spoke orings on two wire wheels started leaking and the cost of repair was way too much. I trashed canned them and bought a set of 7" x 15" GM ralleys and 195/65 on front and 215/60 on rear. Popped on some three bar spinners and paint for the look I wanted. One of the little balls on the end of the ebrake cable came off and had to be replaced. I fired her up late yesterday and went for night time ride to check the lights and returned without any problems. If all systems continue to function I will be driving it to Townsend next month. She goes like stink and handles like a slot car, but it's been a struggle at times. The pics were taken at dusk last night so they are a little dark, will post some day time shots when I get a chance to take some. One final pic of the finished project  Edited 18 time(s). Last edit at 05/06/2011 08:09PM by deltadave. |
Sorry, you do not have permission to post/reply in this forum.
British V8 Home Page
Photo Gallery
Web Forum
Annual Meetings
Contact Info
Site Map
British Race Car

© 2025 British V8™ All rights reserved. Website & graphic design by:
Curtis Jacobson.
BritishV8 Forum is hosted by
SiteWelder LLC,
and is powered by a
Phorum engine.