

Project Journals
create a diary for your project and show us your progress, with up to 100 photos!
|
HealeyRick Rick Neville (495 posts) Registered: 12/19/2007 05:01PM Main British Car: 1963 Austin-Healey 3000 Ford 5.0L |
"The Exploder" - HealeyRick's Austin-Healey BJ7 w/ Ford 5.0
Owner: HealeyRick
City: Northshore, Massachusetts Car Model: 1963 Austin-Healey 3000 Sports Convertible (BJ-7) Engine: 2000 5.0 Ford Explorer: Holley 570 cfm Street Avenger; Edelbrock RPM Air Gap intake;Trick Flow Stage 1 cam; Crane beehive valve springs; Ford recurved Duraspark distributor Cooling: Stock radiator recored with four-row Exhaust: Sunbeam Tiger cast iron manifolds Transmission: Ford World Class T-5Z Rear Axle:Stock with 3.54:1 "Lempert Gears" Front Susp.: Stock springs with spring pans dropped to compensate for rise in front end with lighter motor. ADDCO 5/8" sway bar. Rear Susp.: Stock Brakes: (master)stock (front) stock discs (rear) stock drums Wheels/Tires:Dayton 72 Spoke Stainless 5.5" Wires/ Michelin zX 175 R 15" Body Mods: none Interior: Lempert Wood Wheel, Halda Speedmaster, Becker Europa II AM/FM Stereo Electrical: 130 amp 3G alternator, mini starter, MSD 6AL ignition box w/rev limiter, April 4, 2009 And so it begins. The installation of a Ford 5.0 from a Ford Explorer (hence the "Exploder" name) into my 1963 Austin-Healey 3000. 
A new wooden frame, perhaps?  l l
Nope, a wooden engine and tranny dolly to hold the Healey six when it's pulled. April 5, 2009 
I've owned this car since 1985 when I purchased it from the original owner. In 1965 it was converted to an SCCA road racer and given a turquoise paint job with red wire wheels. Subsequently, it was used into the 70s as an autocross car before being stored in a barn. I stripped it to bare metal, put in new doglegs, did the bodywork on a bunch of minor dents, primered and block sanded before having it shot with a custom-mixed PPG Healey Blue bc/cc 

Removed bonnet, radiator, radiator and heater hoses, fan, fuel lines, throttle linkage, distributor, generator, and coil. April 18, 2009 Removed engine and transmission: 
Obligatory engine swapper's pic of the lump hanging precariously over the aluminum shroud. May 5, 2009 Some bad news in the engine and tranny dept. My junkyard Explorer motor has rust in #1 and #5 cylinders: 

and there's water damage to my cheapie T5 WC as well. Good news is the motor can get by with new pistons and a rebore and new bearings. Everything else is within spec. Will do a three angle valve job while it's apart. Fortes Parts is nearby and will be doing the work plus running it in on the dyno .[www.fortesparts.com] I expect about 300 hp at the flywheel Also getting a new T5Z. Anyone need a WC T5 core cheap? PM me. Meanwhile, I've been collecting parts. Brian McCcCullough has provided his HTOB kit (not a lot of room for an external slave on the T5Z on this swap). 130 A small case alternator and mini-starter from here: [forums.corral.net] (great price and will work with you on custom applications). Fidanza aluminum flywheel (http://ultrarev.com/storefront-c0.html check eBay and make an offer, they'll deal) and a Duraspark custom curved distributor from Performance Distributors have come in: [www.performancedistributors.com] I'll use the Duraspark to trigger an MSD6-AL box and a MSD Blaster 2 Coil. Could've gone with an MSD pro-billet, but I like the availability anywhere of the Duraspark parts and some troubling info about moisture issues under the MSD caps seemed like the way to go in a relatively low performance motor. Also in is a standard rotation, serp belt water pump kit::[www.replicaparts.com] Also won these Sunbeam Tiger manifolds on eBay: 
Will probably cost me a few hp, but will mean less hacking up of the footboxes. This isn't a balls to the wall car, anyway, so it's a fair trade-off June 21, 2009 A little more progress. Did a quick and dirty positioning of the motor and tranny: 
This is going to work OK. I'll need to do some trimming of the foot boxes, but the 5.0 L is the way to go if you don't want to hack the heck out of the car. Thought I might be able to use the Sunbeam Tiger exhaust manifolds as is, but it seems pretty clear I need to find another center-dump Tiger outlet to make this happen as the original rear-dump flipped backwards will empty out into the original motor mount towers that I don't want to remove in case some future concours nut wants to take this car back to original. I'm going to use "saddle" type motor mounts like this: 
That way, I won't have to chop and weld on the chassis. Fortunately, I'm not the first guy to swap a SBF into a big Healey. V8 engine swaps into Healeys have been going on since the '50s. Check this one out from Max Balchowky of "Ol' Yeller fame: [modifiedhealeys.org] These are a take-off of the ones used by Larry Zirbes in one of the first SBF Healey swaps featured in the August, 1963 issue of Hot Rod magazine. Zirbes was the General Superintendent of Ford's Cleveland engine plant so he was able to scope out pretty early in the game that the SBF would fit like a glove in the Healey bay. (thanks to Kent Lacy for the motor mount pics, who put a SBF into a Healey 100M to the chagrin of the purists.) I'll be running a new T5Z and I was happy to see that with the engine placement I've roughed in, the shifter placement almost comes up into the original shifter hole. In this view you can barely see the shift tower is a little to the back of the hole in the original fiberglass cover: 
Not sure yet whether I will be able to center the shifter while keeping the original motor mount towers, but if I need to, I'll modify the fiberglass tranny cover. Best case is I can work it out so an original Healey shift lever can be grafted onto the T5Z so the only tip-off that this car is modified is dual exhausts and a rumpity rump engine note. While I'm at it, props to Bill McMahon, who's local to me, and his son, Pat. Bill's been down this road before and he and Pat have been a great help. June 28, 2009 Did some fine tuning on the engine and tranny location this weekend. Pat McMahon suggested C-clamping a piece of plywood across the bottom of the chassis rails and using that to position the motor so the oil pan wouldn't drop below the chassis. No oil pan on the mock-up motor so used blocks to get the right depth: 
Put a 2x4 across the transmission opening for support and by the time I got done moving everything around I was able to get the shifter to line up in the original opening, locate the motor so I could use the saddle motor mounts without cutting the original towers and placed the oil filter housing in position so it looks like I won't need to use a remote filter. On top of everything else, I got it to sit level: 
I threw on a head to check for exhaust manifold clearance. If I didn't need to run manifolds, I wouldn't have to cut any sheet metal: 
But since I don't like the thought of all that exhaust blowing around in the engine compartment, there was nothing for it but to narrow the footboxes. Out came the mock-up motor so I could get to the sheet metal. First, I had to remove the asbestos heat shields, which were a bear and sent asbestos fibers into a toxic snowfall (I had a respirator, thanks for asking) I gathered my implements of destruction in the form of a sawzall and a whizzer wheel, I took about 1 1/2" from both the driver's side and the passenger's. 
Next step is to put the mock-up motor and tranny back in, make final measurements for the engine mounts and see where I stand with the exhaust manifolds. August 9, 2009 Been still chipping away, but am on hold for a bit waiting for other guys' schedules to catch up. Motor's done, just waiting for it to be run in on the dyno:
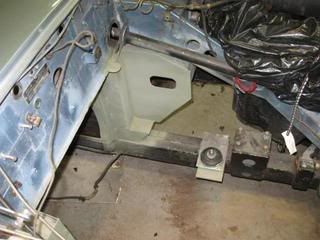
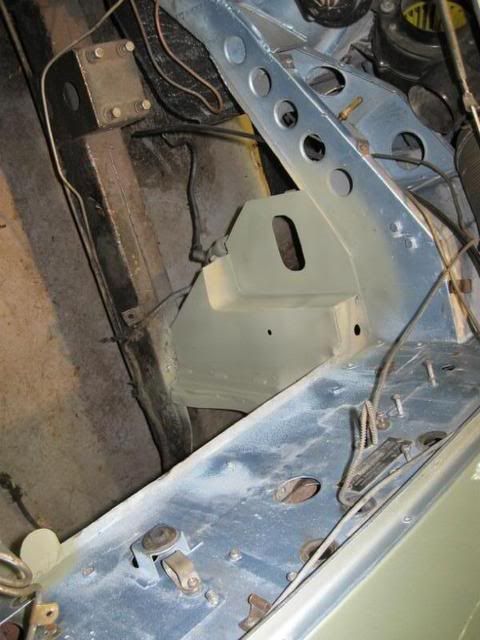
Expecting around 300 hp at the flywheel. I''ve rough-cut the footwell boxes and have drawn up plans for my motor and tranny mounts. Next week, the chassis goes off to a local restoration shop to fab the motor and tranny mounts and weld up the modified footboxes. Since I frittered away my youth by going to college instead of learning something useful, like welding, I'll let the shop reinforce the tranny tunnel, aka "The Doghouse" while they're in there: [www.britishcarweek.org] I was finally able to source a second center-dump Sunbeam Tiger exhaust manifold. Healeys are well known for being somewhat toasty in the footboxes and more so with a V-8 installed. I'm contemplating sending the Tiger manifolds off to SwainTech for their White Lightning coating that is supposed to really reduce underhood temps. Will probably hold off until I get the exhaust system sussed out. I'm going to be ordering up the SpinTech Cruiser mufflers (spintechmufflers.com).At 2 1/4" deep, they should help with the minimal Healey ground clearance. I also ordered some engine-turned stainless from FPM Metals (fpmmetals.com) 
I'll use this to sandwich a layer of insulation between the existing firewall and the engine turned sheet to prevent hot air from entering the cockpit. Stay tuned. September 24, 2009 Lots of progress, mostly because I paid someone else to do most of the work. Sublime Restoration of Rowley, MA fabricated and installed the modified footboxes, engine and tranny mount as well as notching the right side outrigger for the right side exhaust: 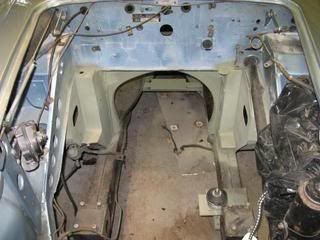
Motor's back home after being run in on the dyno. I was hoping for 300 hp Bit of a surprise, she dyno'ed at 345 hp @5750 rpm and 344 ft/lbs. Thanks to Mike and Jesse at Fortes. October 19, 2009 Why is it when I plan something in my head, it takes a couple of hours, but when I actually do it, it takes two days? I watch all those shows, Gearz, Horsepower TV, 2 Guys Garage, Muscle Car, Trucks, etc. Everything they do takes a half-hour, max. OK, Foose takes an hour, but he's Overhaulin' a whole car. Case in point. My engine-turned stainless firewall. Bad enough I cheated by buying the stainless sheet already engine turned. Made a cardboard template after removing the wiring harness. Then I notice some melted insulation on a couple of the dash wires. Dig out an old Bugeye harness to scavenge some wiring, cut, solder, and shrink wrap the dodgy wiring. Back to the firewall. Trace the pattern and start cutting Take it in and out a few times, using my grinder to make some fine adjustment. Damn grinder quits. Take it apart, can't fix it. Offshore crap, only lasted ten years for $15. Now had to go out and buy a new one. Little known fact, every grinder is $29.95 (WallyWorld, Lowes, Home Defect, different names - same price. Finally get it fitted so it looks like this: 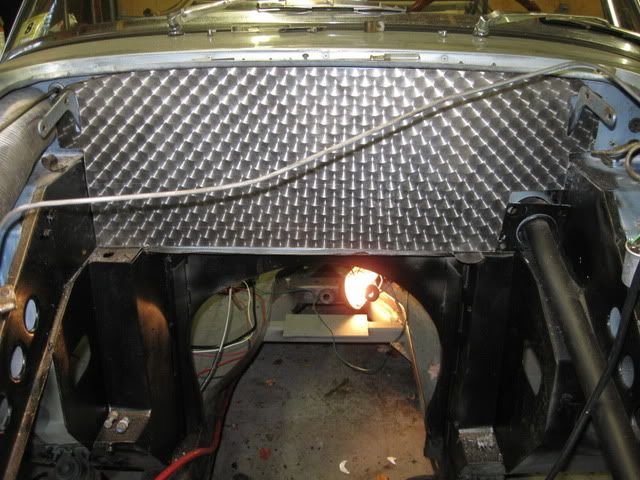
Now I only have to suss out the holes for cables, wires and hoses. ("Suss" = mandatory Brit-speak). Finally figure out a solution. Take a rattle can into the interior and spray all the holes from the back end: 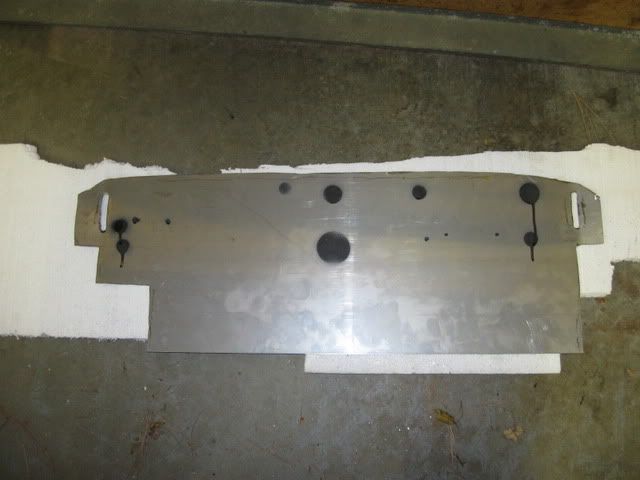
Perfect! But now I have to drill out the holes. No problem for the small ones, but I don't have metal hole saws for the bigger ones. No problem, I'll dig out the mini air die grinder and a rotary rasp. Takes some time, but working ok. Then the die grinder quits. More offshore crap, got it free as part of a class-action settlement when Craftsman overestimated the hp on my air compressor. Worth every cent! Take it apart and put it back together a few times before being able to fix it. Still grinding away but almost there. BTW, before you say "Serves you right for trying to make a gold-chainer bling machine." just want to say I had the best of intentions. Plenty of heat comes through the Healey firewall. I'm going to put some bubble aluminum insulation between the stainless and the original firewall to try to keep the interior a little cooler. November 2, 2009 I could probably install the motor and tranny now, but while the engine compartment is empty I keep noticing things that will be easier to get to now than with a big V-8 stuffed in there. First, I had some engine turned stainless left over from the firewall, so I made up some removable panels for the footboxes. I glued "Reflectix" insulation using 3M Super 77 spray adhesive (designed for foil) on the back: 
and used stainless sheet metal screws to fasten them in place. Here a shot of them installed along with the firewall finally completed after lots of die grinding: 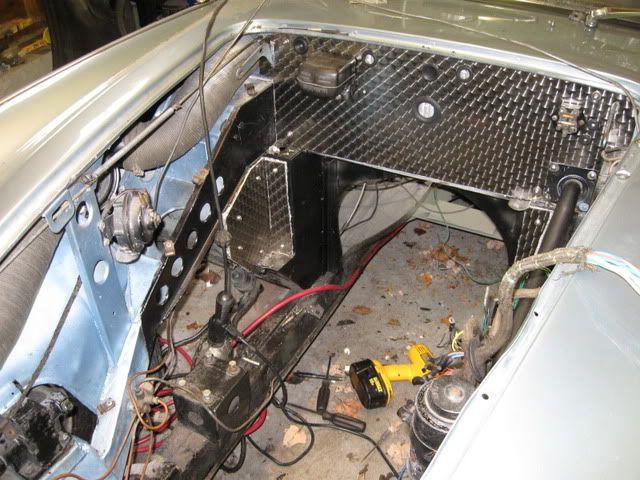
Other tasks completed: installed new 3/4" clutch master for the HTOB; installed cupro-nickel brake lines; installed 1 ga battery cable to handle the alternator output; touched up some "holidays" on the block using POR engine enamel with a brush. Flowed out so well I decided to paint the horns, brake reservoir and upper frame rails while I was at it. December 29, 2009 For those of you checking in and not seeing any progress, here's the reason: 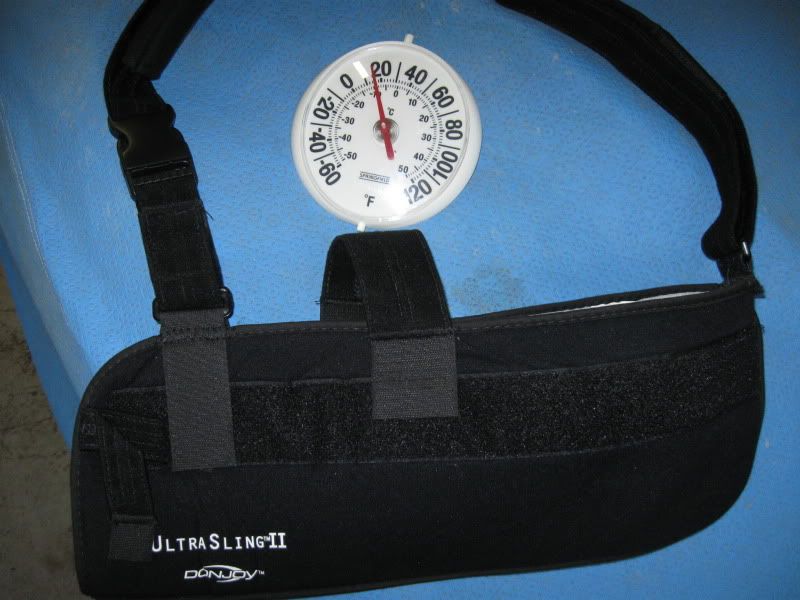
I'm hors de combat with rotator cuff surgery coupled with frigid temps in my unheated New England garage. Before I buttoned everything up for the winter, I did manage to install a Fidanza aluminum flywheel and Ford King Cobra clutch kit: 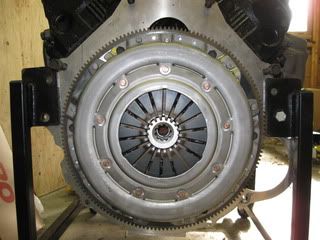
I also replaced the standard bearing retaining nosepiece in the Ford T5Z tranny with one with a slightly smaller diameter in order to fit the HTOB. This was all supplied by Brian McCullough, a site sponsor. The new one is on the left in the picture below: 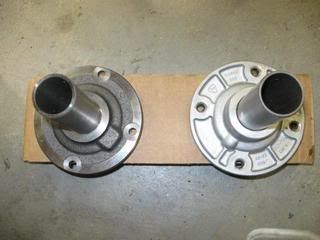
So until ice-out and my shoulder is rehabbed, this will be the view of the Exploder: 
April 25, 2010 Aaahh, spring! When young men's thoughts turn to love, and us old guys start thinking about British iron. After a long winter rehabbing from the R/C surgery, it's time to get back at it by unceremoniously dumping the much loathed sling in the trash: 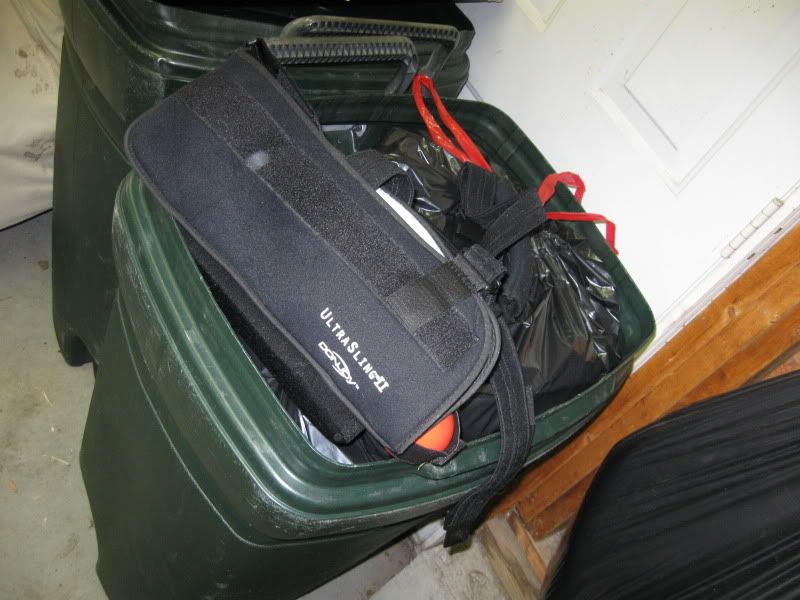
Started thinking about a throttle pedal, when I noticed a slight problem: 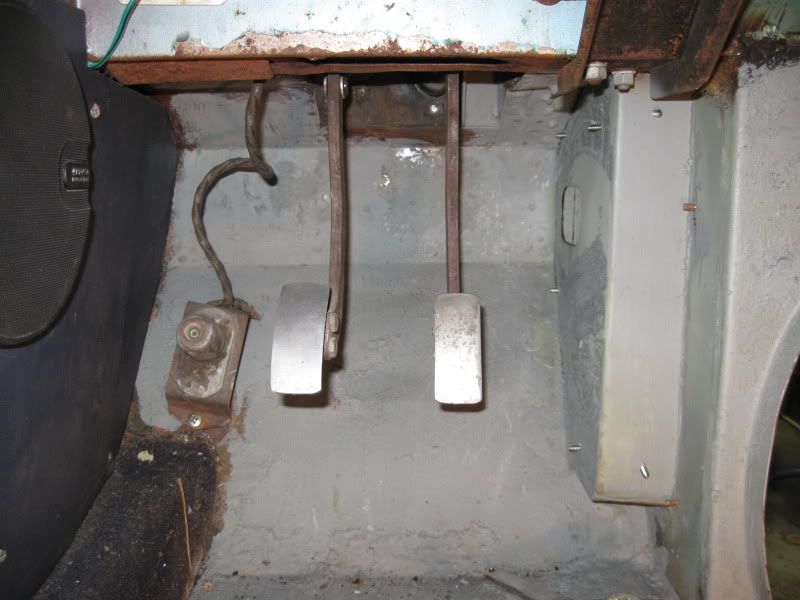
Enlarging the footboxes for the Ford motor is going to require me to cut off a couple of toes to have enough room to put the pedal to the metal. Not ideal, so perhaps I could swing the brake and clutch pedals to the left for some more room. OK, but that means I need to take out the pedal box, which means I need to remove the new clutch master cylinder I installed last fall as well as the brake master cylinder .. . and of course undoing the brake and clutch hard lines I just installed.... Then I was worried I'd need to use a blue wrench (which I don't have) to heat the pedal levers enough to bend them. Not to worry, though. Removed everything and was able to bend everything to the left by chucking the levers into a vice and using some judicious application of force. OK, I know, this isn't race car fab here, people. This is shadetree hotrodding. Anyway, it all worked out fine: 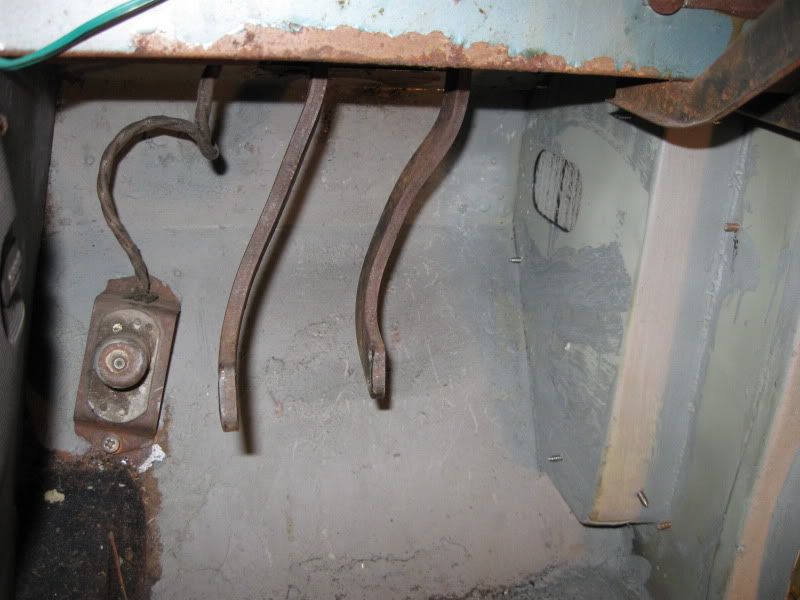
I'm dying to drop in the motor and tranny, but I keep on seeing things I need to do while I've got easy access to the engine compartment. May 2, 2010 Every sports car needs three pedals and I was missing the most important one, the gas pedal. The stock pedal disappeared with the footbox mods and just as well as it would've required a lot of modding to hook up to the Holley carb. So I ordered up a Lokar spoon type pedal and cable. The pedal assembly is designed to bolt to the firewall of your street rod, but of course no way I was going to get off that easy. I spent some time figuring out how to make it work in the Healey. I finally decided on an "L" shaped sheet metal bracket bolted to the inside of the footbox, next to the pedalbox. While it all looks pretty simple, it chewed up about eight hours of time trying to position everything just right and navigating various drills and wrenches in the tight confines of the footbox while on my back and testing the limits of the range of motion in my recovering shoulder. Here's the result: 
You can see where the throttle cable enters the engine compartment to the upper left of the brake master cylinder. Oh yeah, had to take that out again to get the cable properly located. I'm developing a real expertise in clutch and brake M/C R&R. 
June 20, 2010 Engine and transmission assembly - I'm going to install as a complete assembly, so much easier than laying on my back trying to muscle the input shaft into alignment. Here's the transmission, a brandy new T5Z (2.95/1.94/1.34/1.00/.63 ratios): 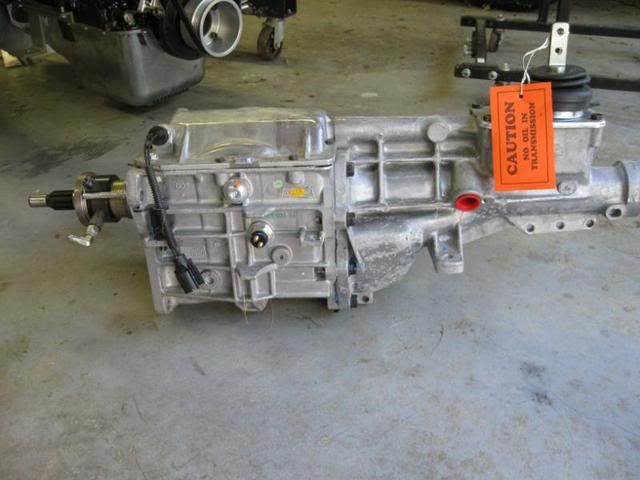
I'm using a hydraulic throw out bearing from BMC British Automobiles to hopefully avoid some of the external slave fitment issues. Various opinions on HTOBs, some like them, others not so much. Two common denominators from my research; they need to be set up properly and using a pedal stop so they don't over extend. For set-up, I bought this gauge from Speedway Motors. Probably overkill, but I didn't wan to take any chances and it worked great. 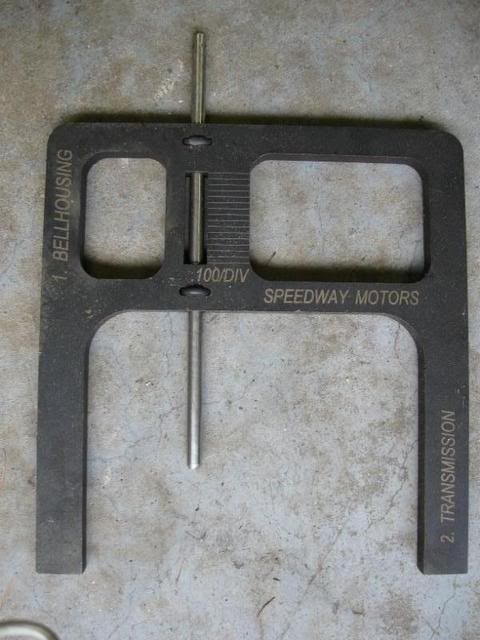
Here's the result after getting enough shims to put the bearing surface at the proper clearance from the clutch actuation fingers: 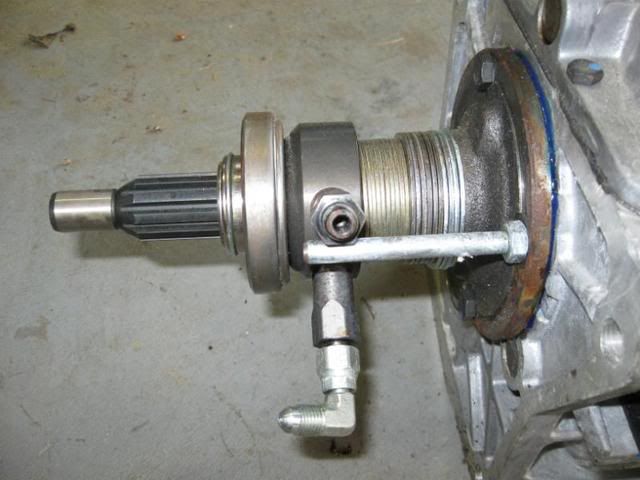
Next was to install the bellhousing and hoses leading to the HTOB. When installing an HTOB, the hoses route through the original clutch fork hole. However, that hole is a bit large and leaves plenty of room for the hoses to flop around and create untold mischief. 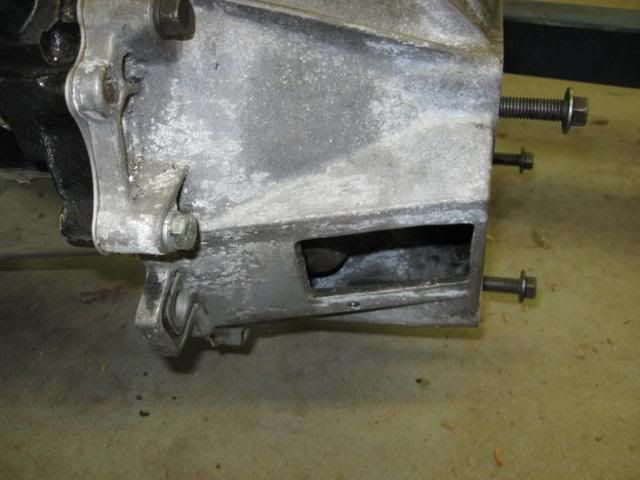
Combine this with Brian McCullough's advice that the stainless hoses can serve as an excellent alternative engine ground if not properly insulated, convinced me to employ my fabulous fabbing skills to fab up this aluminum plate to pass the hoses through the bellhousing: 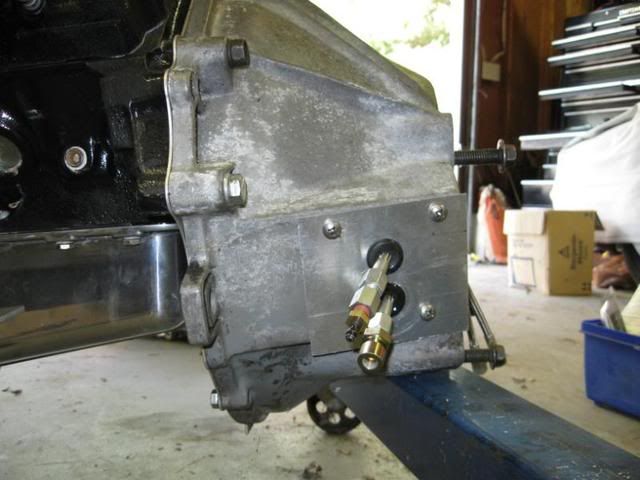
T5 transmissions have easily changeable color coded speedometer gears to adjust for different gear ratios. After using the online calculator [www.hanlonmotorsports.com] I determined i needed a "black" gear. After pulling the speedo drive from my parts T5 (doesn't everyone have a parts tranny?} I found I had a "yellow" gear: 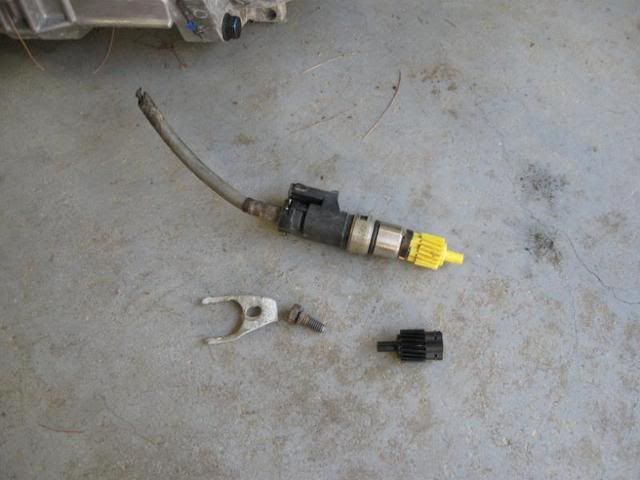
Replaced with the black one and we'll see how accurate my calculations were once we're on the road. Time to mate up the transmission and bellhousing to the block. After manhandling various input shafts into various pilot bearings over the years, I can safely say this is one task I truly hate. I was trying to figure out how I was going to turn the transmission output shaft to line up the input shaft and clutch spines since I don't have the tranny yoke yet. Not being able to come up with a solution, I decided to WTF it and attempt a docking worthy of the Apollo lunar module. Tout alors! Everything slipped in like butta. Unbelievable. As much as every fiber of my being wants to get on with installing the drivetrain in the car, I've resisted the urge and am engaging in some exceedingly rare for me advance planning and trying to get as many auxiliaries squared away before the cold reality of limited engine space rears its ugly head. For instance, I needed to install a -3 stainless hose and fitting to operate the original Healey oil pressure dual gauge. Only problem was I couldn't do that without removing the already installed mechanical fuel pump. What a bear this would have been trying to do this with the motor installed: 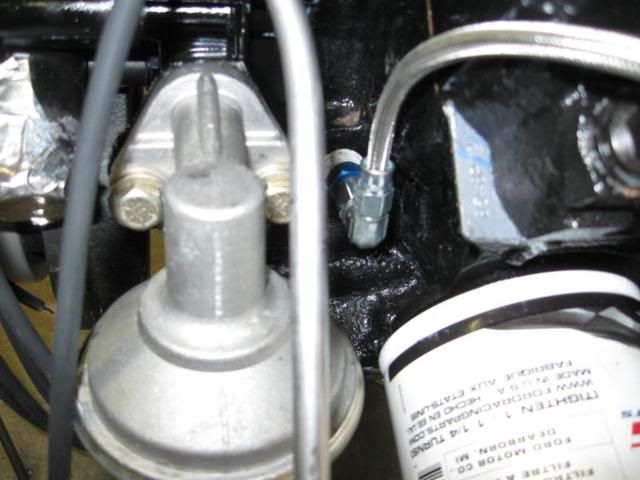
Speaking of the dual gauge, I needed to find a way to insert the bourbon tube (I know it's "bourdon", but bourbon sounds cooler) into a place where it could register the water temp. As luck would have it, Spridget part # 11K2846 from the 1275 cc motor fit directly into the Ford thermostat housing. Problem solved: 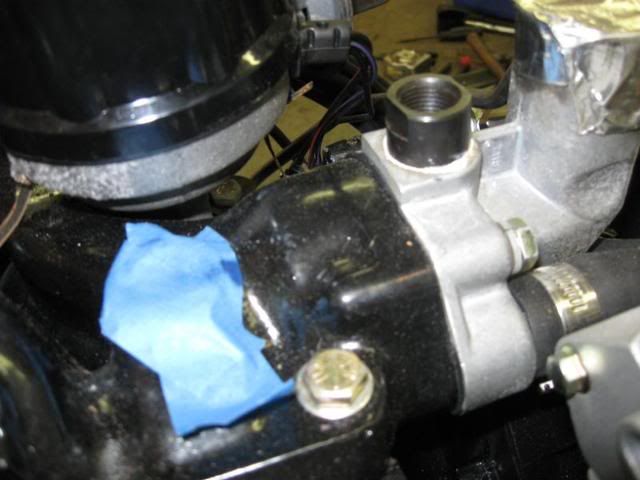
On to the motor. For some obscure reason known only to me, I'm trying to make this swap look like some guy in 1965 wanted to upgrade his 1963 Healey with a Cobra motor. So the motor is done up with the correct 1965 black block, rather than the Ford corporate blue color that came later. Cobra "open letter" valve covers have been added (also correct for 1965), but while trying to install them on the GT40P heads, I found there wasn't enough clearance to fit over the Explorer rockers. Rather than mess with the valve cover baffles or buy the "tall" valve covers meant for roller rockers, I went with Fel-Pro double thick gaskets (p/n 1645). Of course that meant the screws for the original valve covers weren't long enough and spurred another of my endless trips to the hardware store. In keeping with the old school look, I decided no Ford Racing bright blue spark plug wires were going on this motor. I converted the Duraspark large distributor cap to the old style small cap 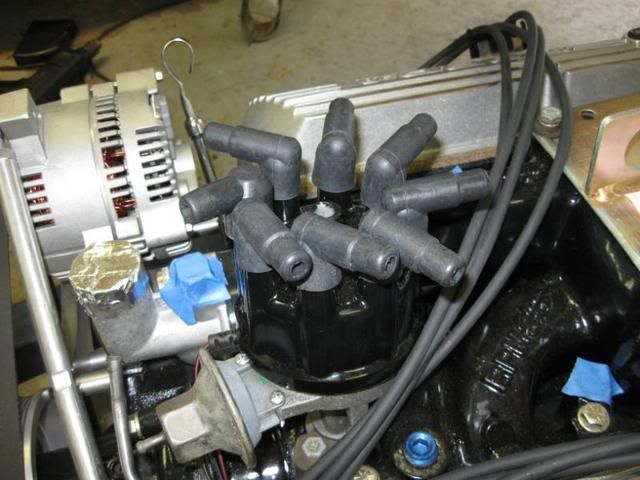
and am using Pertronix black 7mm plug wires for that period look: 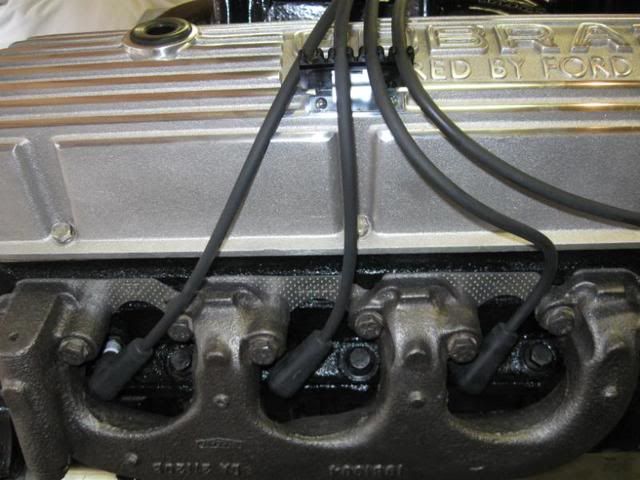
Note the Sunbeam Tiger cast iron manifolds. Pretty restrictive, but period and I'm not likely to miss the HP a whole lot, Figured installing a new starter would be easier now than later: 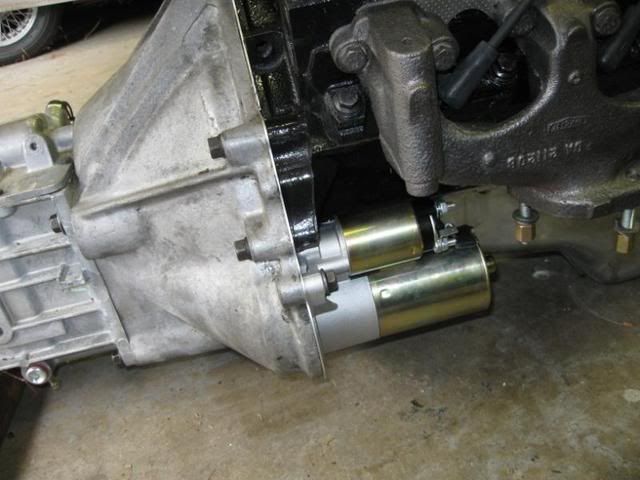
Overall, I'm very happy with the look. I know the serpentine belt and alternator aren't period, but since I'm not planning on entering any Nasty Boy concours and want to make sure I have enough power to drive an electric fan, I'm willing to put up with a few anachronisms. 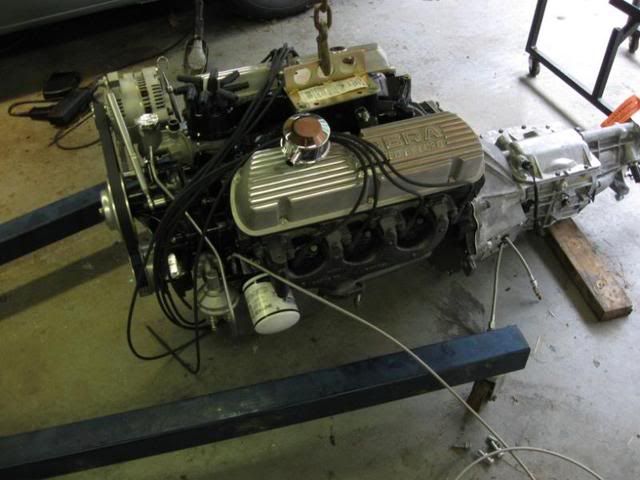
So, I'm almost ready for the drivetrain install. I know enough to check all my fluids, but I feel safer leaving this on until I'm done: 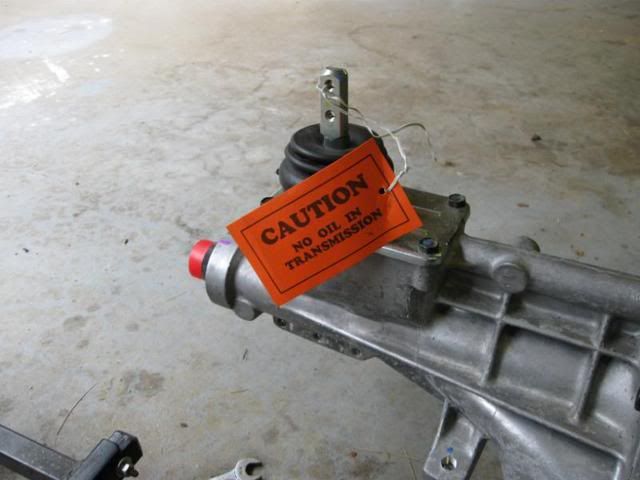
June 27, 2010 Big news! The motor's in ........ sort of. Here's a shot of the approach. Note I've got the engine mounts and rubber biscuits (Chassis Engineering P/N SS-0011 supposed to be the best quality) bolted up and ready to go: 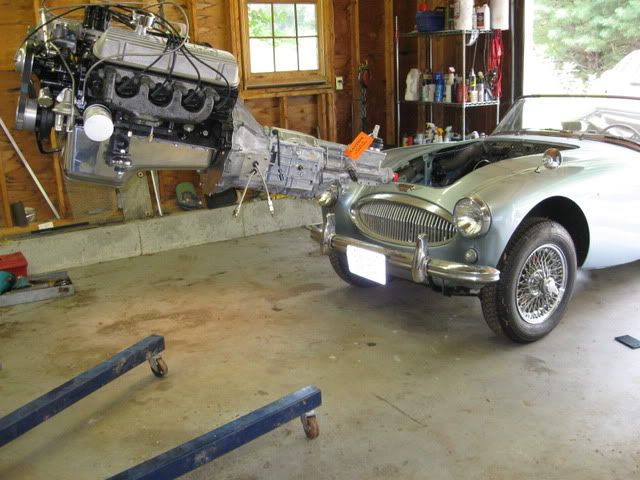
Everything's in place. Glad to see there's plenty of clearance all around with all the accessories installed: 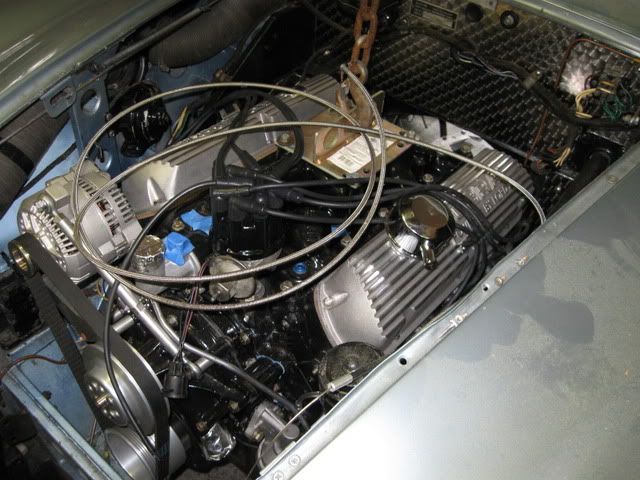
I really like the way the Ford motor fits, looks like it was made to be installed in a Healey. While lowering the engine, I realized the rubber biscuits wouldn't clear the engine mount towers on the Healey chassis. All ahead stop to take out the biscuits. Then I realized I had installed the motor mounts on the wrong sides and had to swap them. While re-installing the right side mount, one of the threads in the block let go. Sheeet!!!! Might as well keep going so I can figure out the rest of the clearances. OK, this is going to be a problem: 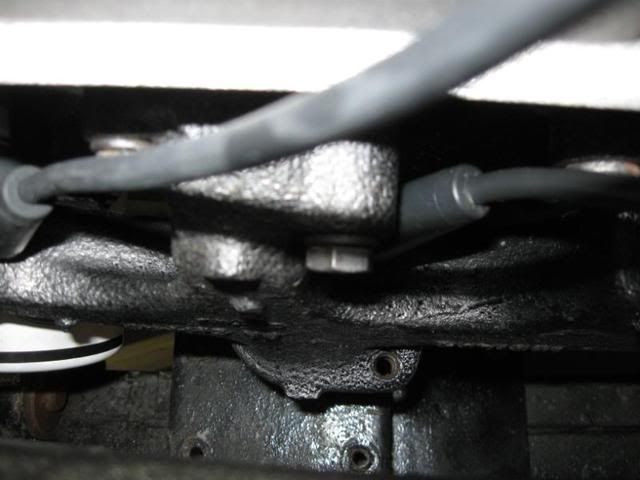
I bought another Sunbeam Tiger exhaust manifold, hoping it would work. No joy. See how it dumps right into the driver's side motor mount tower? Not good. I still have another Tiger manifold: 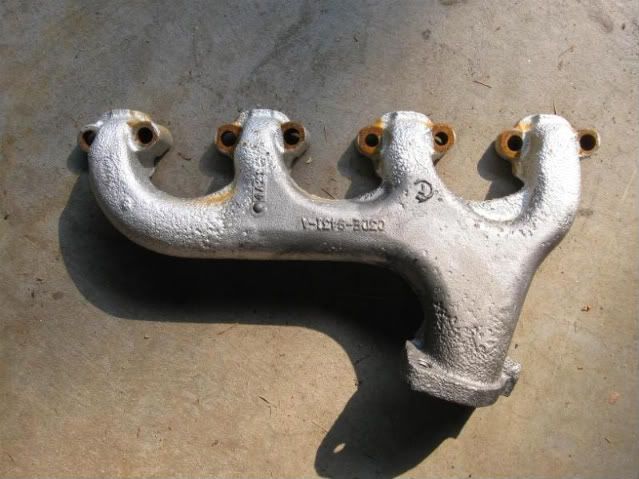
With the motor installed, looks like the outlet will clear the modified footboxes ok. Not all skittles and beer, though. The outlet flange points inward directly to the chassis rail: 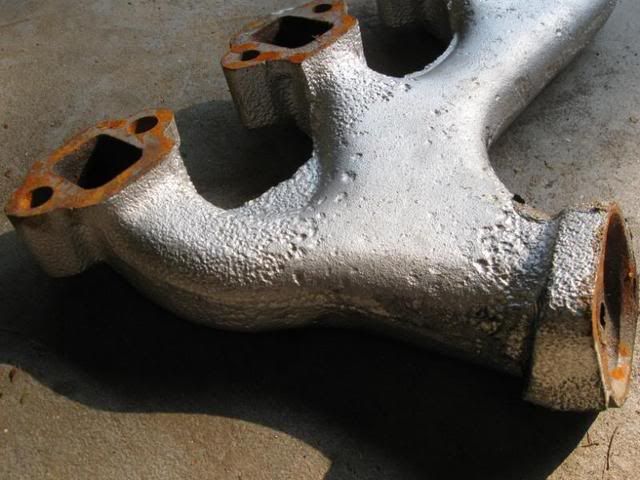
I'll have to find a good cast iron welder so I can flip the exhaust flange outwards, instead of inwards. Nevertheless, much progress was made. If it was easy, everyone would have a V8 Healey. Next steps are to do the final positioning of the motor, mark the holes to be drilled on the chassis motor mounts, raise the motor again, helicoil the stripped thread, and replace the driver's exhaust manifold. Stay tuned! July 3, 2010 Today is Donald Healey's birthday. Had to get something done to honor the "Old Man". So I heli-coiled the bolt hole for the coil mount and had the holes cut out for the motor mount biscuits: 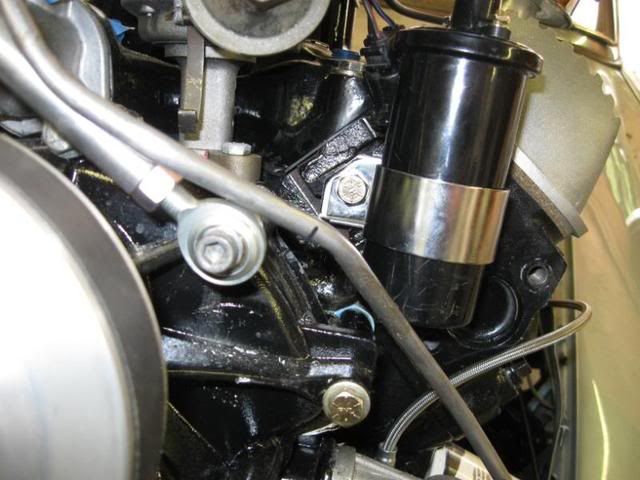

The coil is an MSD Blaster Hi-Vibration (Part No. 8222 ) epoxy-filled. Since it's mounted directly to the block, want to keep bad things from happening. July 4, 2010 Not where I wanted to be, but had to hoist up the motor to tap and heli-coil the passenger side motor mount. Better now than later, I guess: 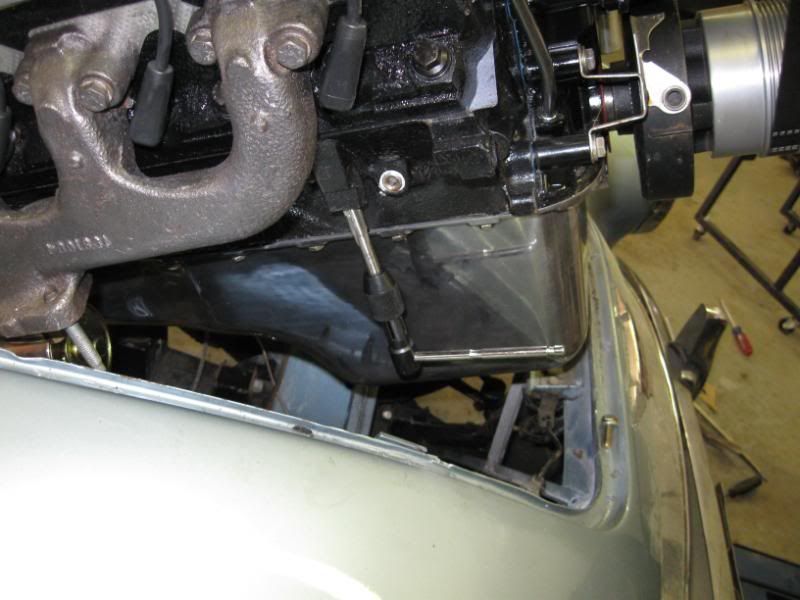
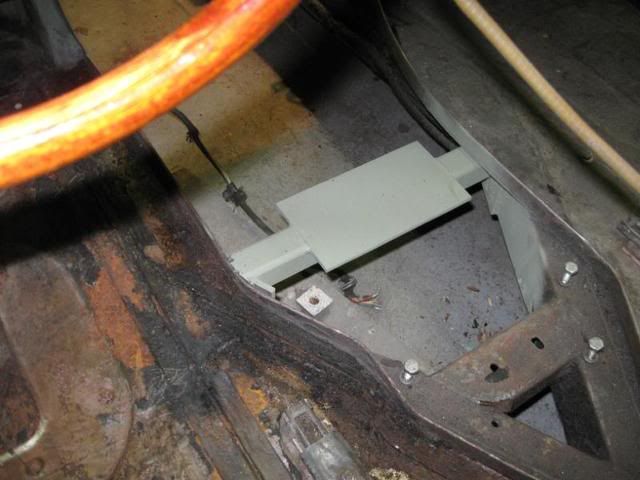
Then the scary part (as if putting a 345 hp motor into a Healey wasn't scary enough), drilling the mounting holes for the tranny mount: 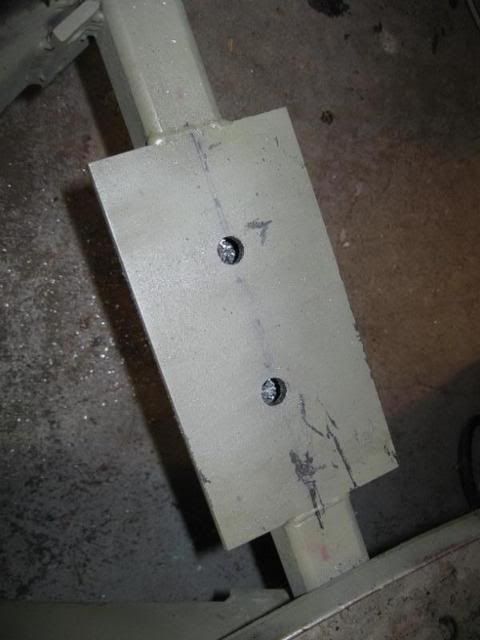
Worked out ok and here's the T5 mount in situ: 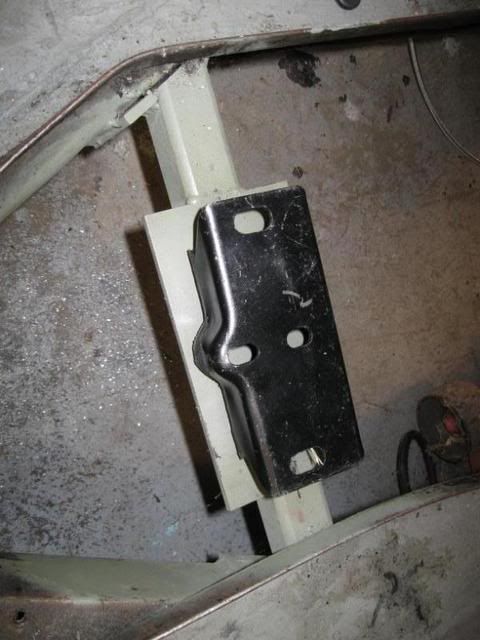
Talked to some welders who told me flipping the driver's side flange around on the Sunbeam Tiger exhaust manifold had a really low chance of success. So bought this really tight (2" radius) mandrel stainless U-bend from Vibrant that should give me the clearance I need: 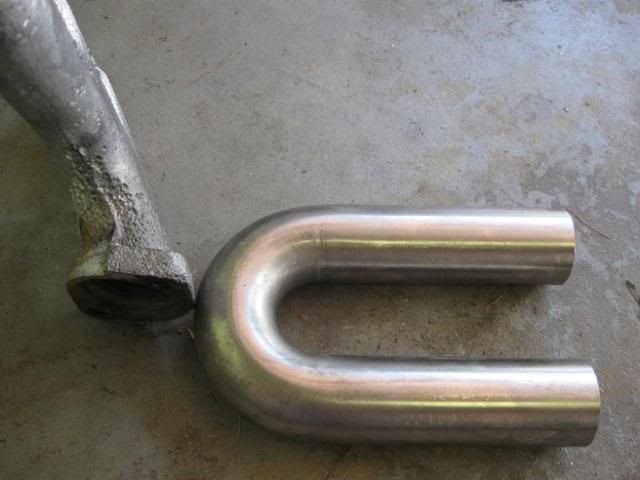
July 10, 2010 Well this looked promising. After a trip to the exhaust shop, got a really tight bend formed on the exhaust downpipe. Just what I needed: 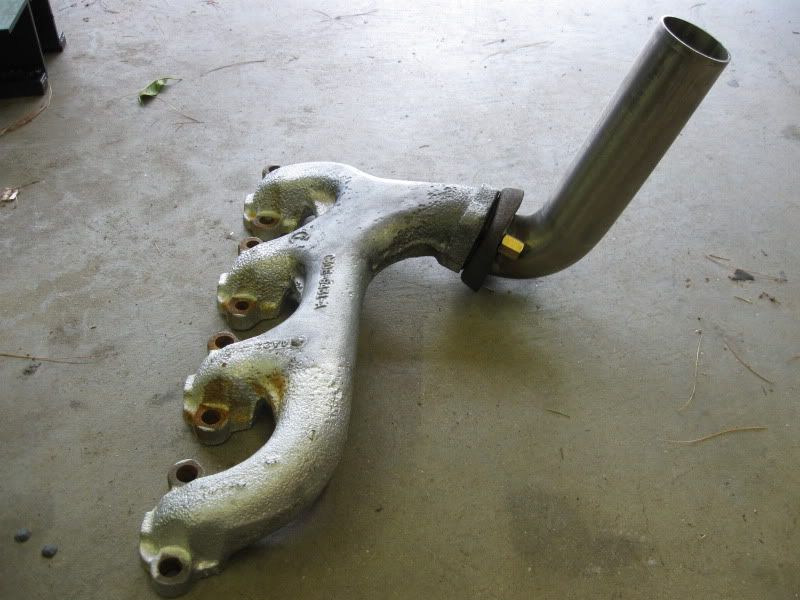
So I mounted the exhaust manifold with the intent to drop in the motor/tranny. Then I discovered the spark plug boots were contacting the manifold. Great, not the smell of burning rubber I was contemplating on fire-up. The GT-40P heads really do create their own header/exhaust issues. Thought about grinding on the manifold to get some more clearance for the boots but looked like by the time I ground enough material away, I'd have some holes in the manifolds. Running out of options here. Re-installed the previous Tiger manifold and briefly contemplated removing the engine mount tower to get the clearance I needed. But that would really go against everything I'm trying to do. I don't want this to be a hack job and if someone in the future wants to change it back to its original motor, want to make it as easy as possible. Swore some more, stared some more, swore some more and finally realized if I raised the motor a bit in combination with the newly formed tight downpipe I just might have enough clearance above the motor mount tower. Bolted everything together and .... better to be lucky than good ..... success! More to follow ,,,, July 24, 2010 In my last post I seem to have suffered from premature celebration. Once I got everything in place, I noticed a little clearance problem: 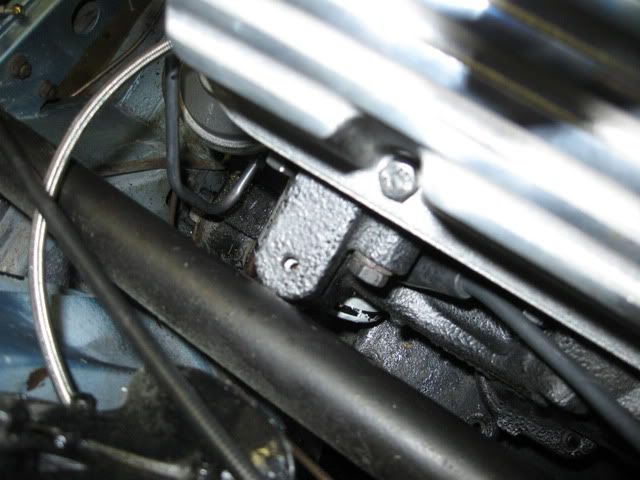
Seems like my driver's side exhaust manifold was contacting the steering column. So I introduced Mr. Grindy Wheel to Miss Exhaust Manifold to get some more clearance: 
Dropped everything back in place and found that the manifold interference had been tilting the motor to the passenger's side, giving me more room between the driver's side downpipe and motor mount tower. Once the interference was removed, I found I was going to need to raise the motor some more. And even with the previous manifold clearancing, it was still too close to the steering column. Once again, Mr. Grindy Wheel had to become intimately familiar with the naughty bits of Miss Exhaust Manifold's choke stove (google it, if you don't know what it is) Finally, sufficient clearance has been established: 
I realize this is all the result of me trying to avoid using headers and keep the motor mount towers intact. I hope some future Healey person appreciates my efforts. Of course, one change begets another and raising the motor a bit has put paid to my idea of using a 289 HiPo air cleaner as it hits the hood with the RPM Air Gap manifold. I've bought a drop base cleaner that will let me use the HiPo chrome top, but will need a taller air cleaner than standard. I'll take some pics later. August 1, 2010 So while I was raising the motor last week, I noticed one of the engine mount bolts was loose. When I went to tighten it, it stripped out as well. Grrrrr .... put the cherry picker in play to hoist the engine up enough so I could put a heli-coil in the mount and did the other two while I was at it (like I should have done when the first one stripped). The studs on the tranny mount were too short to pass all the way through the crossmember. Modified it by cutting off the mounting studs and drilled a hole where the studs were. This let me put a bolt up from the bottom of the crossmember with a nut inside the tranny mount. Got the motor back into position, bolted up the motor mounts and tranny mount. Everything fits. I'm hoping this is the last I'll see of the cherry picker until my next engine swap. August 29, 2010 Predictably, when you install a lighter engine, the front end comes up. Standard floor to center of the wheel opening distance is about 27" Here's mine: 
With apologies to Blood, Sweat & Tears, (who I saw live at the Newport Jazz Festival in 1969 if you're trying to figure out how old I am) what goes up, must come down. Easiest way to drop a Healey front end is to insert some spacers between the coil spring pan and the lower "A" arms. There are kits available to do this, but I just bought some longer Grade 8 bolts, inserted a couple of nuts between the spring pan and "A" arm and came up with this: 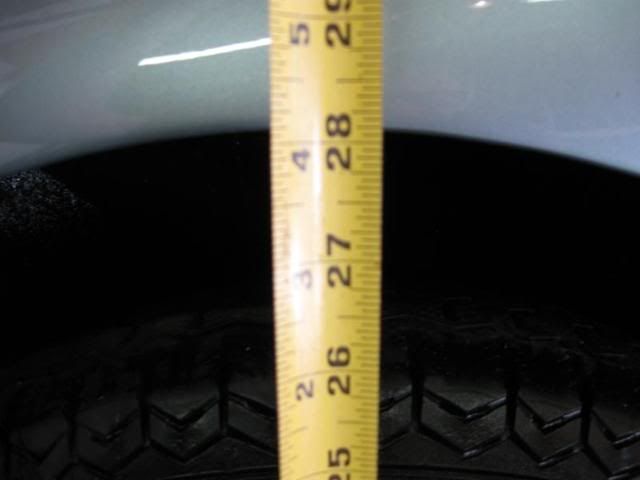
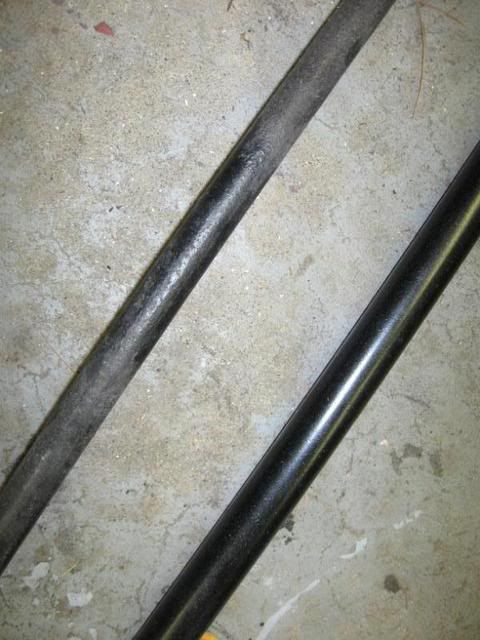
I might be able to drop the front a little lower, but right now I kind of like the "leaping cat" stance the way it is. As long as I was getting dirty under the front end, figure it was a good time to upgrade to a bigger ADDCO 5/8" sway bar. Here's how it compares to the stock one: 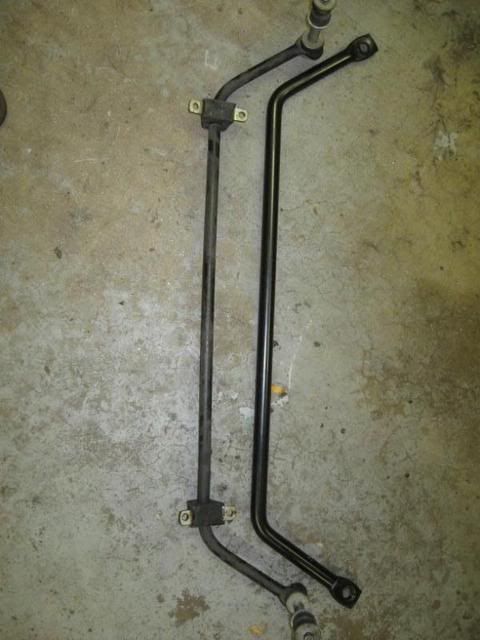
Cooling the Big Healeys is always an issue. When doing a swap, one also needs to pay attention to inlet and outlet sizes. My stock Healey radiator was rebuilt with an extra core and the inlet/outlets were changed to 11/2" upper and 1 3/4" lower to match the 5.0 specs. Rather than take my coat hanger pattern to the local NAPA store to find a suitable molded hose, I wimped out and went to Speedy Bill at Speedway Motors to buy some Gates Vulco hoses that are wire reinforced and can be routed to shape: 
What you don't see when they show engine swaps in the mags or online is that THEY LIE! They never show you how much work is really involved. I had to skim coat the radiator tank with JB Weld to straighten out some of the dents created converting to the larger outlets. Here's the uprated Healey rad. 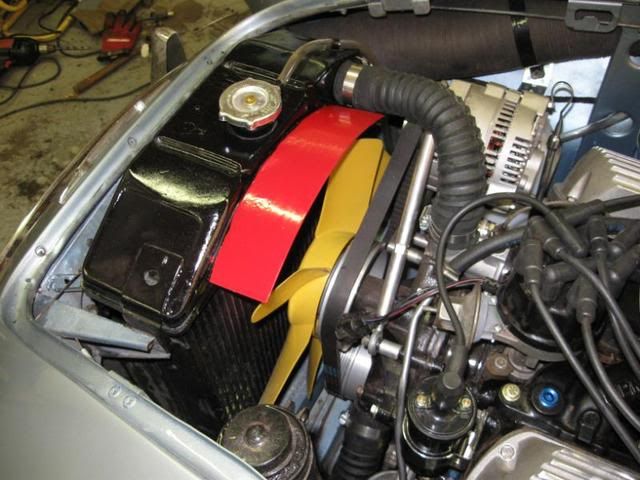
The Vulco upper hose is looking good and the stock fan shroud has been soldered on and painted "Safety Red" just as the boffins at the factory would have done. I added my "Texas Kooler" [www.mossmotors.com] to the snout of the 5.0. I hope this will suck enough air through the rad to cool the Ford motor. Here's the engine compartment as it sits now: 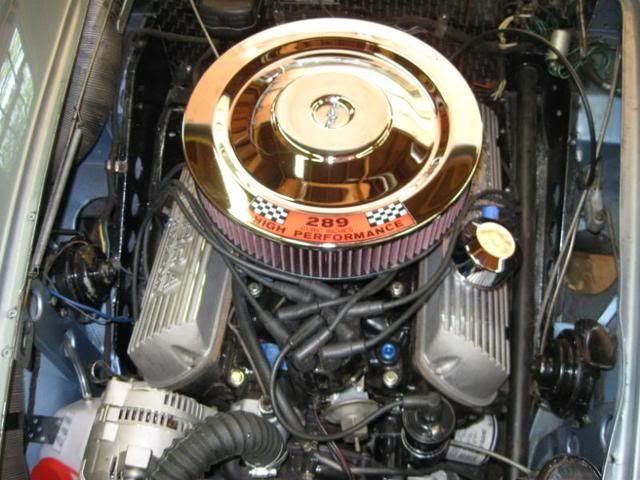
I added a radiator overflow tank: 
And here's how the temperature gauge sensor looks once it's installed in the adaptor: 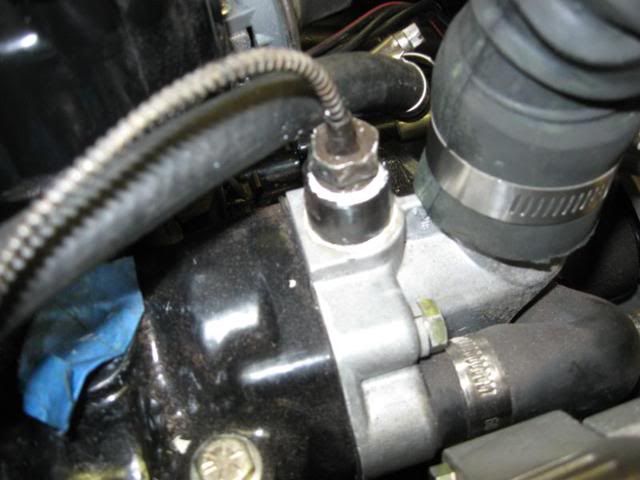
The factory coolant temperature connection travels back to the original Smiths gauge: 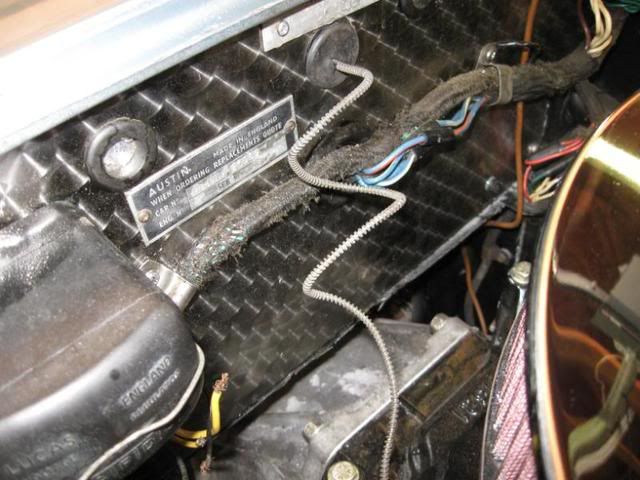
September 5, 2010 Working on some fiddly bits. I had an extra hole in the right side of the dash added by the previous owner. Turns out it was a straight shot to the Holley mechanical choke. So I place a choke knob in the hole next to the period cigar "LITER" that the prior owner installed: 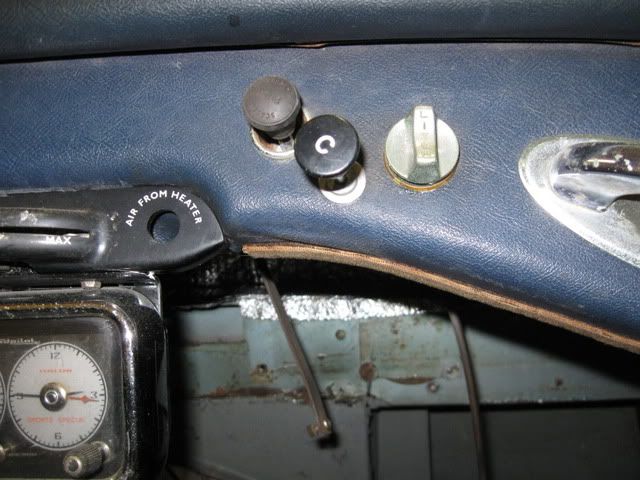
The drop base-air cleaner interfered with the choke lever, but I was able to "relieve" the air cleaner base with a ball peen. Choke works great now. The 5.0 heater hoses are 5/8" while the Healey fittings are 1/2" Bought some adapters to join the hoses. Seems all I do is "adapt" one thing to another. Had the driveshaft shortened at Montrose Machine in Wakefield, MA and a new front slip yoke compatible with the T-5Z installed Turnaround time was under 8 hrs. 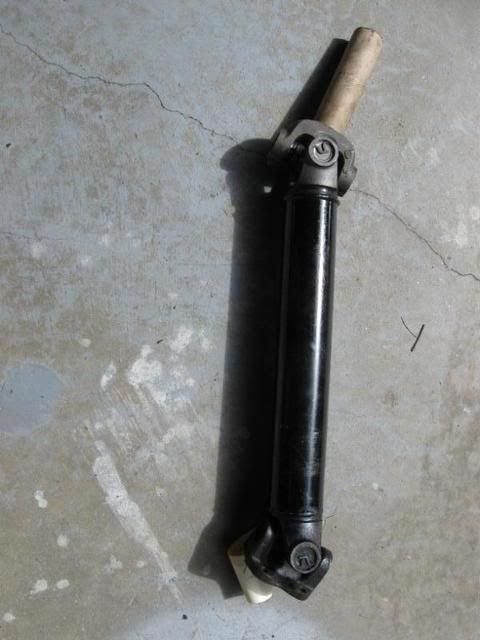
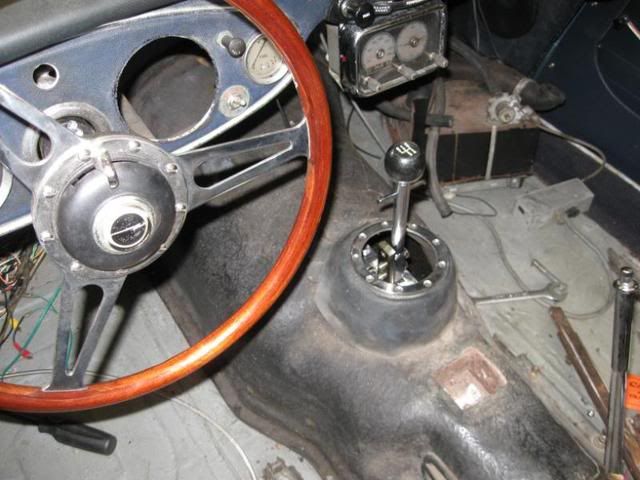
Installed a Steeda Tri-Ax shifter. The T5 suffers from no shift lever stops, the Tri-Ax cures that and has a narrower gate. Although I originally thought about adapting the Healey shift lever to the T5, I've always had a soft spot for the Ford trigger reverse shifter. This was used in the original 289 Cobras. Found a repro lever that bolts to the T5 shifter at [www.finishlineaccessories.com] and a shift knob with the 4-speed toploader pattern and ended up here: 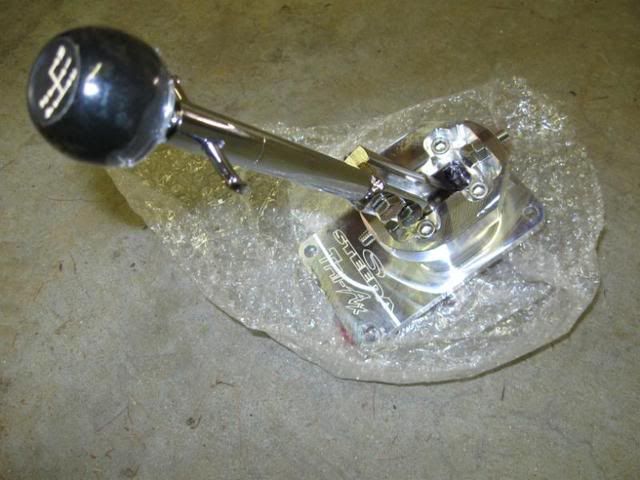
The shift lever is going to align perfectly in the Healey tranny tunnel. 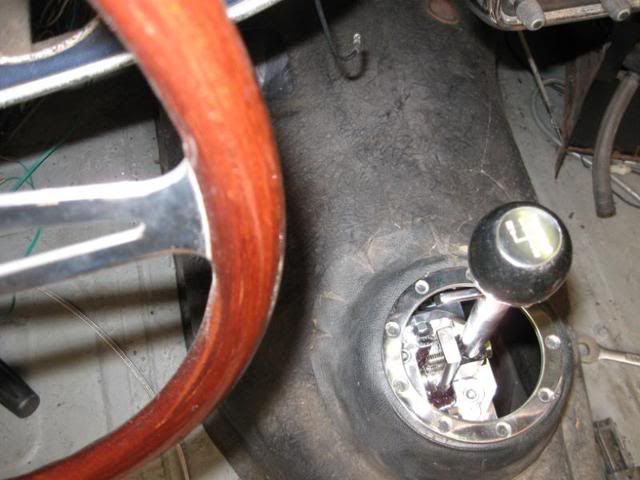
Need to do some more wiring and I'm almost ready for start-up. September 19, 2010 Lots of work, but no pictures. It's wiring, who wants to see that? Three things are causing wiring mods and upgrades: a change from the Healey generator to a Ford 3G small case alternator, a new mini starter and an MSD 6AL ignition box. I've come to the realization that I couldn't have done this swap without the internet. I'm not a natural mechanic and wiring is one of those things I really need to rely on others' experience to get me through. First step in the alternator conversion was to change over the wiring in the control box from the top diagram to the bottom one: 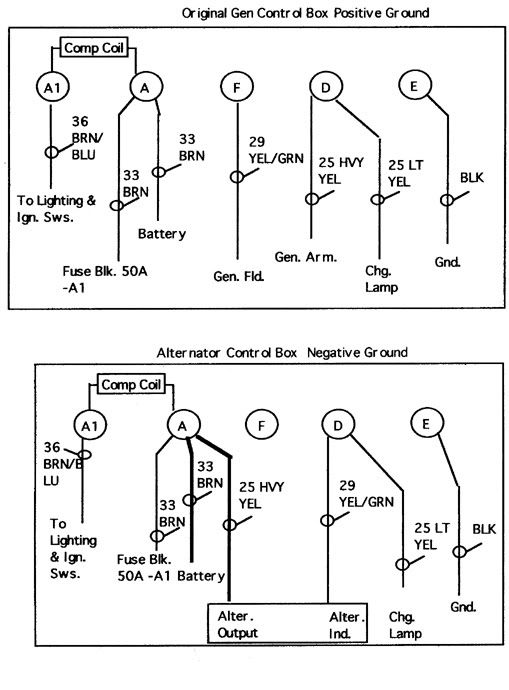
In addition to swapping the wires around, an insulating sleeve was placed over the cut out contacts. (The wiring diagram was courtesy of the late Dave Russell at britishcarforum.com.) I could have removed the control box entirely, as the alternator is internally regulated, but I just like the look of that old Lucas part. I upgraded to an alternator because I originally thought I'd be using an electric fan, but for now I'm giving the mechanical Texas Kooler a try. The extra power won't go to waste with the stereo amp, halogen headlamps and MSD ignition adding some additional draw over standard and I'll have the capacity if I need to go to a electric fan later. The 130 amp alternator needs upgraded wiring. I ran 4 gauge from the alternator output to a 200 amp mega fuse, then more 4 gauge to the battery side of the Healey starter solenoid. I also ran 0 gauge from the battery to the solenoid. Strangely, although the mini starter has an attached solenoid, it's recommended to trigger that solenoid with the original solenoid to prevent delayed disengagement of the starter. So more wiring was needed to connect the Healey solenoid to the mini starter solenoid. I spent a bunch of time on the internet looking at 3G alternator conversions to figure out the wiring connections. Turns out I need a regulator wiring plug, so that will put final wiring on hold until the UPS guy comes around. While surfing, I learned the output of the 3G can cause a sufficient voltage spike to fry an MSD box. The fix is to install an MSD noise filter as a capacitor (p/n 8830). Good thing I stumbled on that before I fried the box. I'm mounting the MSD in the interior. As MSD recommends wiring the box directly to the battery, I'll have to lengthen the power leads to reach the trunk mounted battery. Looks like another weekend of wiring next week. October 11, 2010 Finally! First start today! The last couple of weeks have been wiring intensive. Installed the MSD 6AL and noise filter in the passenger compartment to keep it away from engine heat and keep the period correct look underhood. 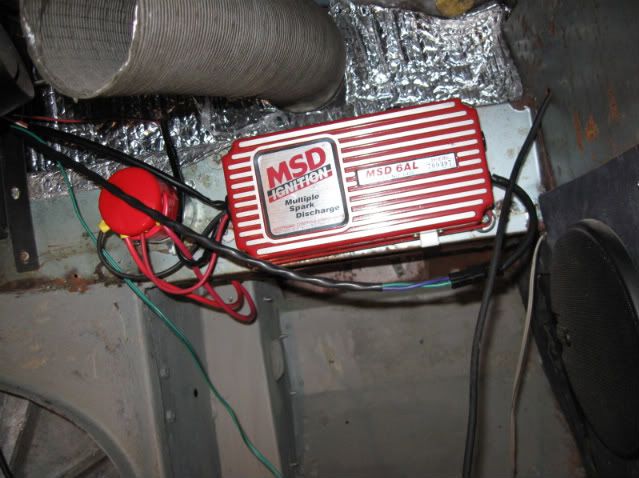
Plumbed the oil pressure gauge line with the appropriate adapter. 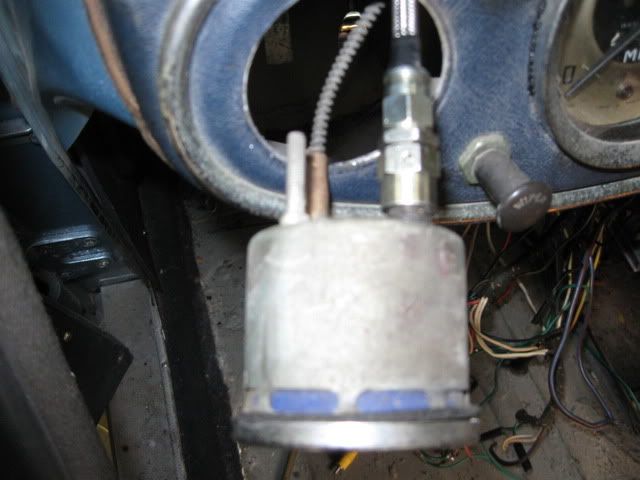
Filled the radiator, brake/clutch reservoir, transmission and bled the clutch. Feels like I have a clutch pedal. So it should be ready for fire up. You know those first start videos. One touch of the starter button and the motor instantly lights off. I should be so lucky. Motor spun up good, which means I got all my starter wiring correct. But no spark. Puzzled that out for awhile then remembered the cut out switch on the MSD. Flipped it and the next turn of the starter brought some explosions, but still no start. Pulled the distributor and reset the timing. Much better. It starts, but's running rough. As I warm it up to see if it will smooth out, I notice a rather large puddle of oil in the driver's footwell. Hmmm, seems like I may not have got the braided oil line properly seated in the adapter. Futz around with it for entirely too long, couple of more starts, couple more oil spills and eventually figure it out. So here's video proof it runs. Open manifolds make it a little noisy but I've got 50 psi on the oil gauge at idle. Checked the clutch with the motor running. Seems to work ok. I'm a little apprehensive about it, never having set up a HTOB before. I'm pretty ecstatic. Feel like there's a lot to be done to finish it off, but the end is in sight. October 17, 2010 Funny how the skills necessary to complete an engine swap range from brute force to watchmaker delicacy. Thought I'd tackle converting the Healey mechanical tach to an electric one, while keeping the look of the original gauge. First step was to find an electric tach with a 270 degree sweep and 6000 rpm max to match the Healey gauge face. Found one in the Stewart-Warner Deluxe series, but the SW gauge face and needle certainly didn't match the Healey. 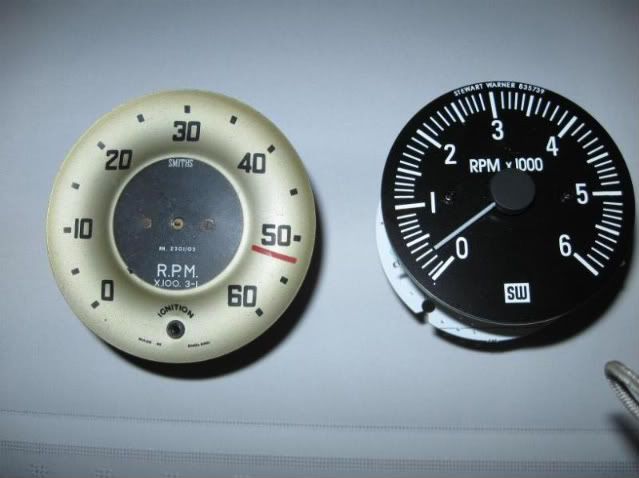
So now it was time to cannibalize the new SW and an old Healey gauge: After I disassembled them both, I ended up with innards that looked like this: 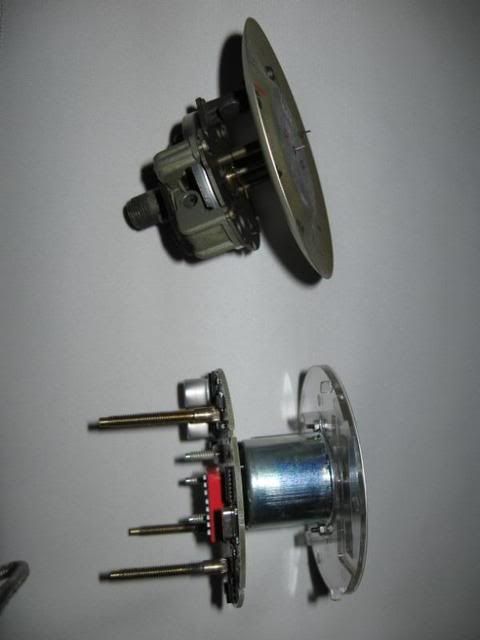
As I'm using the Healey gauge face, needle, glass and chrome trim ring, I decided to put the SW guts into the Healey case: 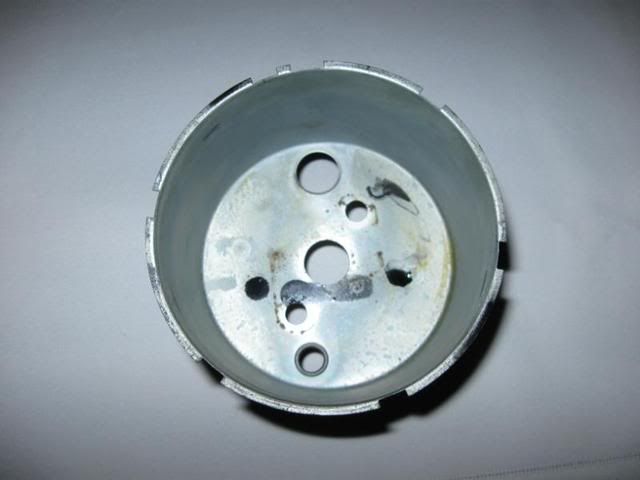
This entailed drilling some holes in the Healey case to match the four mounting posts on the SW gauge, cutting out a rectangle for some clearance around some electrical bits that I have no idea what they do, and using some nylon spacers to establish the correct depth of the gauge face to the front of the gauge. 
As the brass locating posts also carry current to the gauge, I had to insulate them from the metal case using nylon spacers; 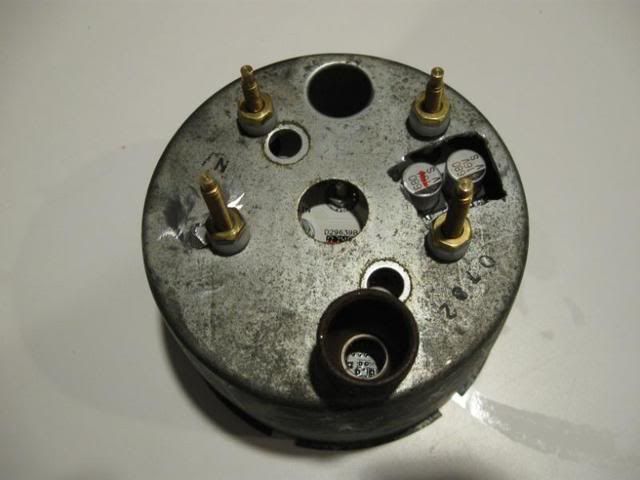
Everything assembled ok and all I need to do is drill out the Healey needle to match the larger shaft on the SW gauge, install the glass and crome trim ring, install in the dashboard and wire it up: 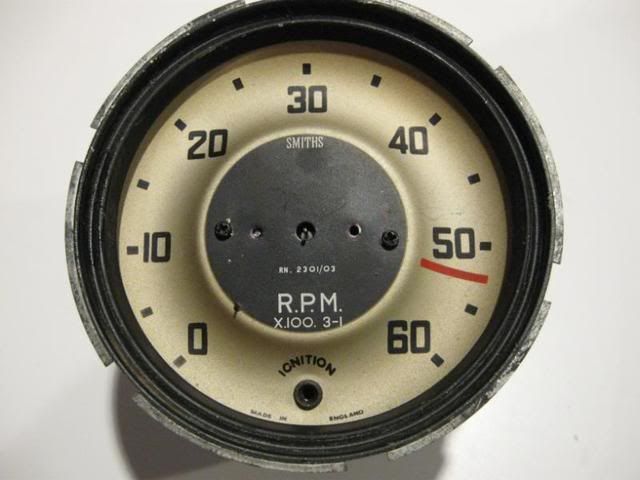
This means I only have to connect the speedo to have a full set of working Healey gauges compatible with the new motor. November 1, 2010 After pulling the distributor to install the heater boss to the intake manifold, I rough timed it to get it started but never had a chance to put a timing light on it. Considered using a dial back light, but MSD doesn't recommend using one with their box. Went with this Flaming River battery powered: 
My timing "pointer" is actually a "bullseye" style where you need to sight through a circle to read the timing mark. Couldn't see it by aiming the timing light in the engine compartment. Once more in the "better to be lucky than good" department, I was able to get a straight shot at the bullseye by removing the right front wheel and sighting through the outer fender well through a space next to the shock absorber. My rough timing was way off and when I got it set to 14 degrees BTDC (which was where the dyno mark had been set) I lost my lopey idle and it smoothed right out. I still need to drop the idle speed a bit. (5/29/11 edit: Found out the "bullseye" isn't the real timing mark, there's an actual pointer a little higher up. I'll be retiming again before first drive.) Spent some time connecting my heater/cooling controls. Had tried to hook up my cold air intake control from Moss earlier, but it was too short. Tried to stretch out the outer spiral cable, but ended up snapping the heater control panel in the process. Turns out the outer cable was defective. Probably been 6 or 7 years since I bought it and asked Moss for a replacement, but was told they had a 2 yr exchange policy. Seems to me you should be on the hook for life for defective parts, but ended up buying a new one which fit perfectly. All the heater/cooling connections are now hooked up and working fine. Had a little weepage from the water pump that I hope I took care of by tightening up the mounting bolts and an oil leak that looks like I need a new oil filter to cure. If I wanted to leak oil, I would have left the Healey six in there. Otherwise, I need to fix some broken seat mounts and bleed the brakes before I'm ready to terrorize the neighborhood with an open piped test drive. Hope I can get everything in place to take it to the muffler shop to get an exhaust system installed before the snow flies. November 12, 2010 Seems to me this swap is like climbing a hill. Started out with small changes, made some big ones to crest the hill, and now I'm on the other side with small changes to make. Changed to a new oil filter, which fixed my oil leak. Added an elbow to the drop base air filter so I could connect it to the oil breather. Bled the brakes. Started it up and let it idle. So far, cooling temp is ok, but it's not the same as testing it in July. Ran it up and down the driveway a couple of times. The pedals are kind of close, need to look at them again to get some more space. After dialing in the timing, the motor idled a bit high, so adjusted the fast idle on the Holley. Has a nice lumpy idle again @ 1000 rpm. Installed the repaired driver's side seat rail. Next step is to add some heat shielding to the underbody so I can get the exhaust system installed. November 13, 2010 Moved the pedal block to the other side of the clutch lever. Good clearance now, but maybe a pair of Pilotis in my future to make sure I have enough room for the brake/clutch/gas ballet. Bought some speed bleeders for the brakes but couldn't get them to seal. After cleaning off the factory installed thread sealant, got them to seat, re-bled the brakes and now have a nice firm pedal. Fabbed an additional brace to shore up the gas pedal mount. Chased down a bottom radiator hose leak. Adjusted the handbrake. I'm the second owner of this car, don't think it's been adjusted since it left the factory. November 14, 2010 Here's something snow belt Healey owners don't see too often, a solid unrestored driver floorboard: 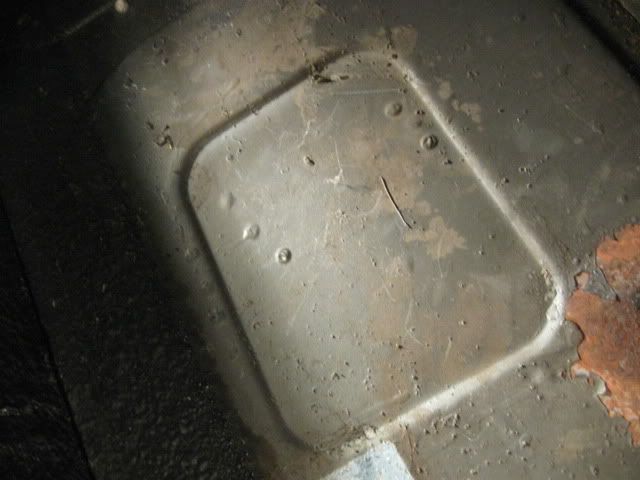
That's a view from underneath the car. One of the advantages of having a Healey that was turned into a racer early in its life. I was under the car to install some heat shielding under the floorboards. It's embossed aluminum sheet bonded to a composite fiberglass insulation. It is self-adhesive and only 3/16" thick which is perfect with the limited room under the Healey. I was able to cover the front of the footboxes as well. 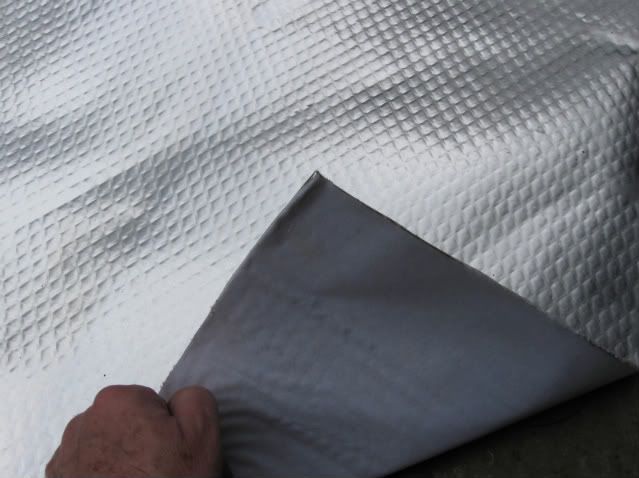
December 19, 2010 Not too much to update. Winter is here and it's too cold to play in the unheated garage. Here's a picture of my mufflers, Spintech Cruisers. They measure 9 wide by 16 long. 
But the important measurement for the ground clearance-challenged Healey is the height - 2 1/4" 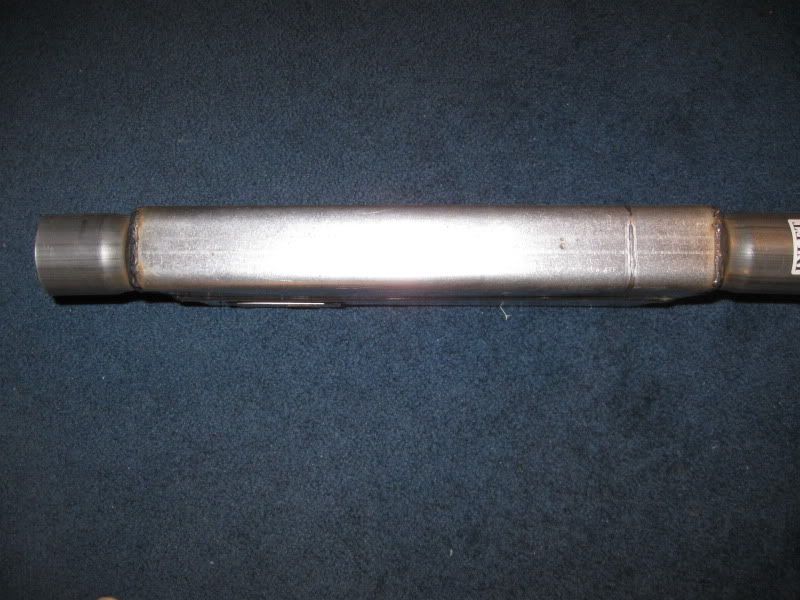
They're supposed to be the thinnest mufflers out there and I can't wait to hear how they'll sound. May 29, 2011 No progress through the winter and a bit slow getting off the dime in spring as well. Thought I'd start up again by addressing the underbonnet area that was a little scruffy with rust and a bad paint surface: 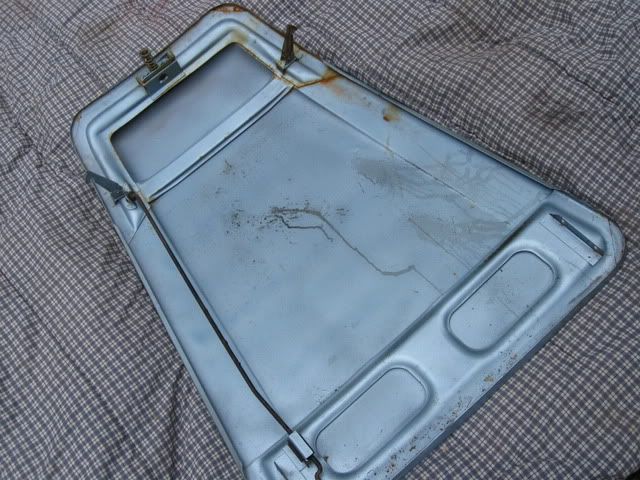
Not wanting to spend the money and time on a basecoat/clearcoat Healey blue deal, I'm making do with some rattlecan engine enamel in white: 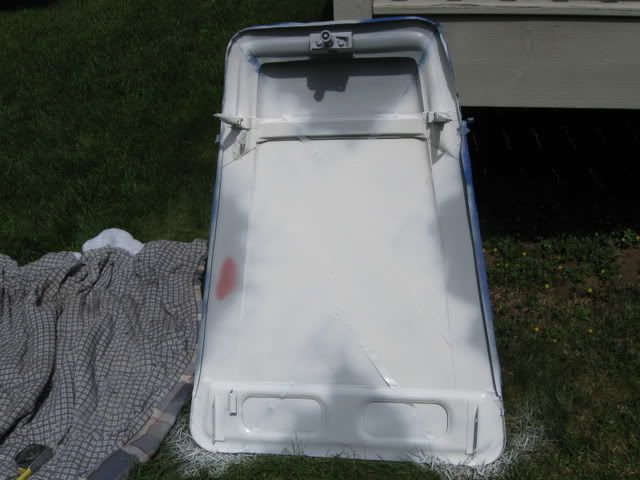
With the masking tape removed, it looks like this: 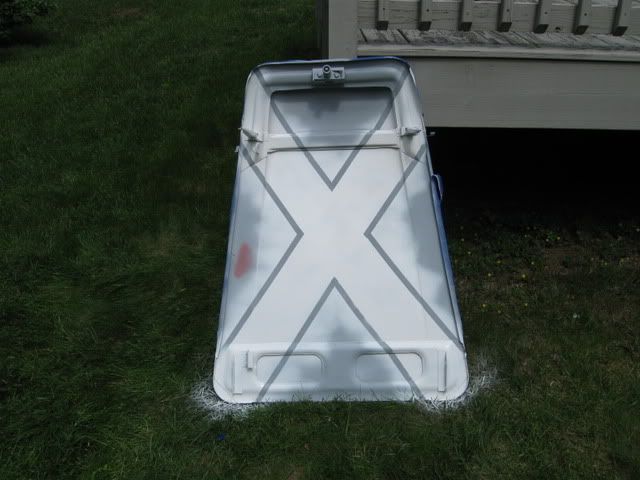
Tomorrow, I'll tape over the cross, paint the rest red, and clearcoat the whole thing so it looks like this: 
WTF, you might appropriately ask? It's the coat of arms of the Neville family. Richard Neville (my name) was the Earl of Warwick, aka "The Kingmaker" Warwick, as Healey folks know, is the home of the Healey cars and Warwick castle is featured on the Healey badge. I don't claim any connection to the Kingmaker, just looking for something a little different with a British theme when I lift the bonnet to display the nastiness. May 30, 2011 The finished project: 
August 22, 2011 Went to the exhaust shop today. 2 1/4" stainless pipes ending in a 3" chrome tip: 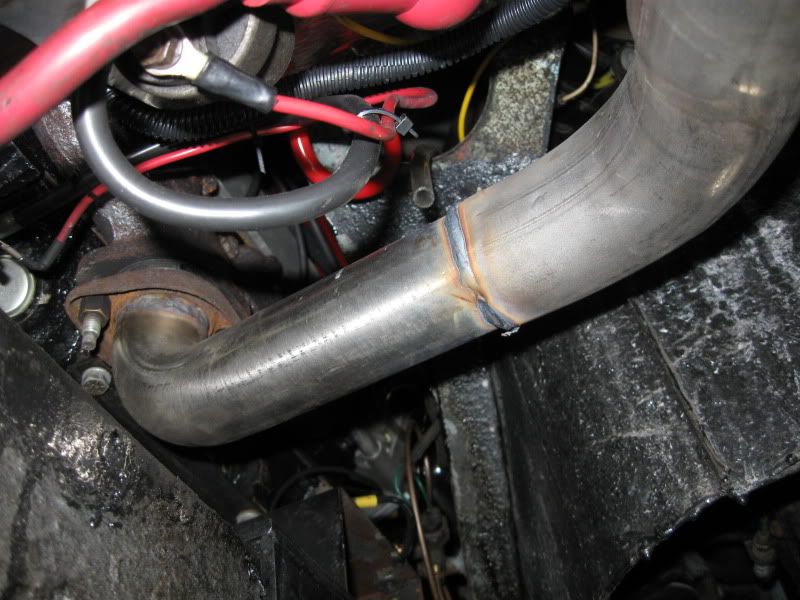
View from the Tiger manifold 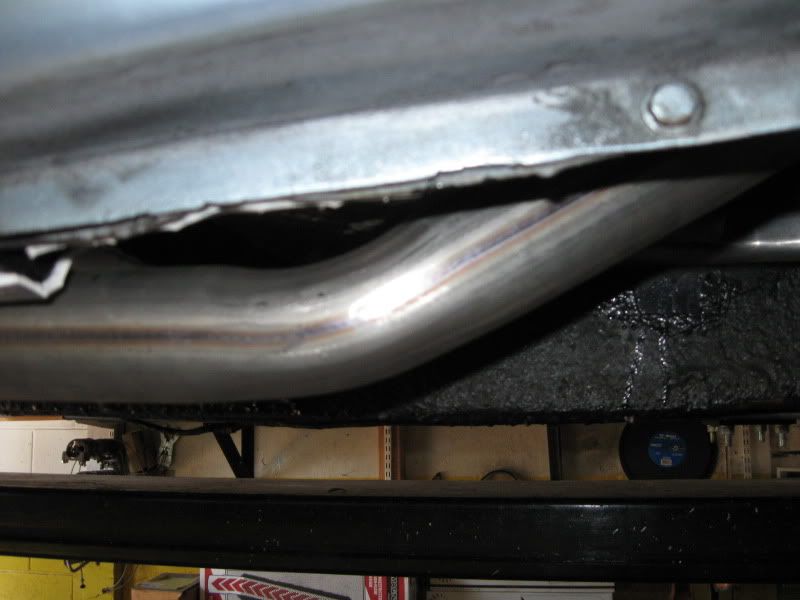
Down to the muffler 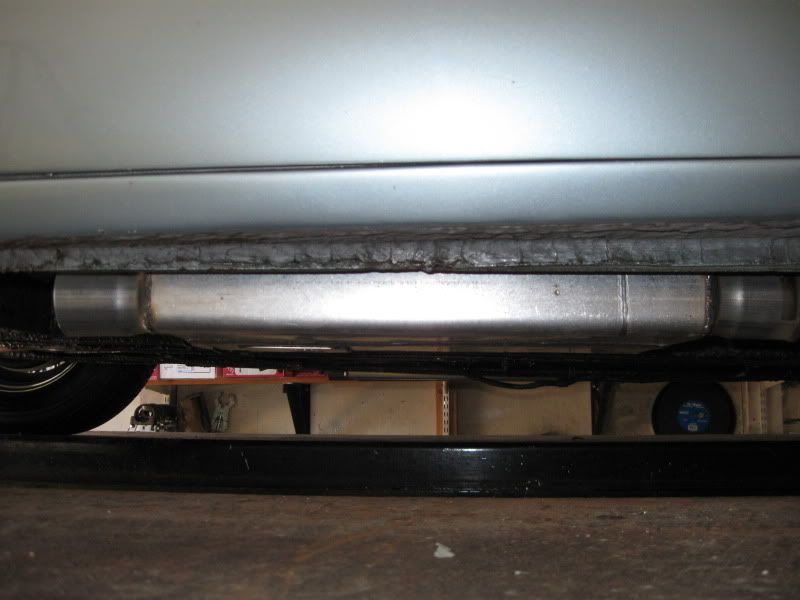
Spintech Cruiser Muffler 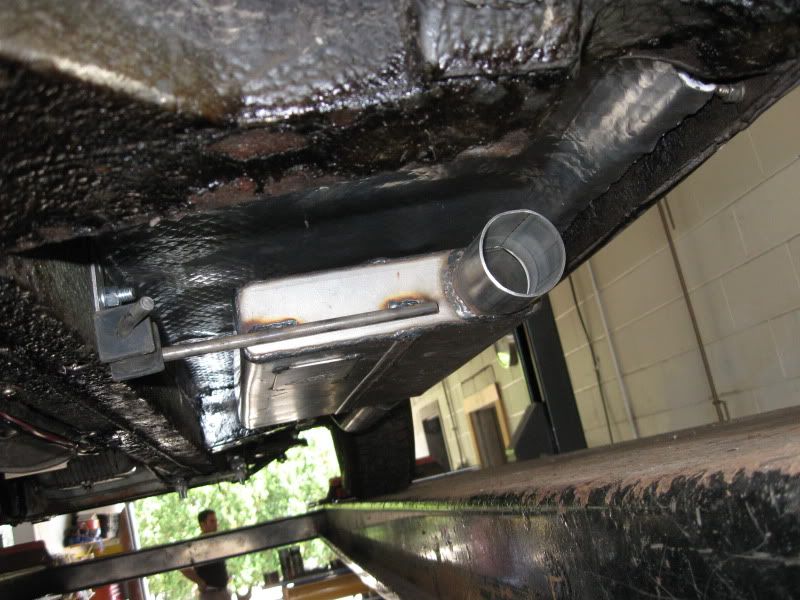
The right side tailpipe crosses over to the left behind the rear frame crossmember and joins the left side pipe to give the appearance of twin pipes. 
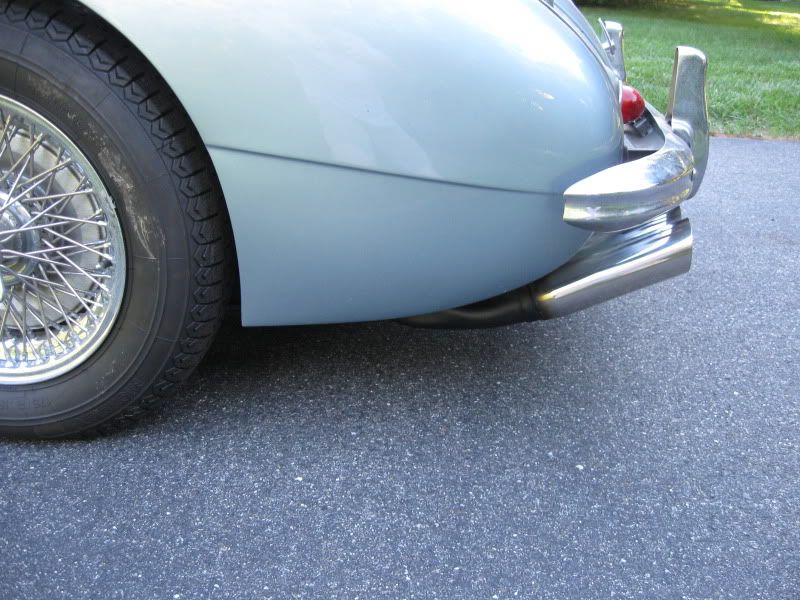
From the side, it could pass for a Monza big bore system, but from the rear ... No! I also added a 100M leather bonnet strap: 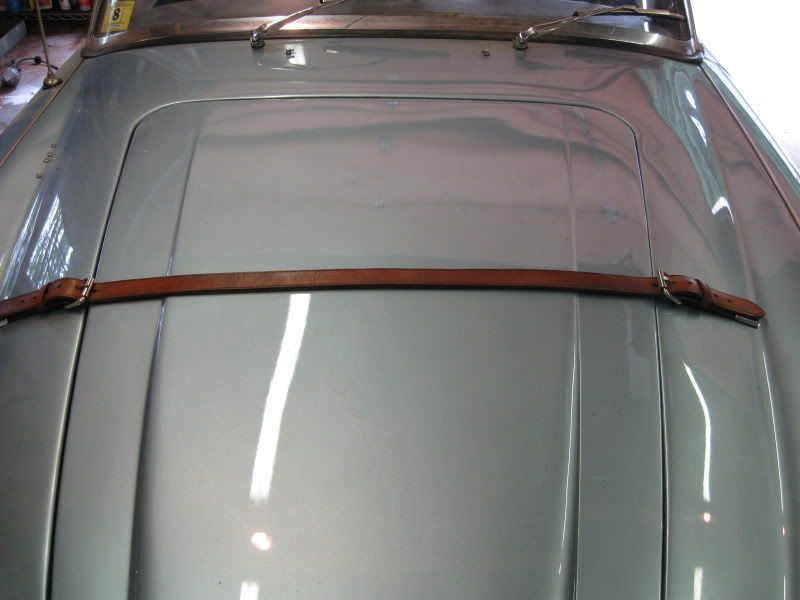
Now, this isn't any old generic bonnet strap, this is a gen-you-wine 100M strap purchased from the 100M Register, which I had to join in order to purchase. And it is a much higher quality one than obtained from the usual suspects. I just like the look and it brings to mind one of my favorite quotes from Burt Levy's "The Last Open Road" when describing a Cad Allard: "My God, what a beast that car was! The grille was nothing but a huge chromium sneer and there were scoops and vents and louvers chopped all over the place to let the heat breathe out (or cool air in, I could never figure out which) and you couldn't miss how they had the hood buttoned down with no less than five separate butterfly fasteners and two great wide leather straps, each one hefty enough to harness a prize bull. Whatever monstrous kind of motor was in there, they weren't taking any chances on it breaking out." October 2, 2011 Healeys are hot. Modified Healeys are hotter, especially in the footwells. I've been trying to add more insulation without spending a fortune. I made some lo-buck Lizardskin by mixing some ceramic microbaloons into latex paint and coated the underside of the fiberglass transmission tunnel: 
The microbaloons are available from www.hytechsales.com and look a lot like talc. I mixed them in with DP40 primer to do the floorpans, firewall, footboxes, etc. to try to keep my feet cool. Here's how they are delivered: 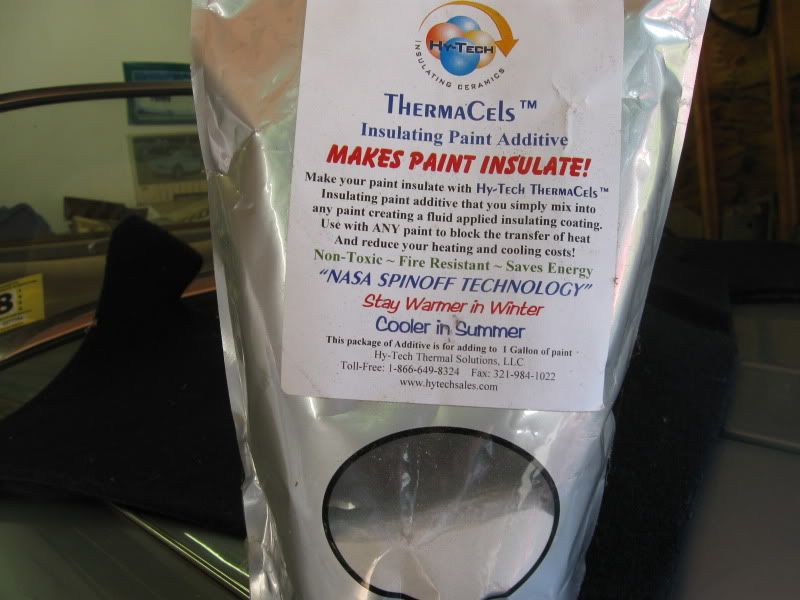
I've used Reflectix aluminum bubble insulation (available from Lowe's/Home Depot) to insulate the interior: 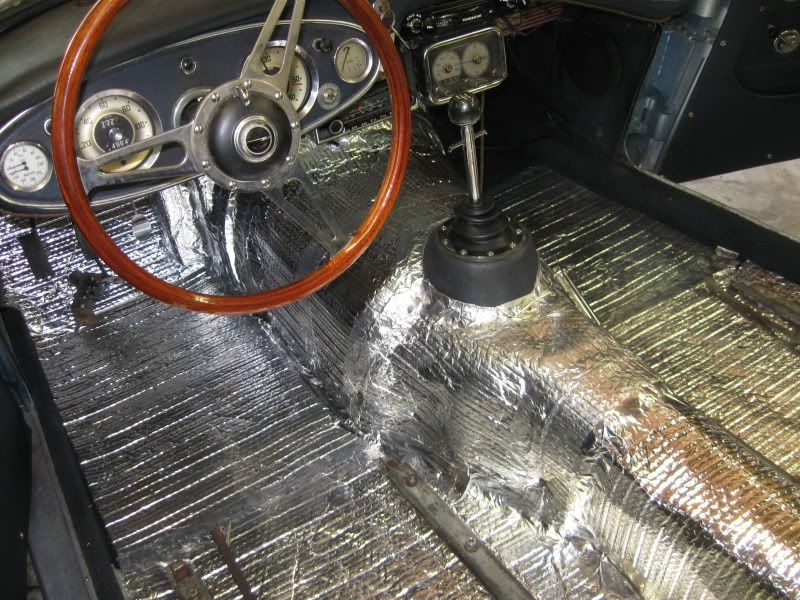
Like everyone says with a driveline swap, "The motor and transmission placement are easy, it's the details that kill you." Spent about a half-day trying to get the shift boot to work out. The stock Healey boot wouldn't work with the T5 and shifter so I used a 289 Cobra boot. The bottom had to be trimmed to fit inside the Healey shift tower and I used a stainless trim ring that matches the steering wheel hub. Looks good, I think: 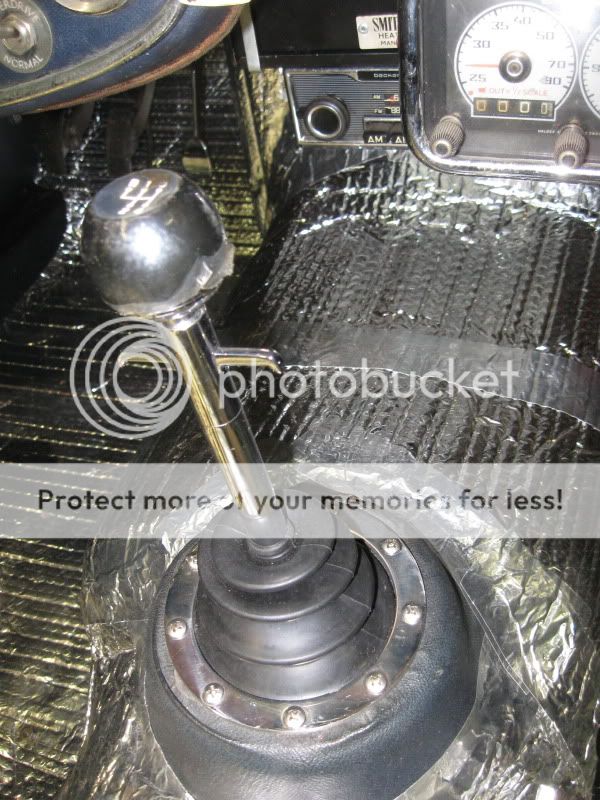
Started installing the carpet. In my view, the only chemicals that work these days are the ones that will kill you, so I used this contact cement that has all kinds of warnings on the label: 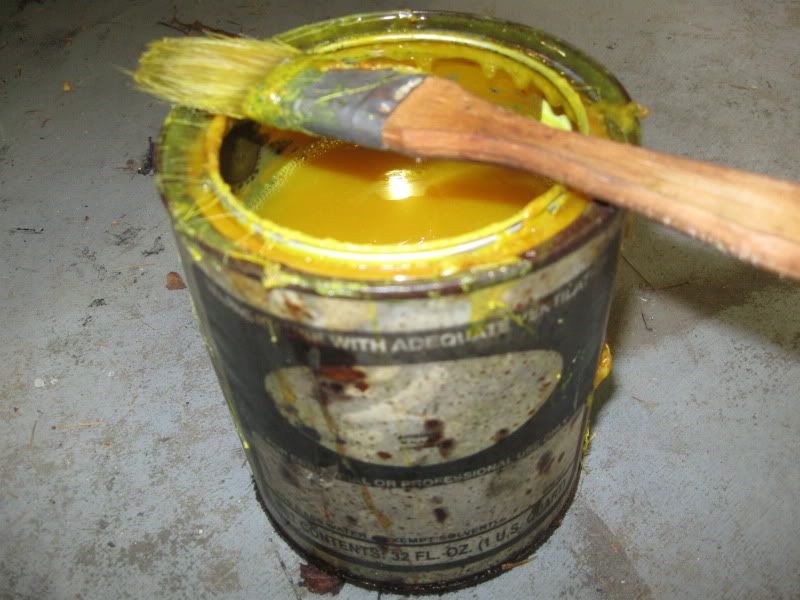
That ought to be sticky enough: 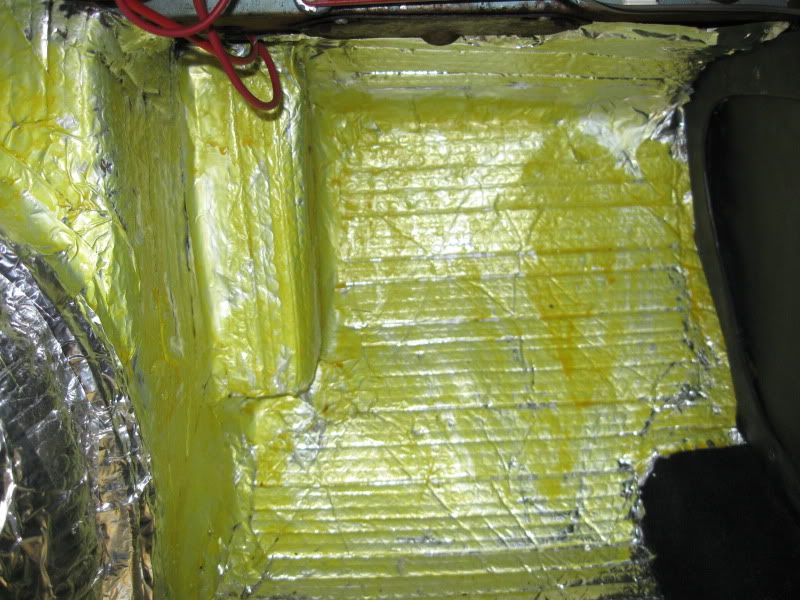
And throw some on the bottom of the carpet for good measure: 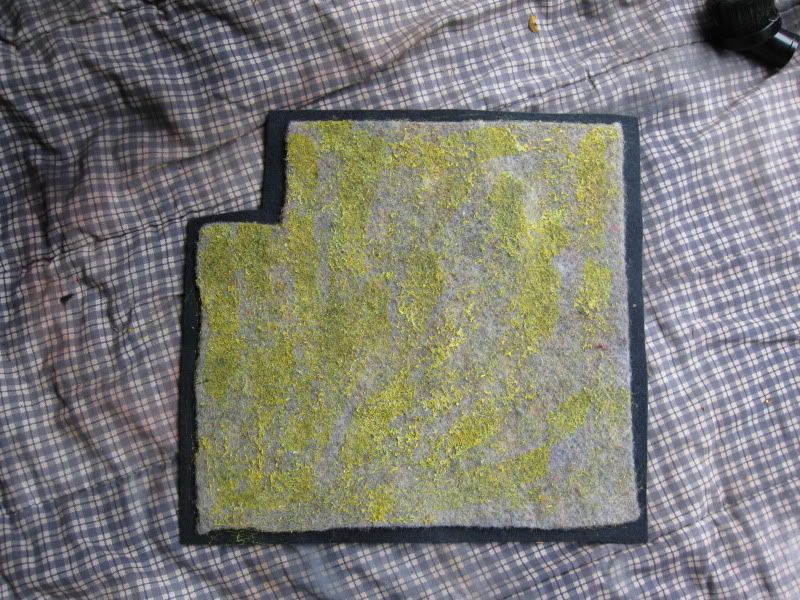
I also replaced my rear brake cylinders after one developed a leak as well as brake shoes when fluid contaminated the shoes. Getting closer. October 16, 2011 Still doing some finishing up exercises. Replaced the rear pinion seal that was leaking and adjusted the handbrake. Cut up an old pair of rear springs to make Bill Guzman's "traction masters" described here: [www.britishv8.org] Here's the extra springs after modification: 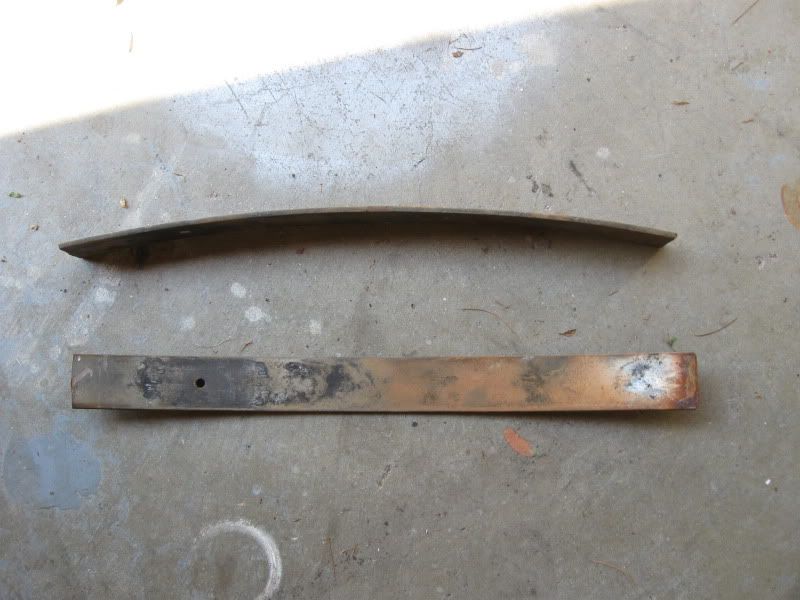
And here's a shot of one in situ: 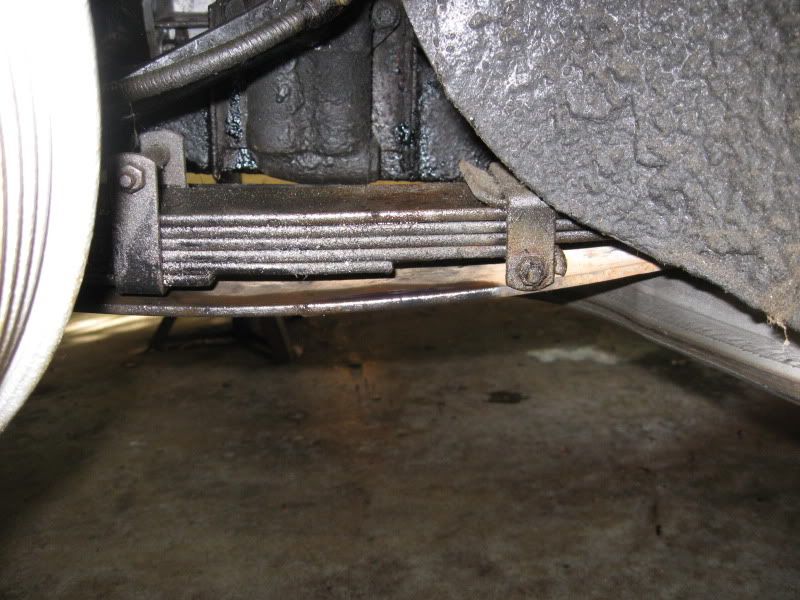
October 24, 2011 I've been trying to get enough done to get it street legal before it gets too cold to play in an unheated New England garage. Today, success: 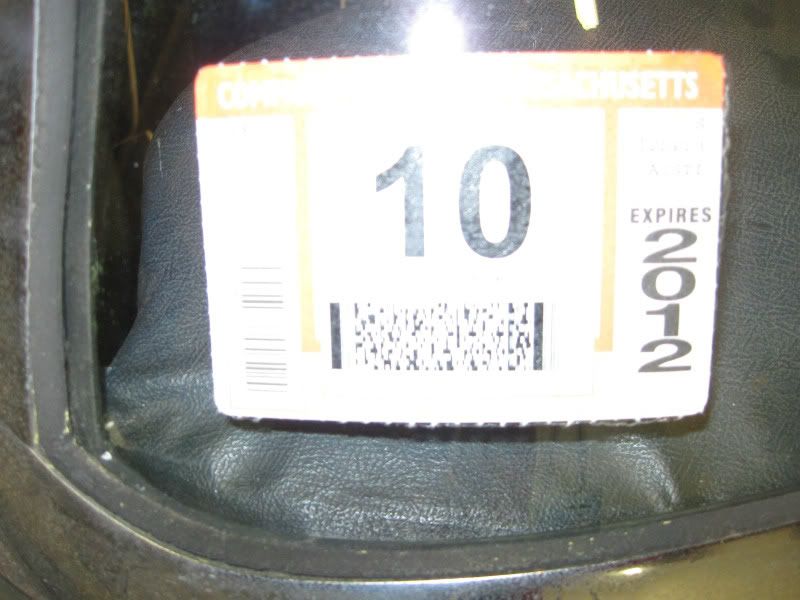
I have, what we Bostonians refer to as a "stickah" (rhymes with "pissah")
I'm now free to terrorize the highways and byways of the Commonwealth (more later). November 13, 2011 Here's the reward for all that labor. Come along for a ride: July 5, 2012: The Big Healey cooling system is quite adequate when used according to its design parameters ... 50 degree damp, foggy spring days in England. Add some additional heat from a typical stateside summer day, or worse yet a warmed over V-8 motor, and you'll find yourself spending some nervous moments staring at your Smiths dual gauge. When doing my motor swap, I had added cooling rows to the recored radiator and installed a Texas Kooler mechanical fan. And on the possible eventuality that wouldn't be enough and I'd need an auxiliary electric fan, I wired in a 130 amp alternator. My set-up cooled fine when the car was in motion, but began to overheat in traffic or at idle. The mechanical fan has a couple of problems. First, when you most need it, it's loafing along at idle. And second, because of the vee-shaped crossmember of the chassis, the fan only covers about 2/3 of the radiator core. And that crossmember also makes it tough to design a fan schroud that will cover the entire rad core. So the search was on for a suitable auxiliary electric fan. When it comes to engines, I subscribe to "There's no substitute for cubic inches" theory. And when it comes to fan motors, "There's no substitute for CFMs." Trouble is, putting a big Cubic Ft/Min fan in a Healey is like putting in a big cubic inch engine ... there are packaging issues ... not much extra space. And this cross brace directly in front of the radiator doesn't help much either: 
What finally produced the best numbers was this 14" Maradyne fan: [www.thewedgeshopstore.com] It puts out over 2000 cfms, draws low amps and is only 3.32" deep. And at 14", it will cover just about the entire front of the core to push air through: 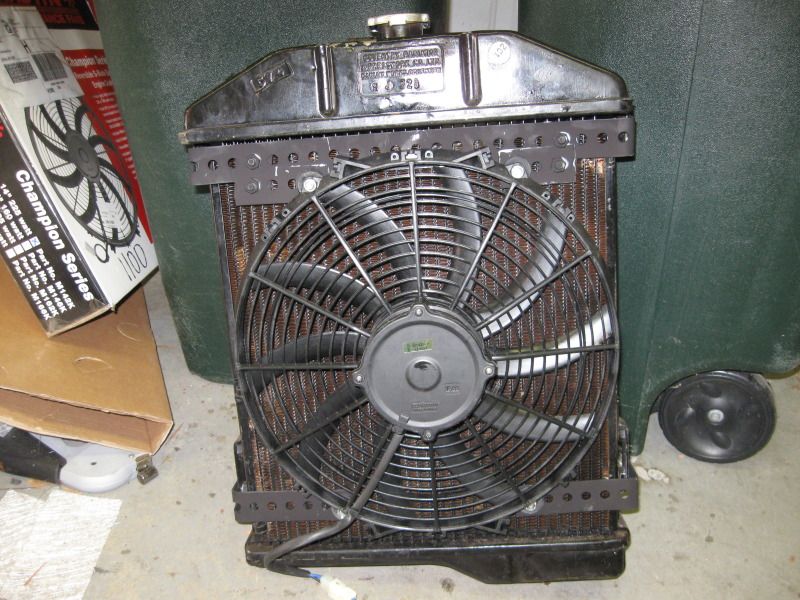
I used some drilled stock to make some brackets that mount to the top and bottom bolts on the radiator sides and had to push out the cross brace to get sufficient clearance for the motor. My first instinct was to take a BFH to the brace,wasn't that the weapon of choice on the Sunbeam Tiger? But then I spied the scissors jack that came in the trunk of my Fiat 124 Spyder in 1972 and the solution was obvious: 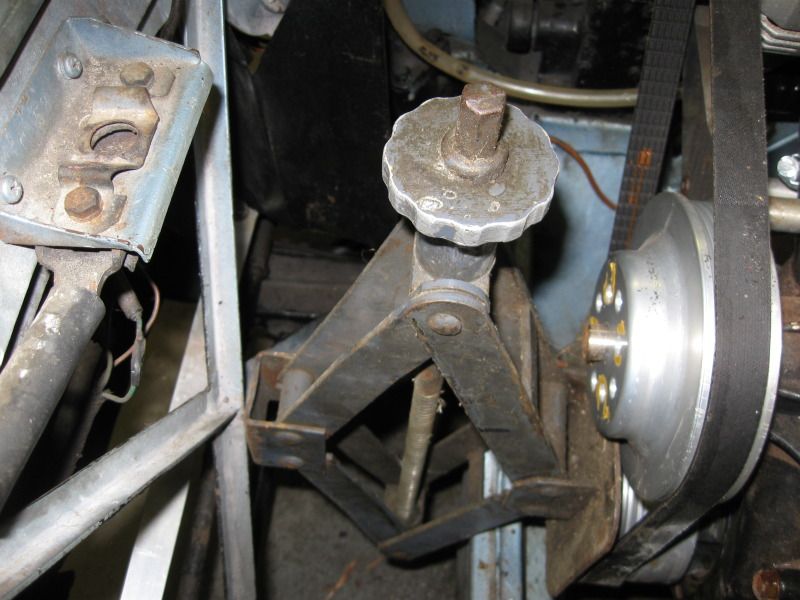
I wired in a Derale adjustable fan controller: [www.summitracing.com] , set to kick the aux. fan in at 190 degrees. The Maradyne fan can be used as a pusher from in front of the radiator or a puller from behind. It comes set up as a puller and to make it work as a pusher, you need to flip the fan blade over AND reverse the polarity of the fan motor wiring. The instructions kind of overlooked the second part and I was less than happy when I first installed the fan and watched the temp climb to 230 degrees. I was even less happy when I walked to the front of the car and felt the tremendous airflow BLOWING OUT THROUGH THE GRILLE! After taking everything apart and fixing that little problem, the fan now triggers at 190 and blows plenty of cool air through the rad and it seems to be sitting there pretty well at idle. This is what it looks like installed: 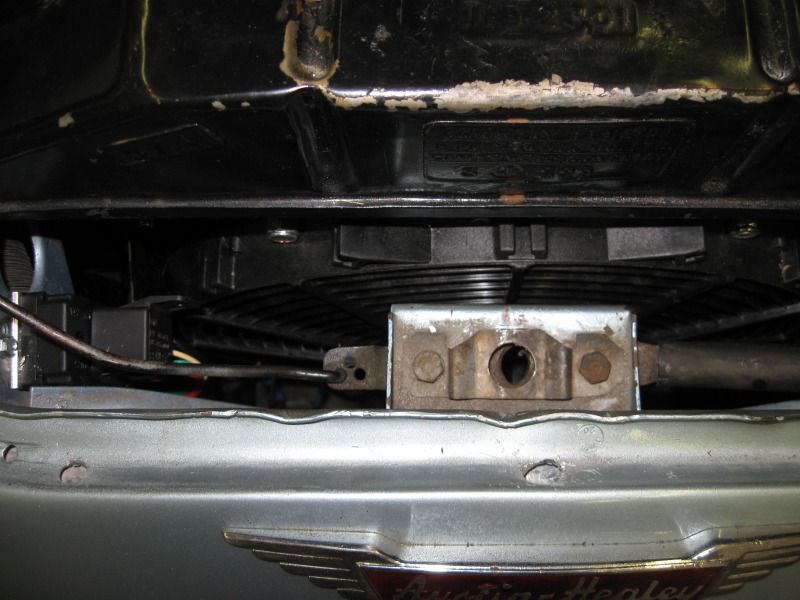
May 8, 2012 One of the last things I did before putting the Healey away last winter was to try to address the cooling issues. Despite fitting a 14" Maradyne electric fan as a pusher, it still wasn't getting the job done. The car was running hot and was even worse in traffic. So I built a shroud out of a discarded cookie baking pan, attached the Maradyne as a puller, and leaned the radiator back so the rear of the fan could motor could pass under the water pump pulley and hoped for the best: 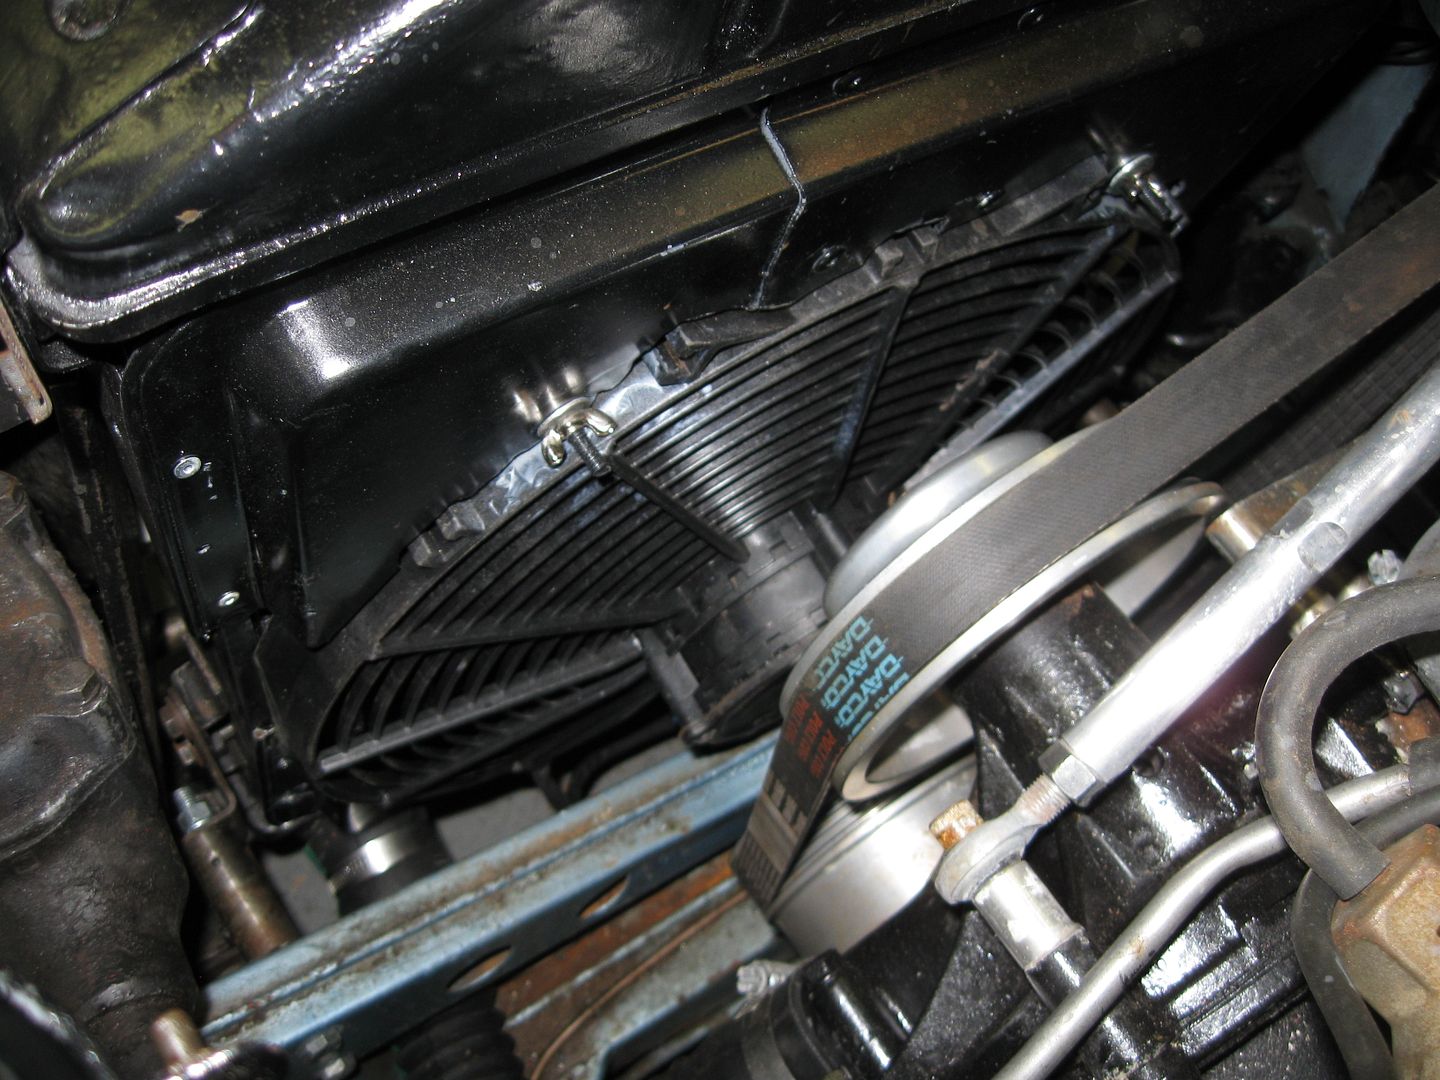
I finally got to try it out yesterday and to my dismay found it was running even hotter. Limped it home, raised the bonnet and watched the fan whirring away. But I didn't feel any air movement under the hood. Took a piece of paper and put it near the fan in the engine compartment and it was sucked toward the fan. Hmmm. Took the paper and held it against the grille and it blew straight forward. I had engineered a perfect system for passing engine heat through the radiator. Even though I flipped the fan over properly to change it from a pusher to a puller and thought I had wired it correctly ... apparently I didn't. Embarrassing thing is I had the exact same problem when I installed it as a pusher last year. Reversed the leads on the fan motor and it was now operating correctly. After two days of driving it around, my water temp hasn't gone over 200 degrees. I'm cautiously optimistic. November 10, 2022 _ Can't believe it's been ten years since I've done the swap. It's been a great car and I'm as happy with it now as ten years ago. I've made some additional changes over the years and an unfortunate engine fire from a leaking carb connection is causing me to make some more so I thought I'd do an update. I had an extinguisher on the tunnel and was able to get to it pretty quickly. One magjor project I did was to louver the hood. Took it to a local hot rod guy to do the louvering, then I spent hours blocking and sanding louvers. I thought it came out excellent and the louver pattern mimics that of the Healey 100M 
So when the fire happened, guess which work got destroyed: 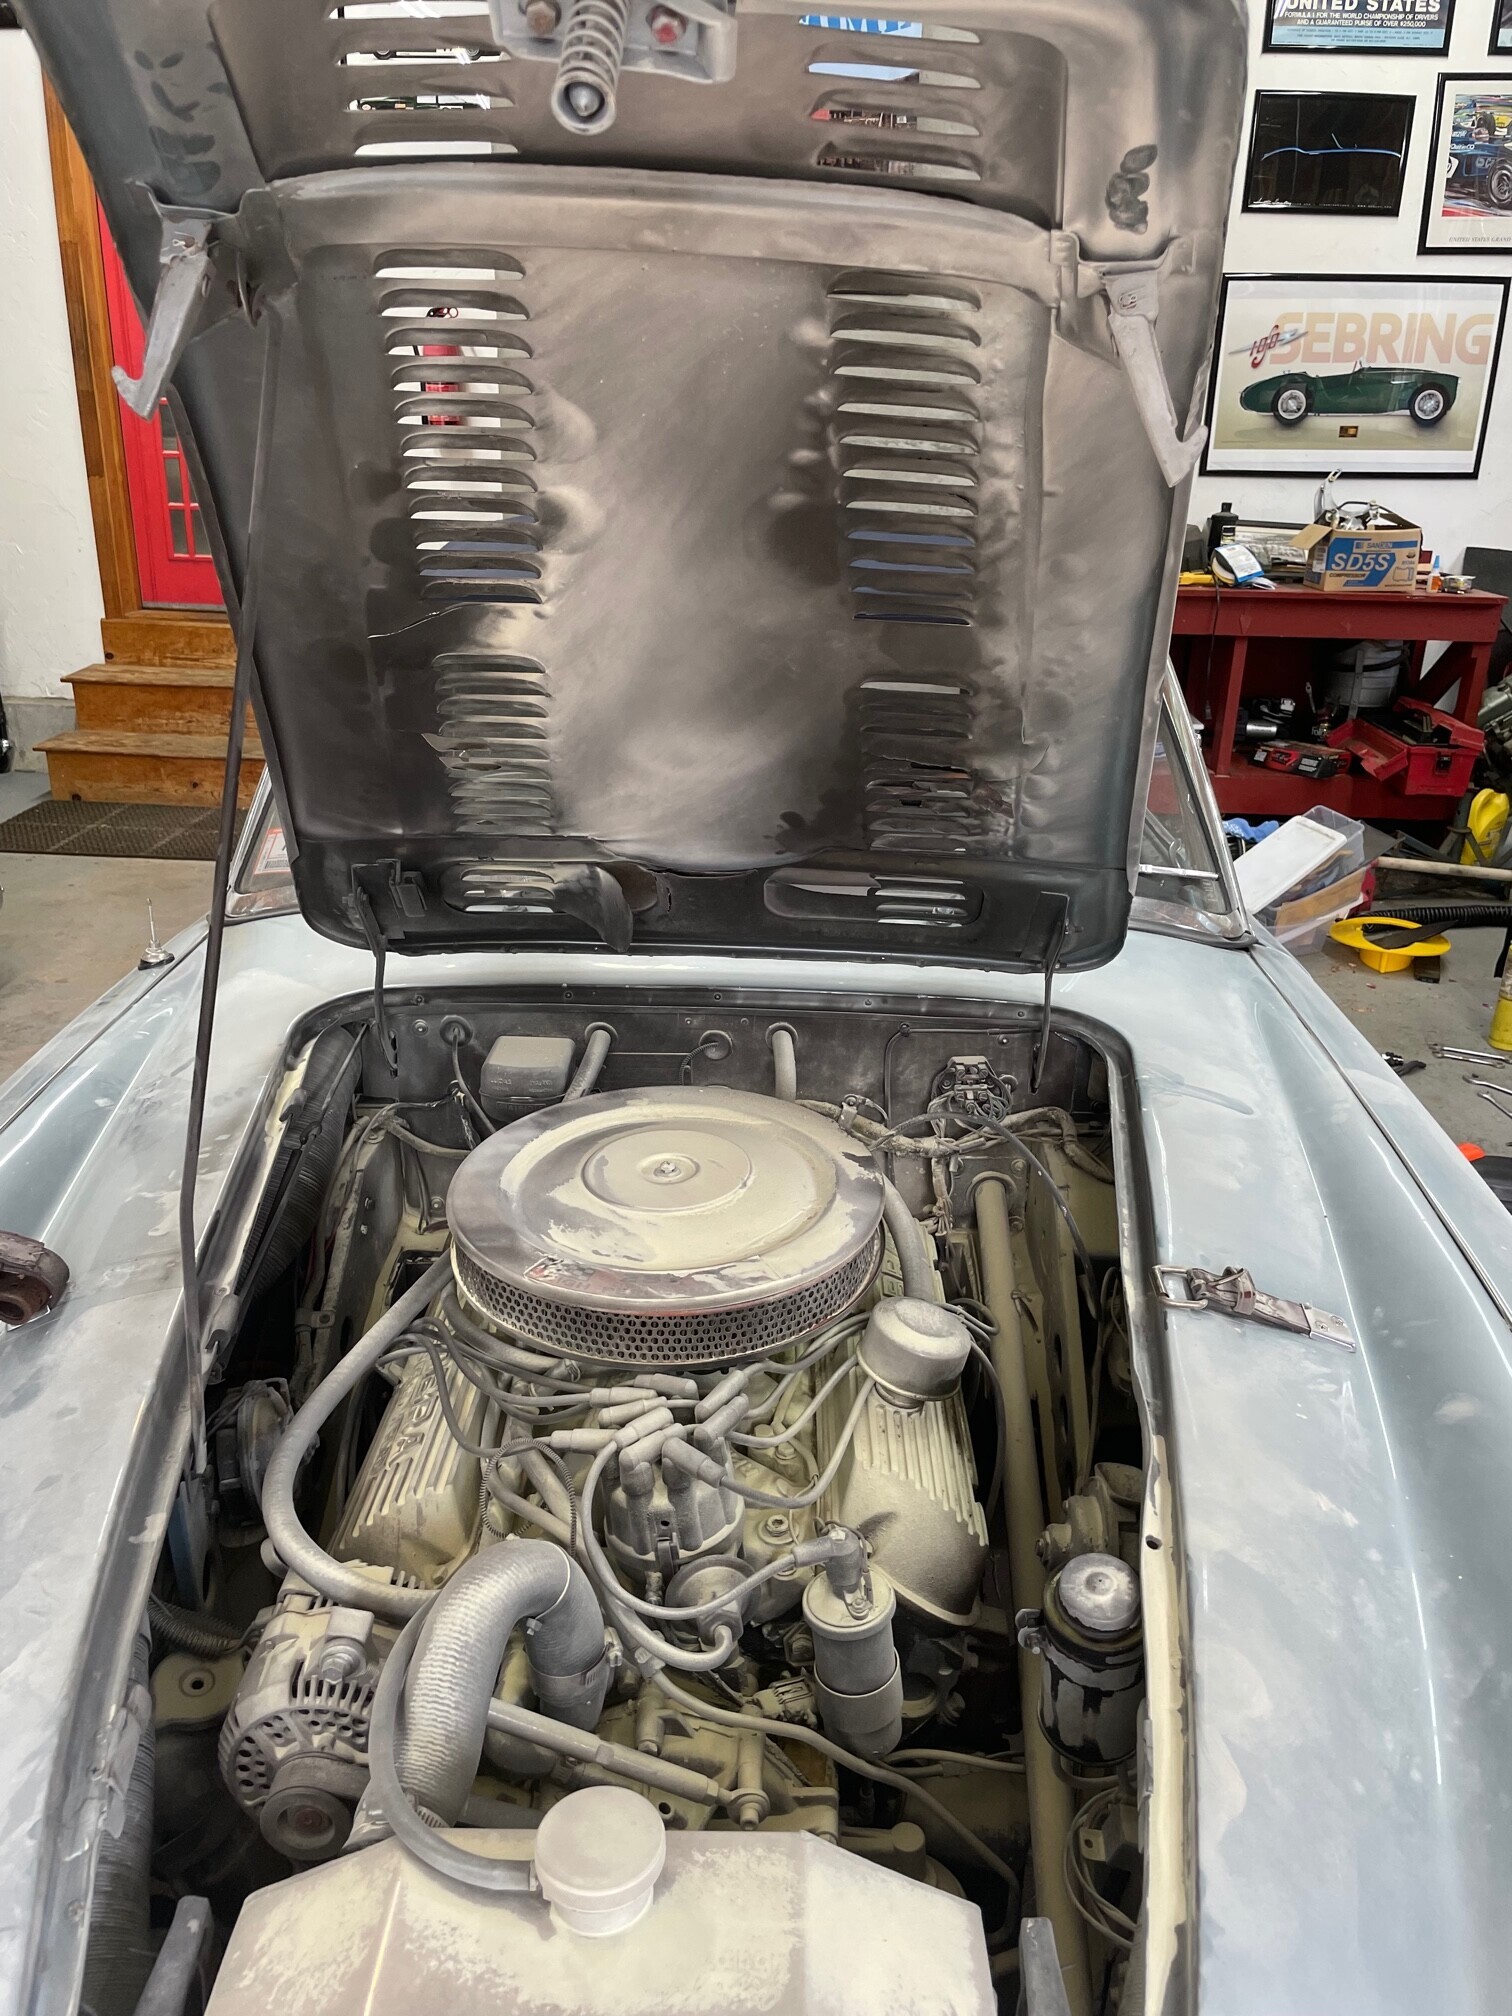
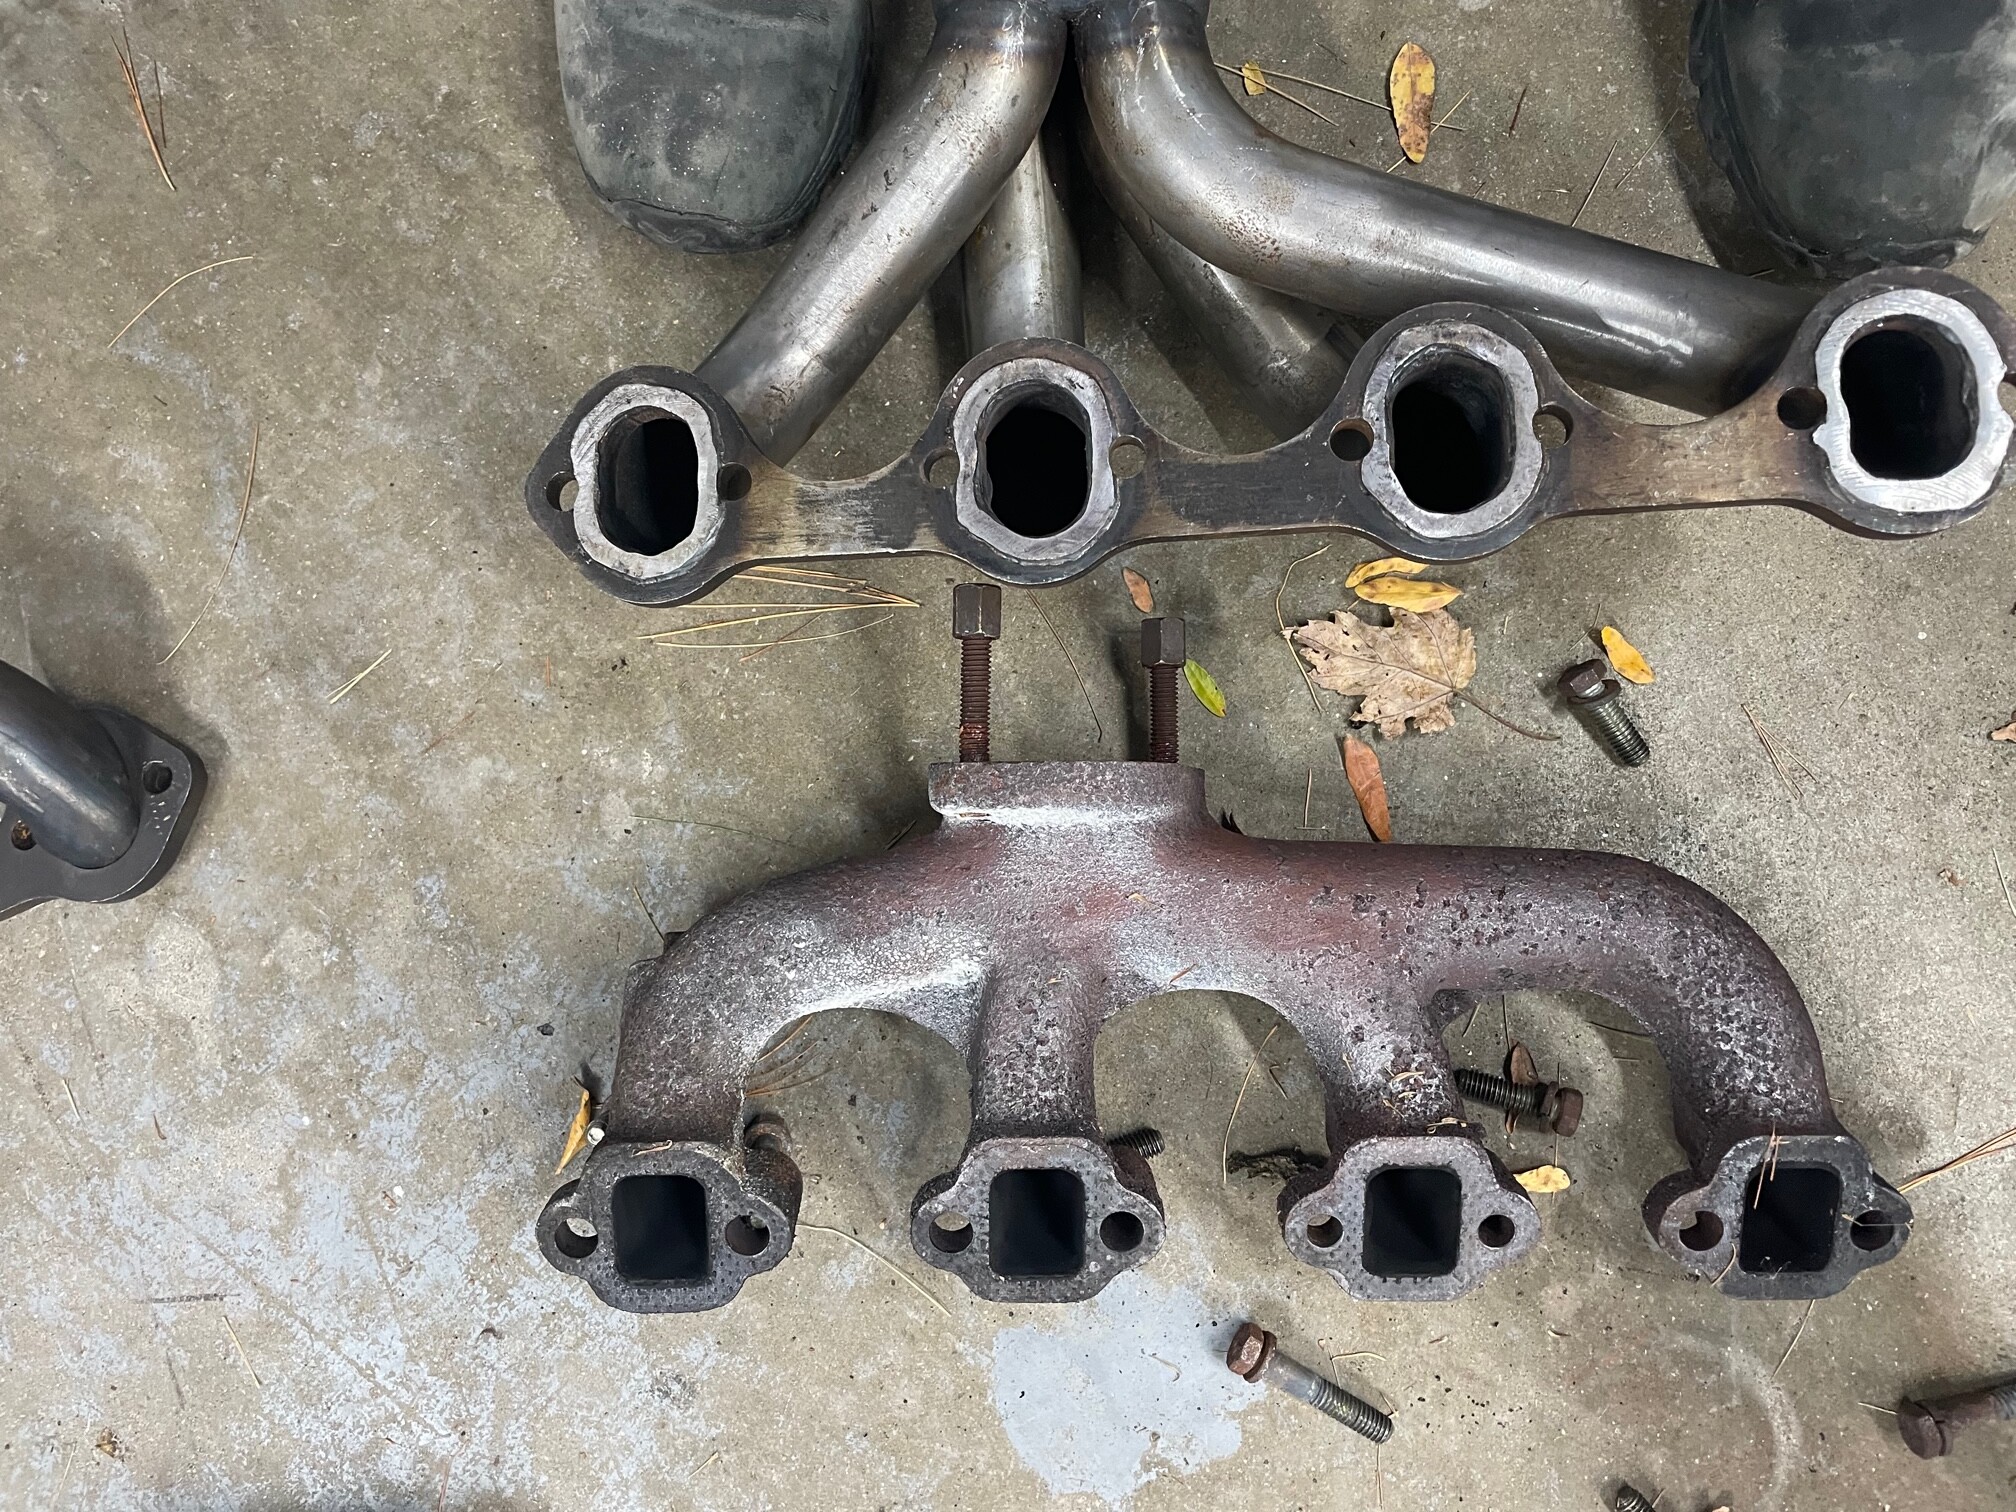
Other than the hood, the remainder of the shroud and paint avoided damage. Wiring harness is destroyed, other parts need to be replaced and the engine and engine compartment need to be repainted. Interior carpeting got burnt and needs replacement. I talked to a few shops to handle the whole bit but most either didn't want to touch it because it's not stock or they have long lead times. Other than the hood, I'll be doing most of it myself. Because I had a dry chemical extinguisher (next time Halotron) clean-up was a pain and meant the engine and transmission had to come out. Not all bad as it allowed me to send the T5Z out to repair an issue with 5th gear that sometimes pops out when you lift the accelerator and gave me the incentive to try to find a set of headers that will fit. The engine dyno'ed at 345 hp at the crank and only 200 at the wheels and I'm hoping some of that horsepower loss was caused by the restrictive Sunbeam Tiger cast manifolds. 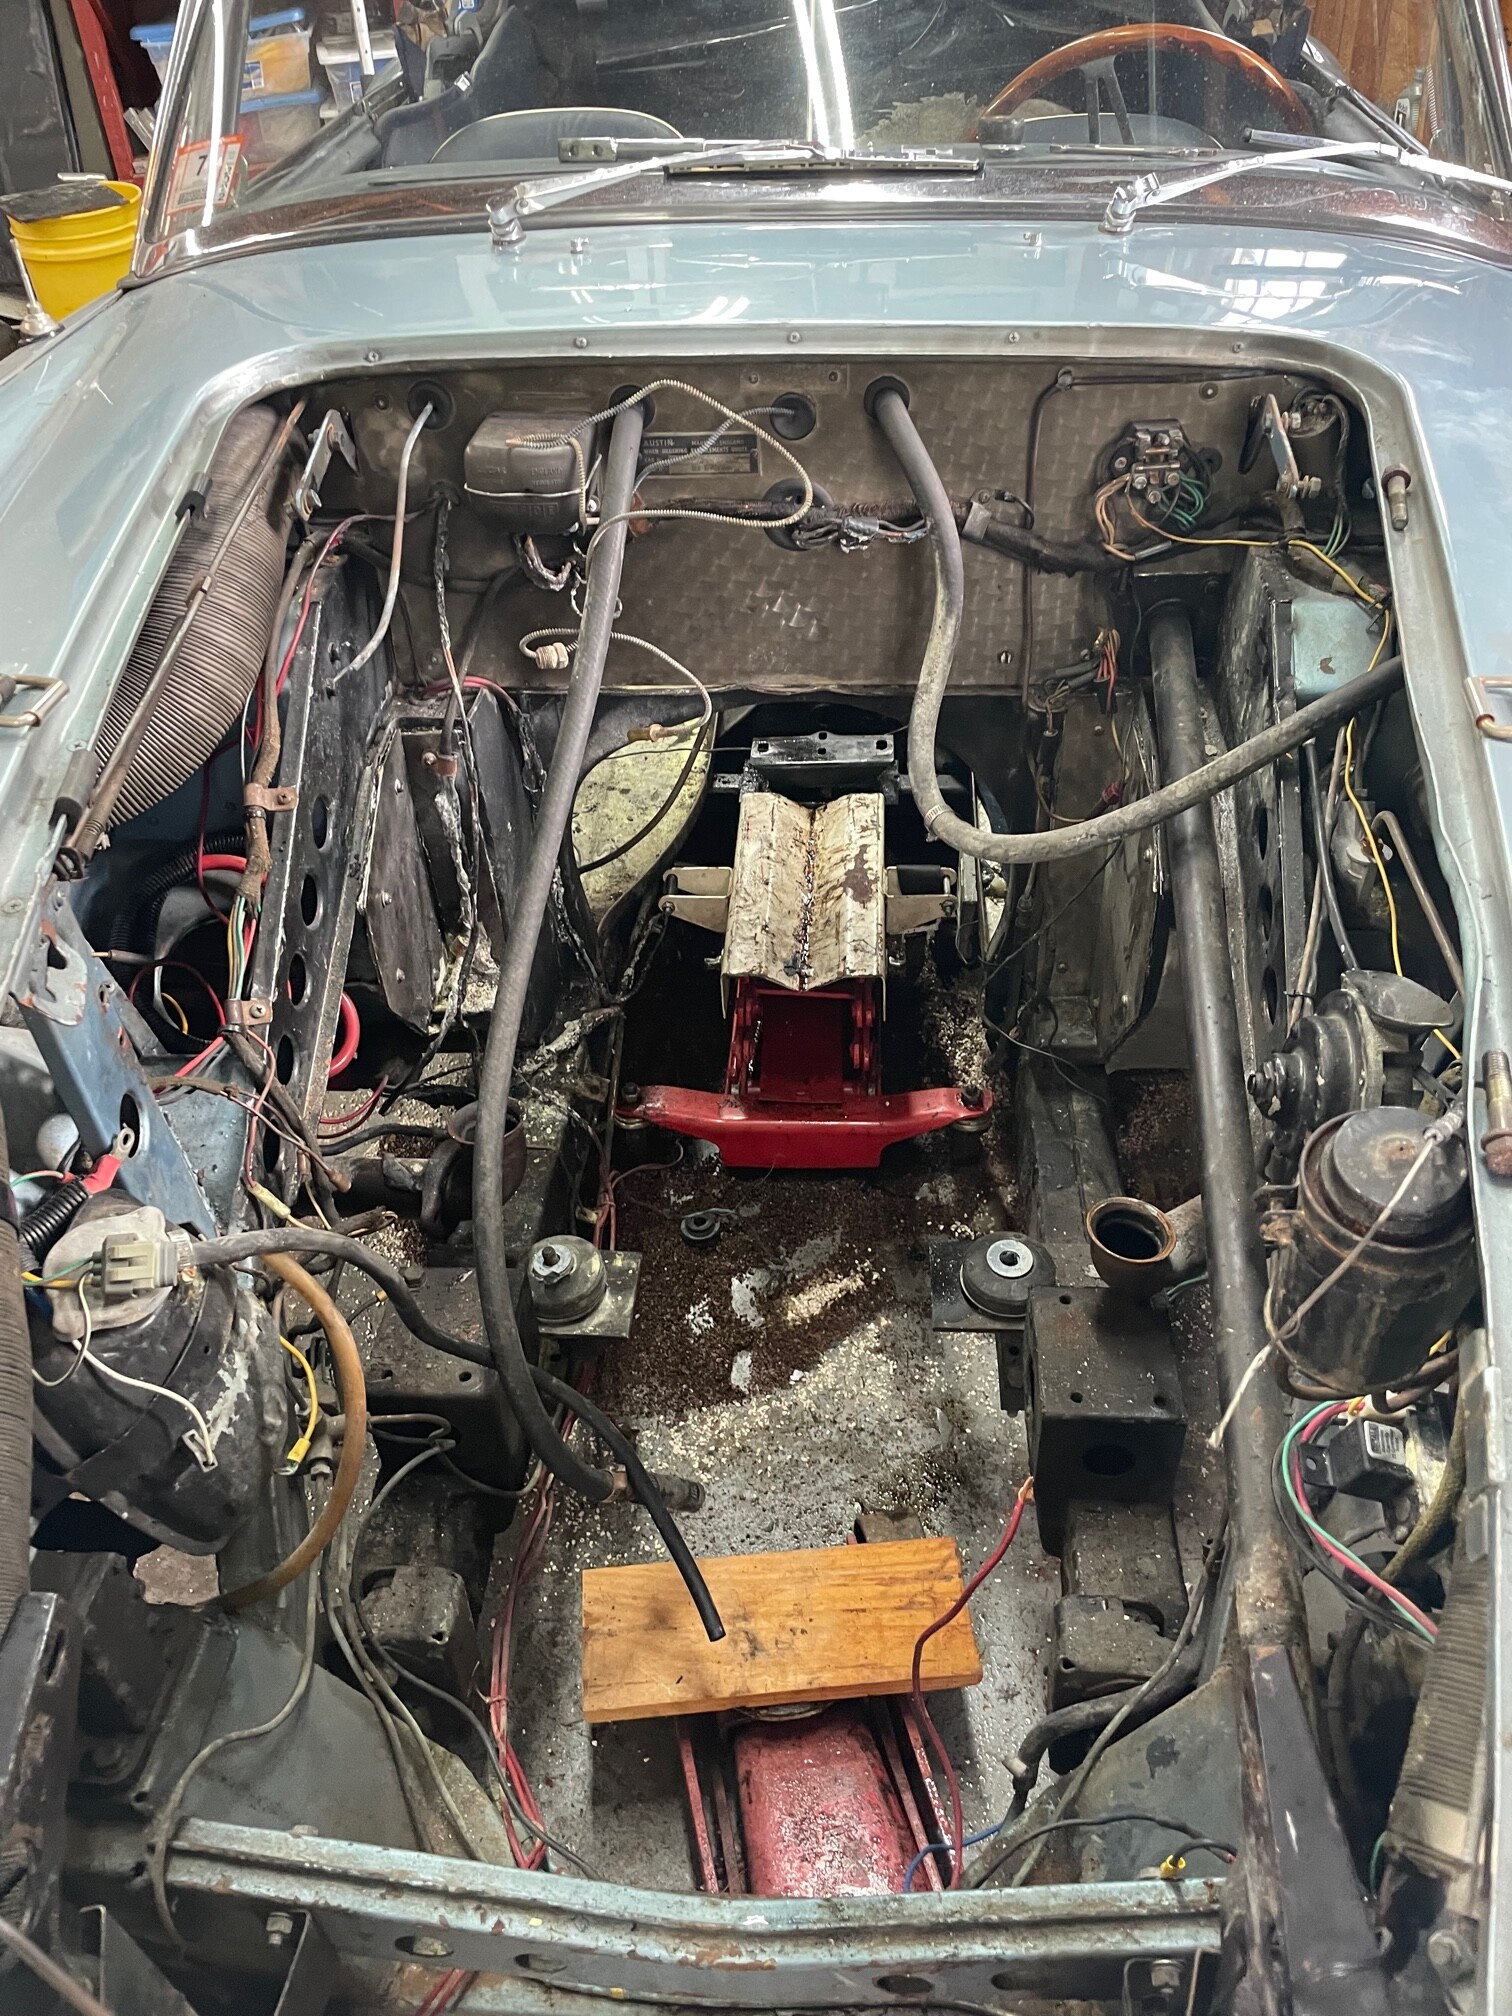
November 13, 2022 - Here's a comparison of the new headers to the Tiger manifolds. Should pick up a few horses..The headers are these Patriots:[pertronixbrands.com] with the outlet modified so they will exit above the frame and allow me to run the exhaust outside the frame rails. 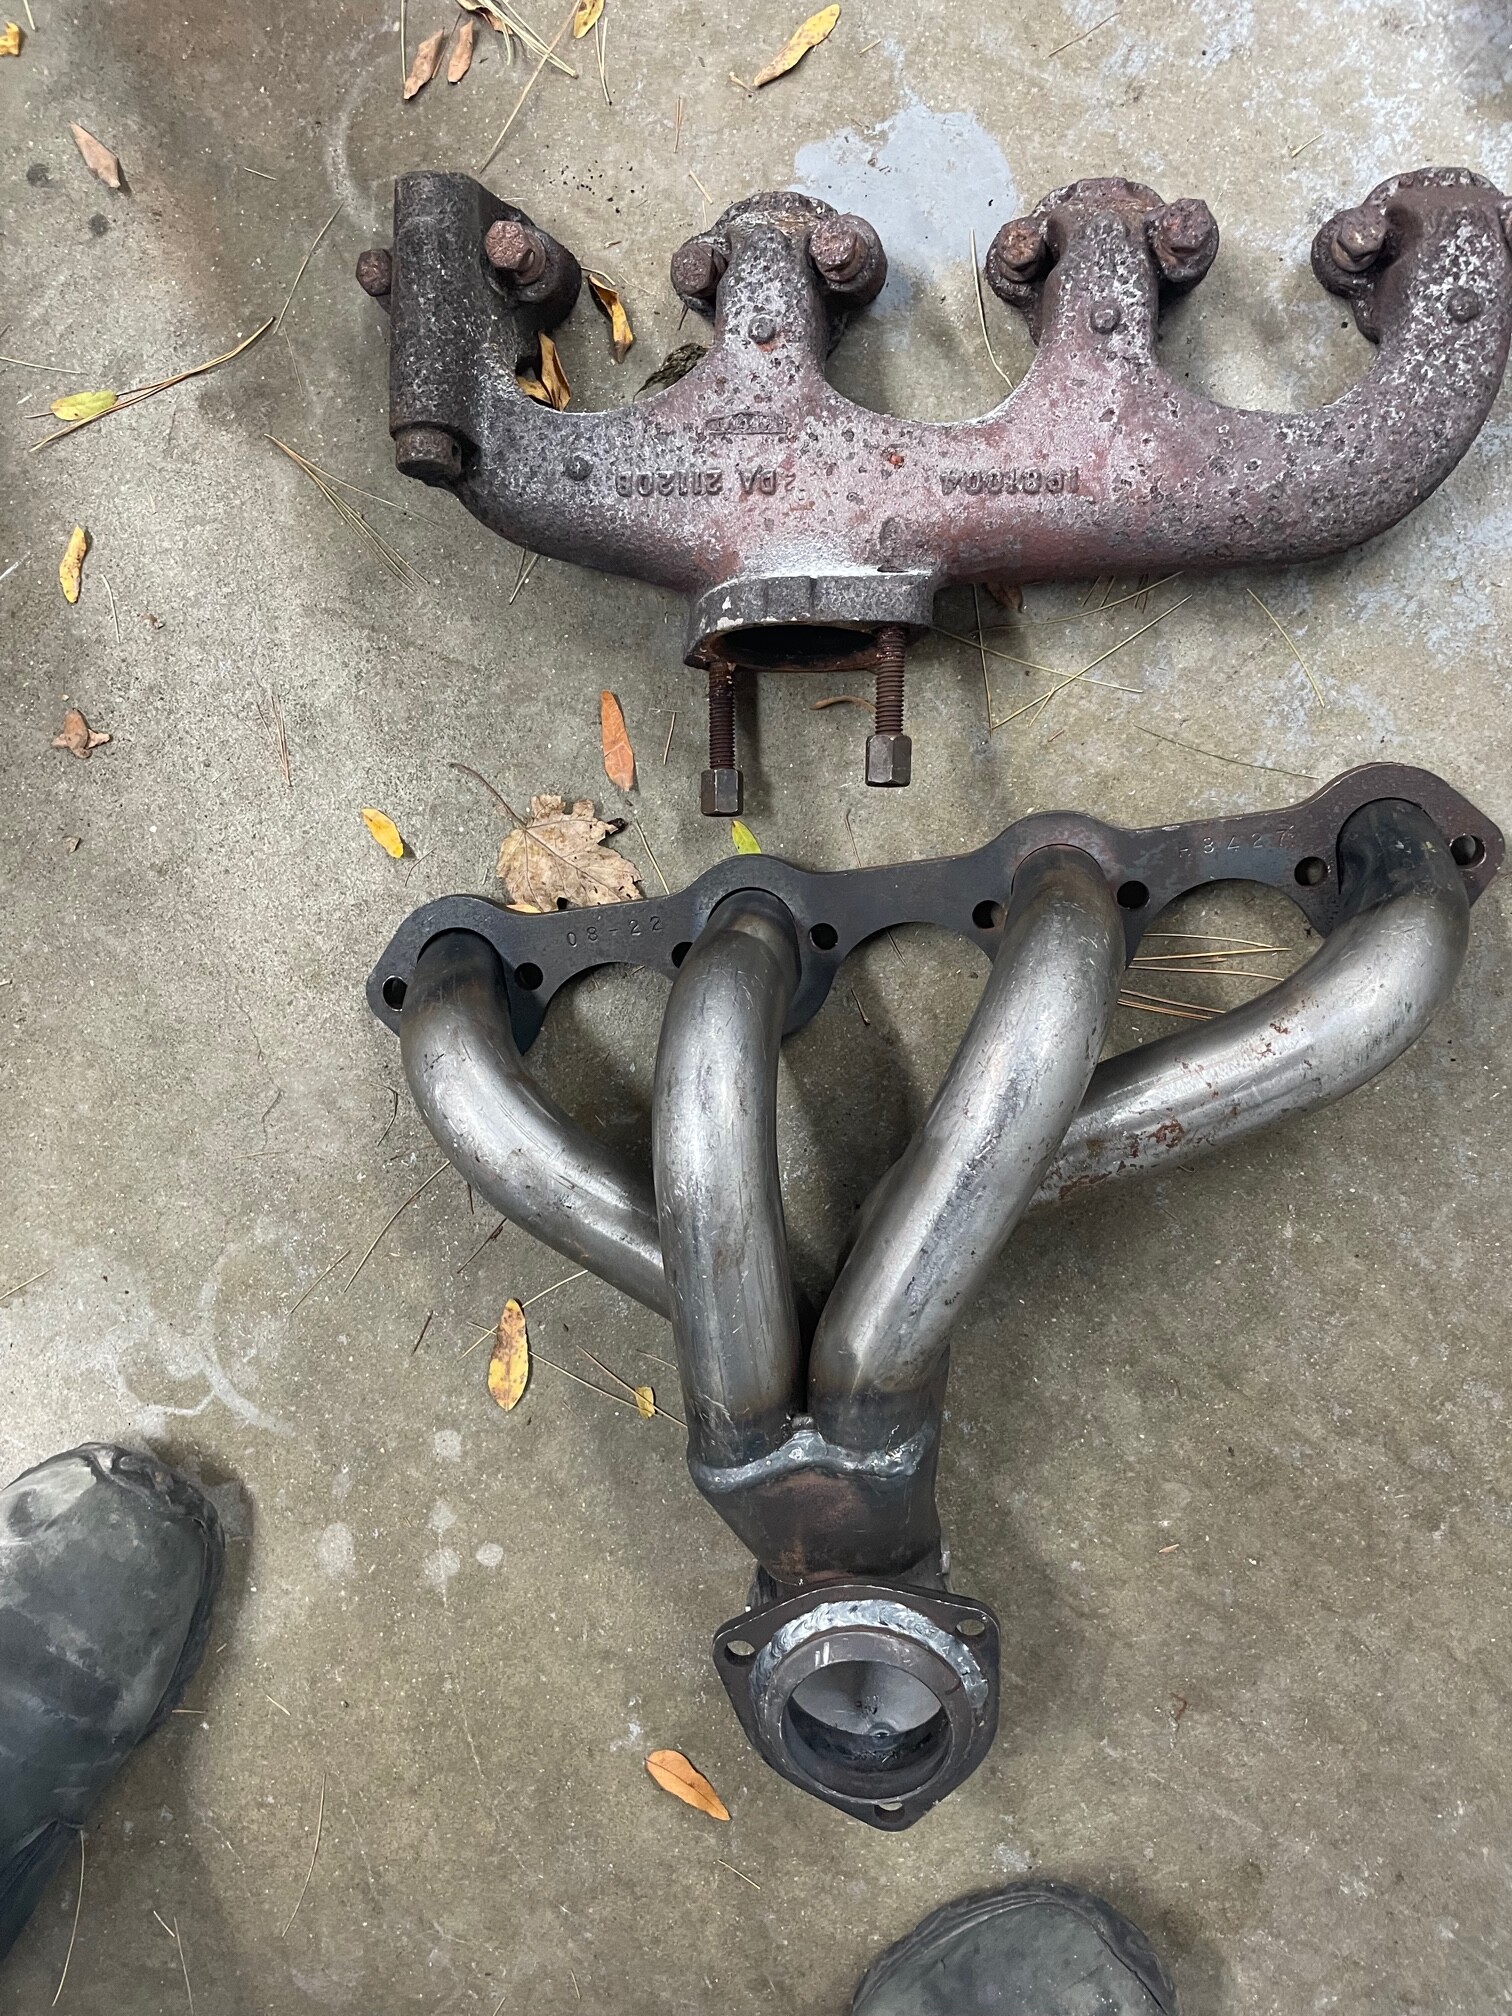
 Edited 95 time(s). Last edit at 11/13/2022 12:49PM by HealeyRick. |
Sorry, you do not have permission to post/reply in this forum.
British V8 Home Page
Photo Gallery
Web Forum
Annual Meetings
Contact Info
Site Map
British Race Car

© 2025 British V8™ All rights reserved. Website & graphic design by:
Curtis Jacobson.
BritishV8 Forum is hosted by
SiteWelder LLC,
and is powered by a
Phorum engine.