MG Sports Cars
engine swaps and other performance upgrades, plus "factory" and Costello V8s
|
Keith Keith Tanner Grand Junction, Colorado (92 posts) Registered: 10/31/2008 01:45AM Main British Car: For the purpose of this forum, 1972 MGB GT 5.7l Chevrolet LS1 |
Rabbit flares, installed
There are always lots of questions about flares, and the Rabbit ones don't get discussed as much as the Omnis. Hopefully this will serve as a bit of a how-to for future modifiers.
I decided to go with Rabbit flares on my car for a couple of reasons. One, I could find some! Omni flares seem to only be available as junkyard parts, and there are none anywhere around here. Two, I think they suit the shape of the car well. My track is about 4" wider than the MG, so even with stock-size tires I had a lot of extra coverage needed. Actually, my tires are a bit smaller in diameter than most MG ones, they're around 23" total diameter. The flares themselves were cut out of some patch panels from rabbitparts.com. I used the flares from the rear of a two-door, and the panels were $48 each. Easy to find and good quality, much easier to work with than old metal. In the rear, the fit is fantastic. I didn't have to really do any trimming. I simply cut the flare off the patch panel with an angle grinder and trimmed the cut with a belt sander. I placed the flare higher on the body than some other folks have, so I did have to make a simple fill piece to mate up to the body above the step in the side. The higher placement was partially dictated by that wider track but also because I wanted to make the car look stock instead of looking like a modified, lowered car. This was easy enough to do, I used tin snips to cut the piece from the leftover patch panel bits. The flares have a curve where they meet the body of the Rabbit. In order to keep the profile good with the fill piece, I flattened out this curve before attaching the flares to the MG. Just a few taps with a hammer on a flat surface. There's also a little rib in the body of a Rabbit that the flares meet, but some hammer work took care of that as well. I also have a set of flares from the front of a Rabbit, but I've decided the rears would work best on the front due to the shape of the wheel cutout. I've ordered another set of patch panels so I'm just waiting for them to show up. I'll update this thread at that time. Tacked on. This is seriously an untrimmed Rabbit part, the fit is that good. 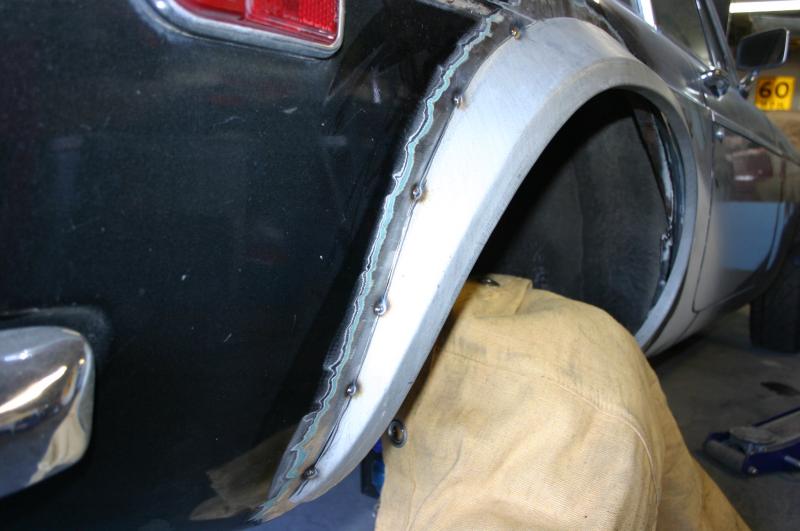
Fill piece in place. 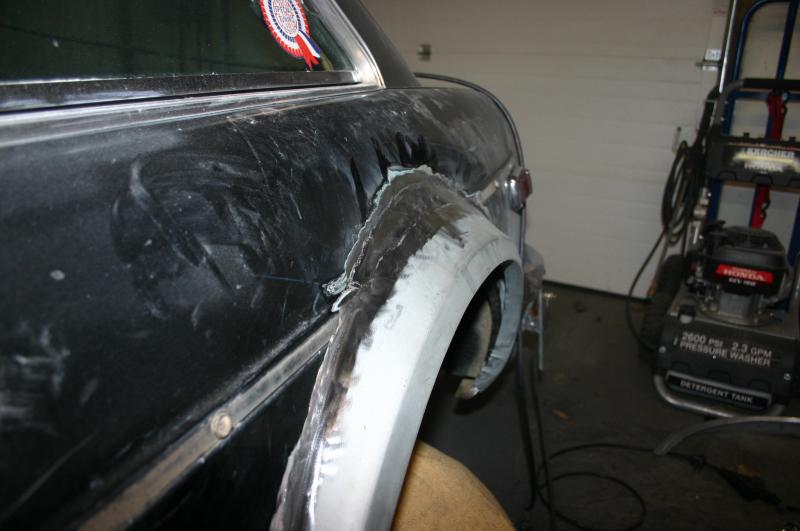
In order to get full clearance, I rolled the inner lip flat. 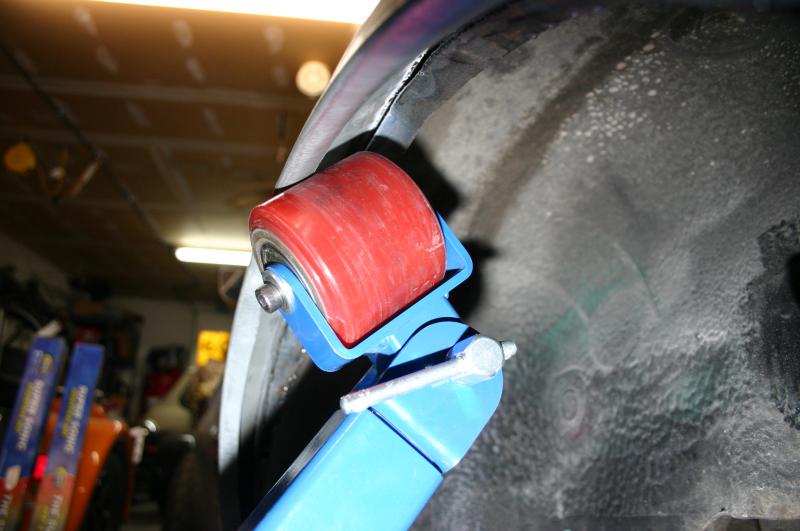
On the car before any filler work. That's just metal right now, and I still have some final shaping to do. 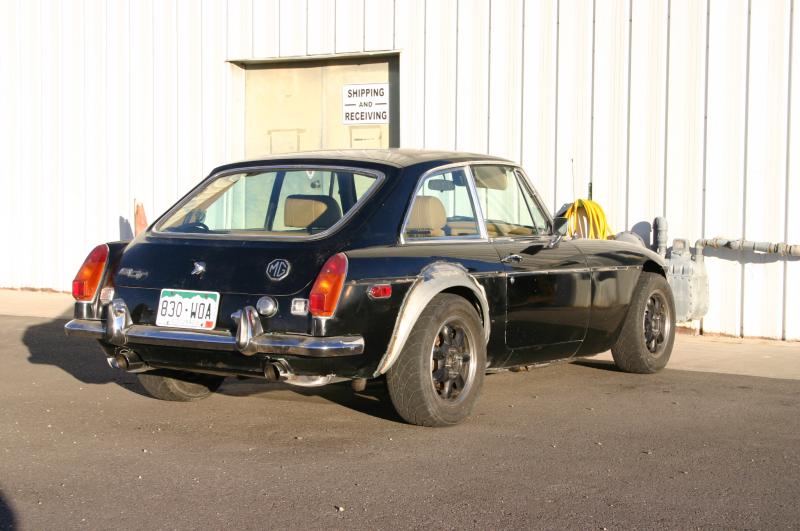
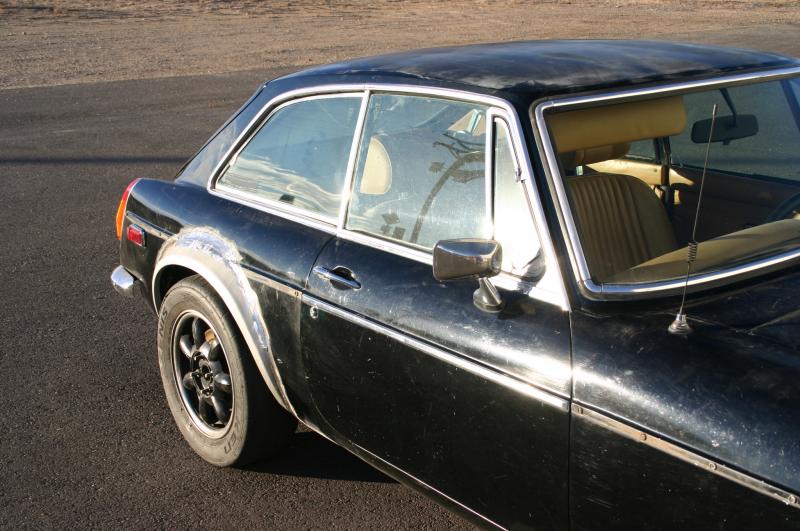
Total time to get both rear fenders to this point: about 3 hours. It was a really quick and easy job. The MG wheel wells had already been cut and patched. Edited 1 time(s). Last edit at 12/03/2010 03:01PM by Keith. |
|
MGB SS Joe Schafer Central Michigan (150 posts) Registered: 10/23/2007 06:46AM Main British Car: 1971 Mgb 1991 5.0 Ford |
Re: Rabbit flares, installed
Keith
I was looking your car over some last night, very cool project. The Rabbit flares look great another option for making our Bs look better and getting rid of the bicycle tires that are stock on our cars. I will be digging a little deeper on the other sites you are posting your car on looking especially at the front end/suspension set up. Joe |
|
mgb260 Jim Nichols Sequim,WA (2632 posts) Registered: 02/29/2008 08:29PM Main British Car: 1973 MGB roadster 260 Ford V8 |
Re: Rabbit flares, installed
Keith, Thanks for sharing your build here and on the other MG forum. Have you thought about using the early Euro style tailights?
|
|
Keith Keith Tanner Grand Junction, Colorado (92 posts) Registered: 10/31/2008 01:45AM Main British Car: For the purpose of this forum, 1972 MGB GT 5.7l Chevrolet LS1 |
Re: Rabbit flares, installed
Joe - that was the intent. The Omni metal is hard to find, the Rabbit stuff is easily available. Plus I like the look! [www.slowcarfast.com] should give you pretty much all of the suspension information.
Jim - I'm actually going to install a set of early taillights right now :) I have a set off my parts car, and the one missing lens just showed up yesterday. |
|
|
|
Keith Keith Tanner Grand Junction, Colorado (92 posts) Registered: 10/31/2008 01:45AM Main British Car: For the purpose of this forum, 1972 MGB GT 5.7l Chevrolet LS1 |
Re: Rabbit flares, installed
They're from the rear of a two-door. Model year is "whatever the original generation of Rabbit was". I'm sure Wikipedia or a VW nerd could clear that up. Here's the source of the parts I used:
[www.rsjparts.com] [www.rsjparts.com] |
|
Keith Keith Tanner Grand Junction, Colorado (92 posts) Registered: 10/31/2008 01:45AM Main British Car: For the purpose of this forum, 1972 MGB GT 5.7l Chevrolet LS1 |
Re: Rabbit flares, installed
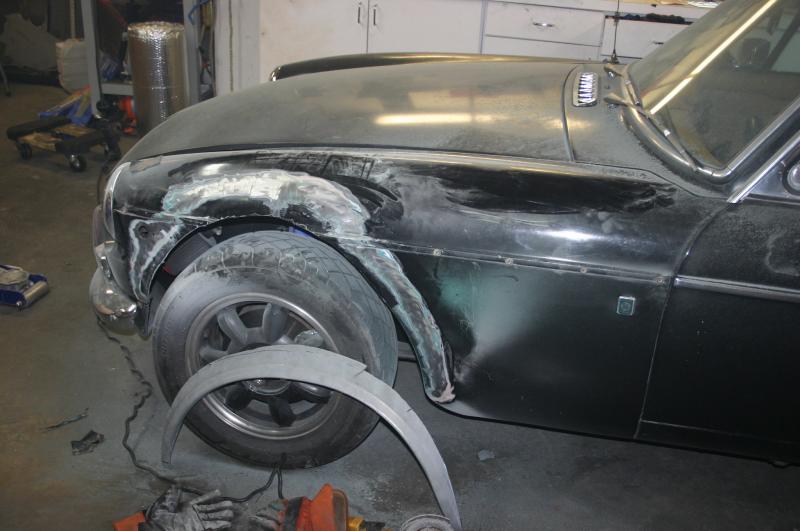
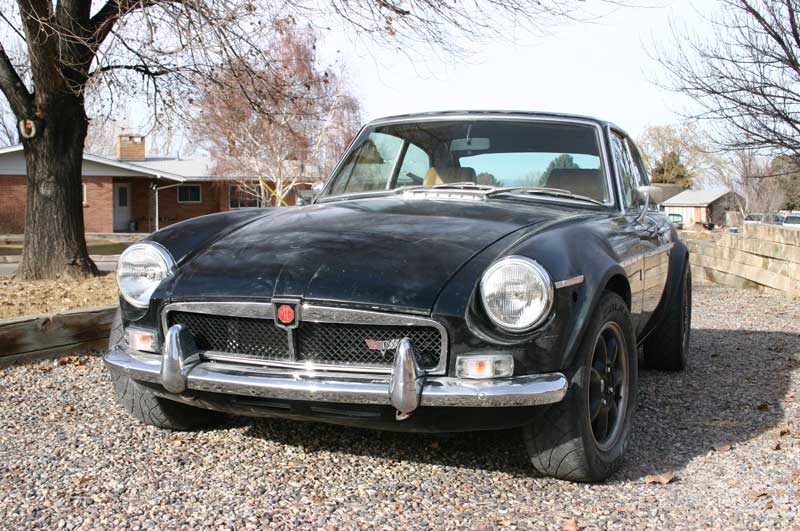
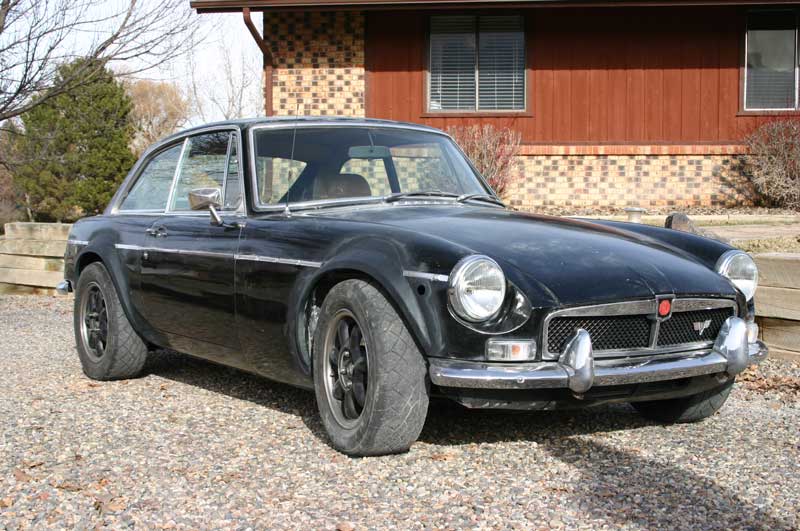
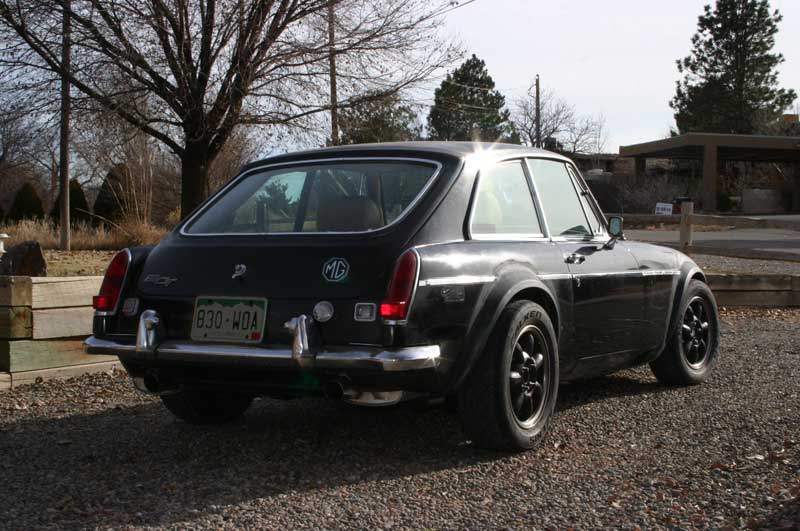
The fronts were more of a challenge than the rears. I ended up putting them on the same sides as on the Rabbit, but if I'd been putting them a bit lower on the body flipping them left to right might have been an option. I used rear patch panels again. They're just shot in black primer right now with a quick grind of the welds, there's no filler.
 |
|
Keith Keith Tanner Grand Junction, Colorado (92 posts) Registered: 10/31/2008 01:45AM Main British Car: For the purpose of this forum, 1972 MGB GT 5.7l Chevrolet LS1 |
Re: Rabbit flares, installed
Not really. The rears were incredibly easy. The fronts were more of a challenge, so start in the back to get comfortable. I also removed the springs from my coilover suspension so I could run the suspension through the full range of travel - this let me make sure there was enough clearance for the wheels no matter what.
|
|
kerbau53 Geoff Morton Naples, FL (109 posts) Registered: 08/09/2010 10:27PM Main British Car: 78 MGB Ford 5L |
Re: Rabbit flares, installed
Keith,
Thx. for the info. I'll make sure to run things full up without the coilovers. Looks like you have plenty of room. More pics here or on your website. I'm following your lead on this! |
|
castlesid Kevin Jackson Sidcup UK (361 posts) Registered: 11/18/2007 10:38AM Main British Car: 1975 MGB GT Rover V8 4.35L |
Re: Rabbit flares, installed
Wish I'd thought of those, I quite like the Omni flares but the VW ones would be much easier to source in the UK and seem very reasonably priced.
Did you have to add any additional metal? The full sebring kit is in my opinion are too big for a road car and requires the use of excessively wide wheels and tyres to make it look right, the VW ones look just right and almost as if they were original bodywork. Look forward to seeing it once the car is repainted. Kevin. |
|
MGB-FV8 Jacques Mathieu Alexandria, VA (299 posts) Registered: 09/11/2009 08:55PM Main British Car: 1977 MGB Small Block Ford, 331 Stroker |
Re: Rabbit flares, installed
For the purpose of comparison, does anyone have photos of two "MGB" one with Rabbit flares and one with Omni flares? Also, which one gives you the bigger opening?
Jacques |
|
|
|
Keith Keith Tanner Grand Junction, Colorado (92 posts) Registered: 10/31/2008 01:45AM Main British Car: For the purpose of this forum, 1972 MGB GT 5.7l Chevrolet LS1 |
Re: Rabbit flares, installed
Here are a couple more shots. Don't mind the lumpy side trim, it's just foil tape at the moment. As you can see, the weather isn't good right now so the car's spending most of its time in the garage. I'll get more pictures online as I go.
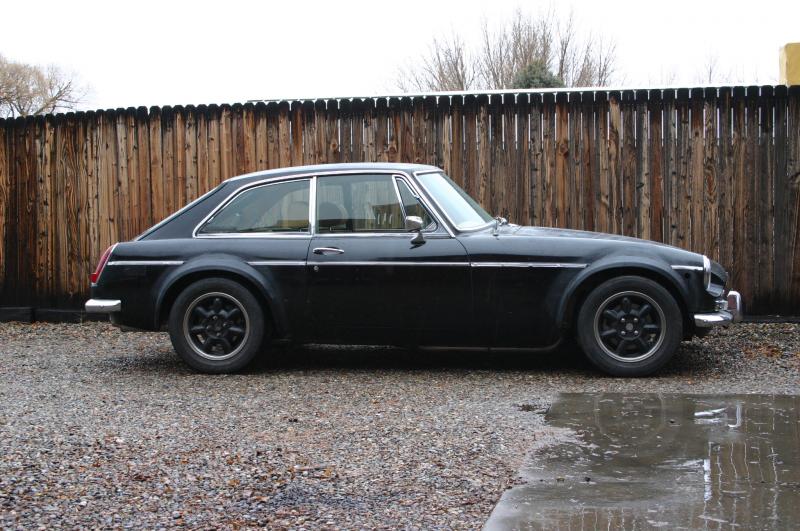
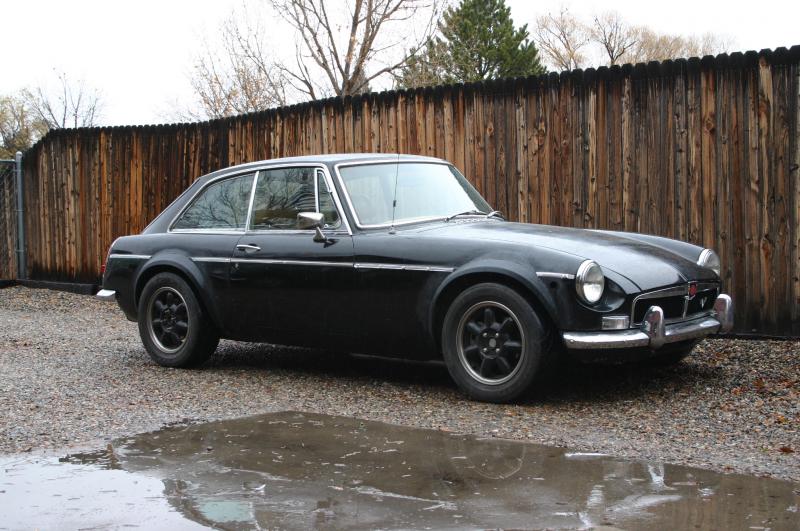
I've personally never been a fan of the Sebring flares, and wanted something that looked like it could have been added at the factory. It's not hard to find pictures of Omni-flared cars (try the Dan Masters gallery on British V8), but Rabbit cars are much more difficult. That's a big reason I started this thread! The only other pictures I've seen are this red car, and it apparently uses Rabbit in the rear and Omni in the front. .jpg)
I did have to add extra metal both front and rear to deal with the fact that the flares went above the crease in the body line. I don't think that would have been necessary in the red car above. The extra metal was easy enough, just an arced shape that was easily sorted out on the car. The front was more challenging (of course) but the rear gave me good practice. |
|
MGB SS Joe Schafer Central Michigan (150 posts) Registered: 10/23/2007 06:46AM Main British Car: 1971 Mgb 1991 5.0 Ford |
Re: Rabbit flares, installed
Keith
I am wondering why you think the Rabbit flare is more difficult that the Omni? I will agree that installing either of them above the body line is more difficult but not sure the difference otherwise. This has Omni Flares. I will try to find a better picture for the Comparison Joe Edited 5 time(s). Last edit at 12/23/2010 08:33PM by MGB SS. |
|
Keith Keith Tanner Grand Junction, Colorado (92 posts) Registered: 10/31/2008 01:45AM Main British Car: For the purpose of this forum, 1972 MGB GT 5.7l Chevrolet LS1 |
Re: Rabbit flares, installed
I don't think the Rabbit parts are more difficult to install, they're just less common so it's harder to find pictures. That's what I said in my last post. Heck, I don't think it would be possible to have an easier install than the Rabbits on the rear. I've never installed a set of the Omnis (they're much harder to get!) so I can't comment on the actual difficulty of installation.
|
|
MGB SS Joe Schafer Central Michigan (150 posts) Registered: 10/23/2007 06:46AM Main British Car: 1971 Mgb 1991 5.0 Ford |
Re: Rabbit flares, installed
Keith
Sorry for the above comment. After re-reading your post I see what you were saying. I think that the Flares are very similar and what ever one you can get your hands on would be the ones to use. As I have mentioned in other posts you have a great project going there. Joe |
Sorry, only registered users may post in this forum.


