

Triumph Sports Cars
engine swaps and other performance upgrades, plus "factory" V8s (Stag and TR8)
|
Re: 74 TR6 upgrade
Great story Phil! On the 4.8, I've got a '66 malibu I've thought about putting a 4.8 in. Although I suppose as cheap as 5.3's are it would make sense to go with one of those. If I did that I'd probably try to keep the truck intake, I'm sure I'd have to change the pan. I think that 4.8 is going to be more than fine in your TR!
|
|
Phil Crawford Philip crawford Bogalusa, La (80 posts) Registered: 02/01/2013 10:38PM Main British Car: 74 TR6 07 4.8L |
Re: 74 TR6 upgrade
Ryan
I have a friend with a 66 camaro convertible with a 5.3 and it is really quick. I believe you will have to change the intake to a camaro type for it it fit. You might also be able to keep all of the accessories in their stock position which would be great. I believe after 05 they were all drive by wire. If you get a DBW and go to a camaro intake you will have to change the water pump because the discharge goes straight up into the throttle servo and if you change the water pump the harmonic balancer will have to be changed to a camaro balancer because the pulley on the water pump is recessed towards the motor. Consider a LS1 and compare end price. I'm happy with what I have for the time being. Have you been working on the malibu? I belong to a hot rod club and we may have some malibu's. We have a meeting tomorrow night I will try to check on what will fit. Phil |
|
Re: 74 TR6 upgrade
Nope, I'm not working on the Malibu yet, it's a project for the future, maybe. I'm just finishing one project and kind of reassessing my car hobby and not starting anything major in the near future! My wife tells me to keep all my projects lined up for when the kids get older and I'm suddenly bored!
|

|
|
Phil Crawford Philip crawford Bogalusa, La (80 posts) Registered: 02/01/2013 10:38PM Main British Car: 74 TR6 07 4.8L |
Re: 74 TR6 upgrade
Ryan
Our car club met tonight but no one could give me an answer about the manifold fitting in the malibu. Ask on google and you will surely get an answer. Keep dreaming and one day you will have time to play. Phil |
|
Phil Crawford Philip crawford Bogalusa, La (80 posts) Registered: 02/01/2013 10:38PM Main British Car: 74 TR6 07 4.8L |
Re: 74 TR6 upgrade
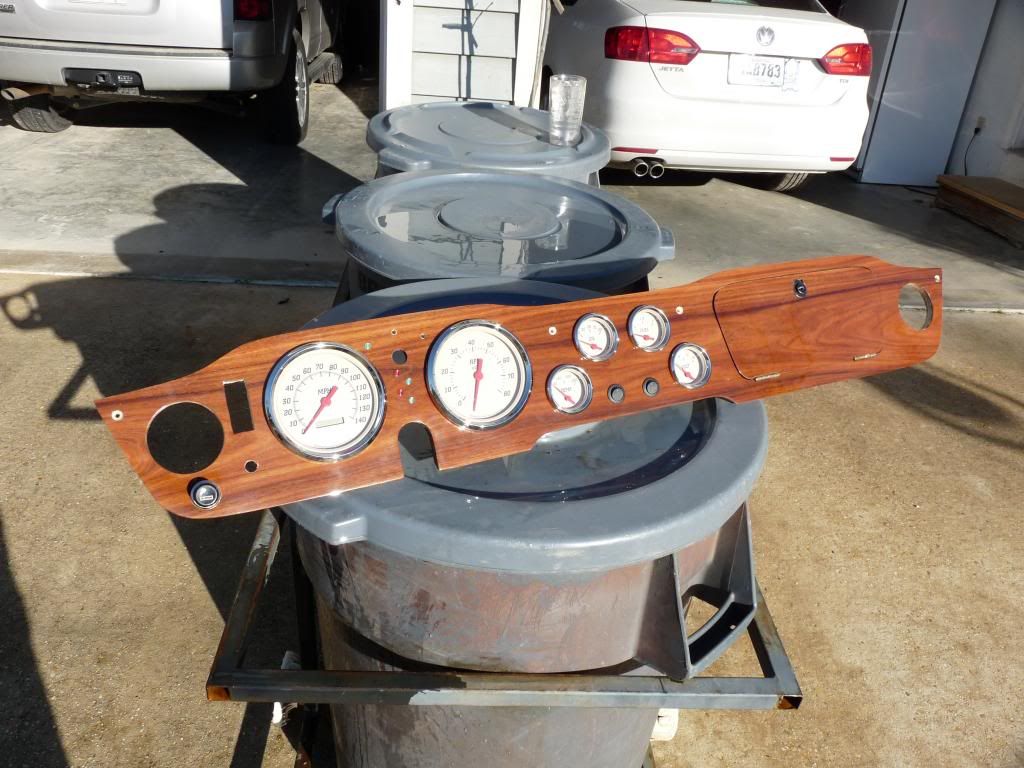
Starting to look like a dash. 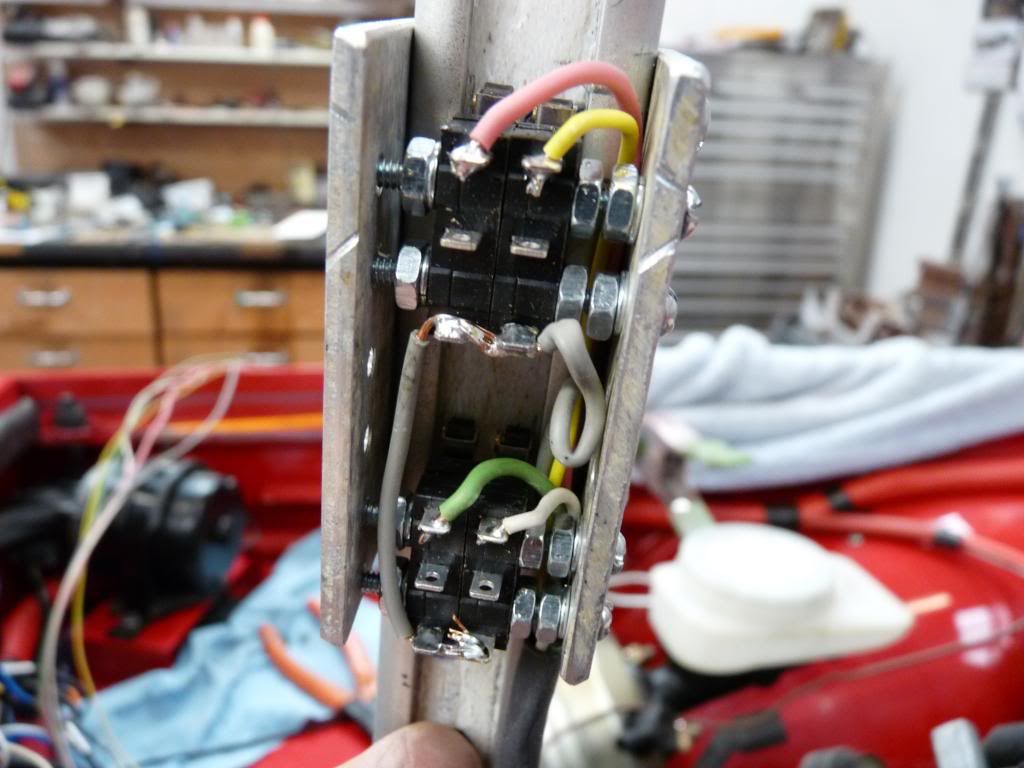
This is the trans. gear indicator. I ran an old boat control cable from the gear selector and made a linear switch to indicate which gear I am in and also gives me a backup light. I have LED's in the dash to indicate the gear. 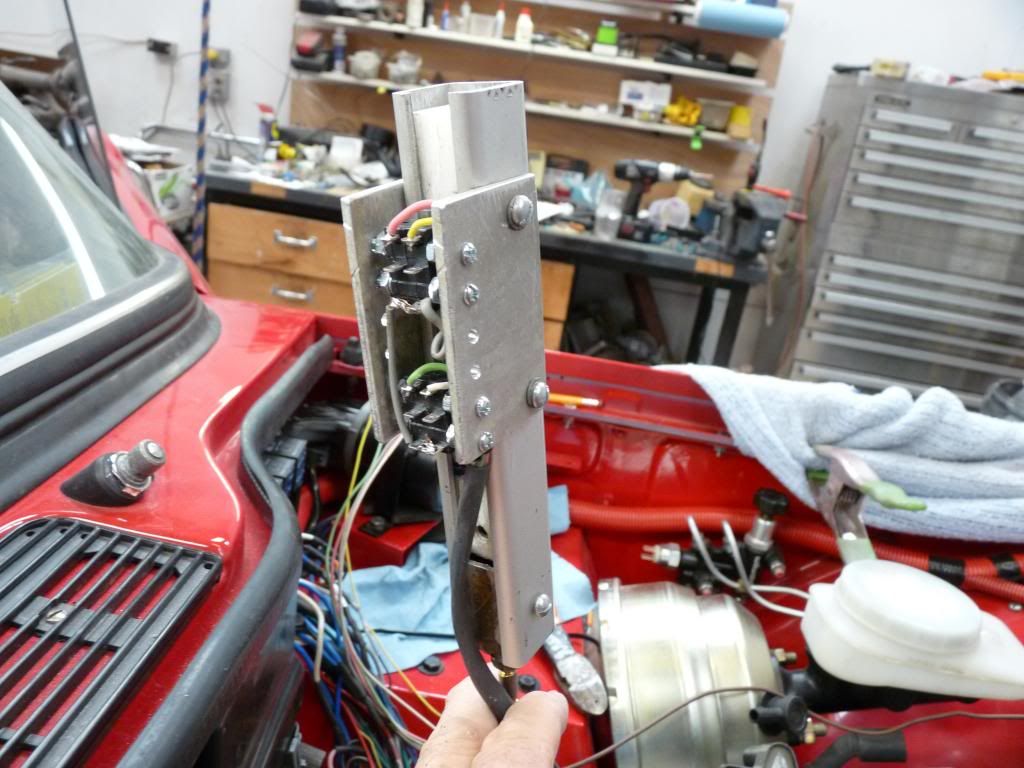
Getting the dash to go into place was a tough job. With vintage aire ducts, wiring and the new gauges which are deeper it was a tight squeeze but it looks good. 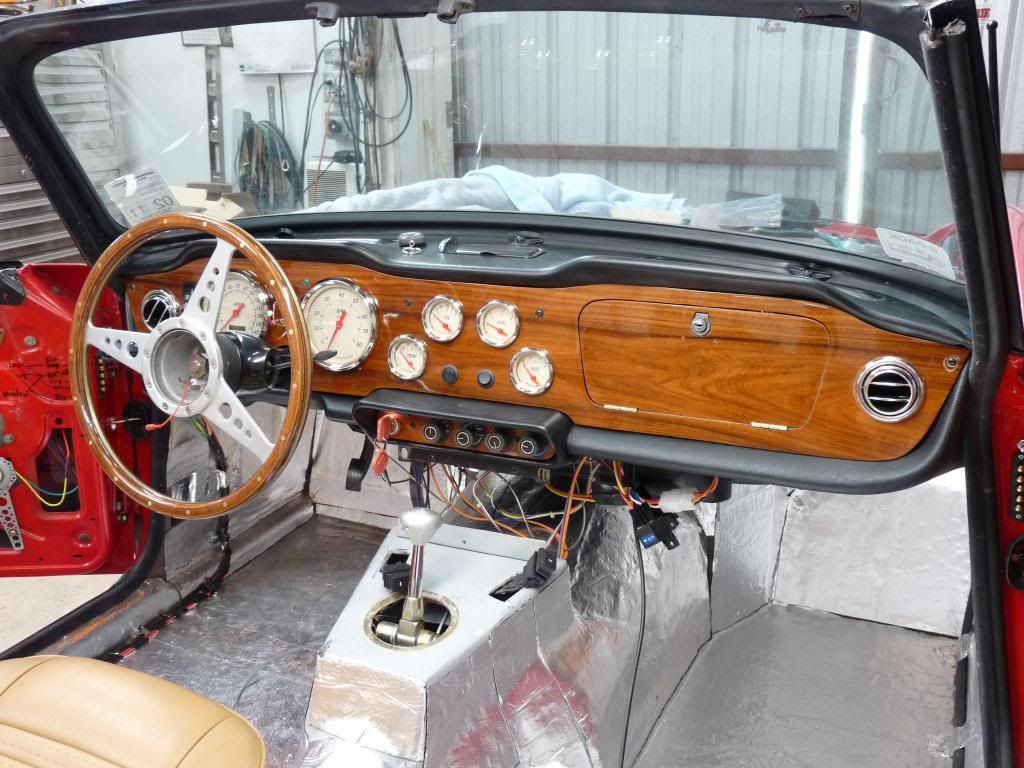
I removed the steering lock and put the ign. sw. next to the AC controls. With the wireless control for the door locks one of the benefits is ign. disable when you hit the lock button. The key turns on but the motor won't crank until you hit the unlock button for the door opener. I installed 2 LED's above the AC controls one for the AC controls which comes on when the lights turn on and one above the ing. sw. that comes on when the door is opened. Will be nice to see the key when it is dark.. 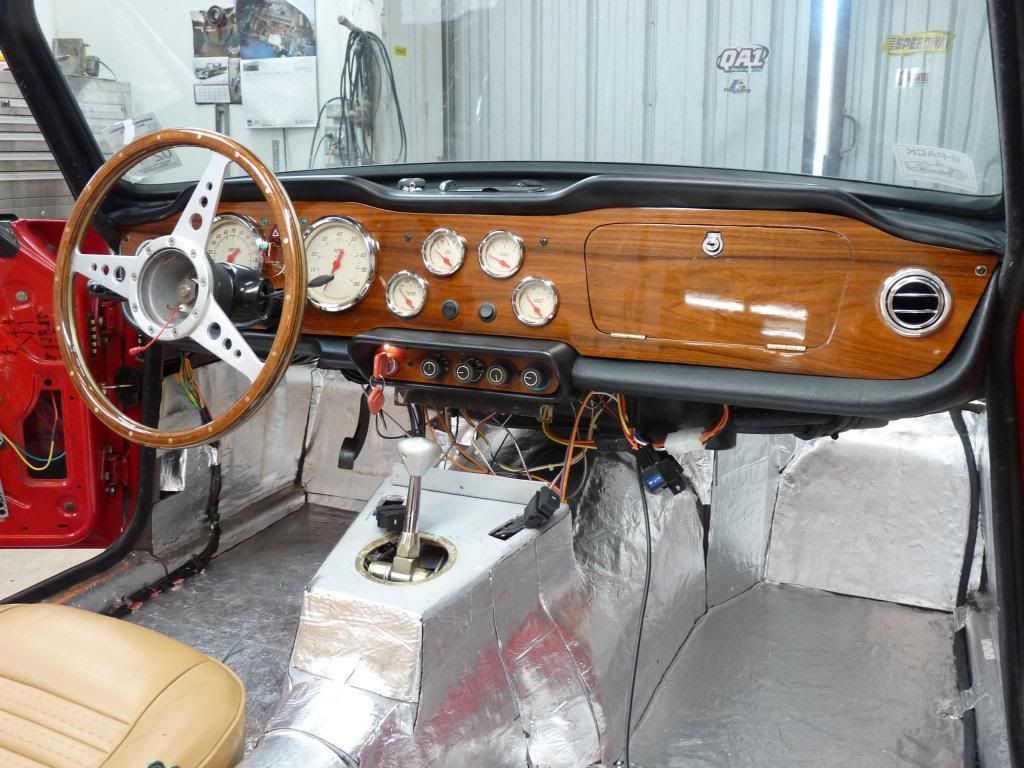
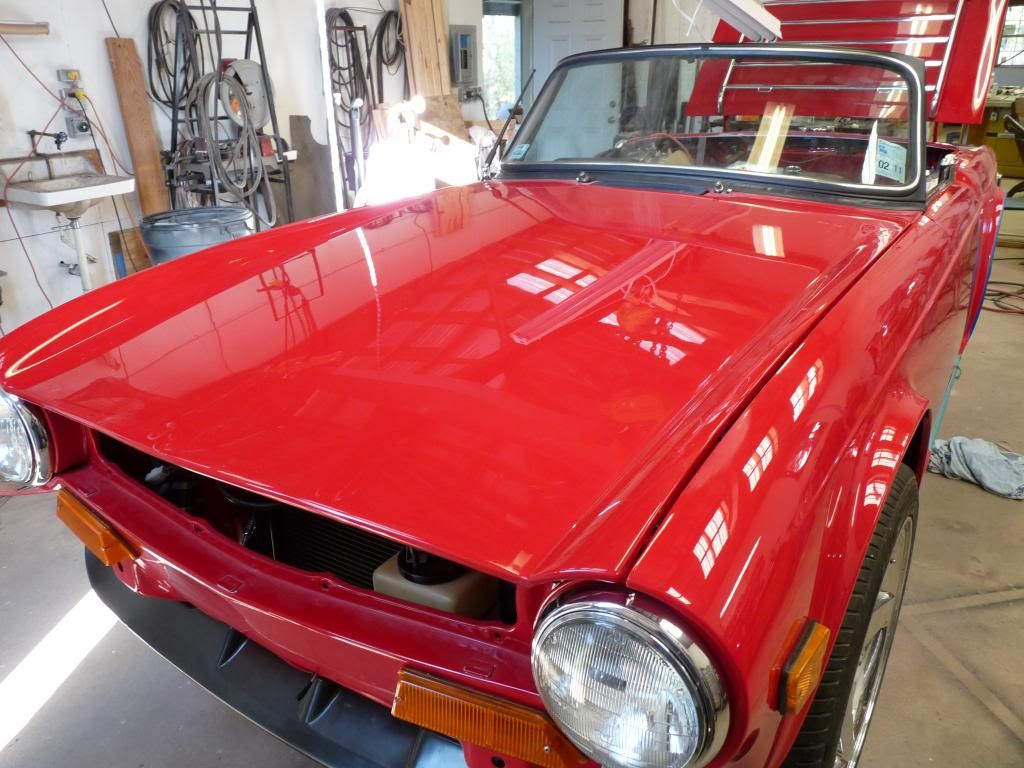
A friend came over and helped me put the hood in place for a trial fit. I needed to see how much room I had between the radiator and the hood for a fresh air duct for the motor intake. This is the first for me to see the hood on the car since before I painted it. It looks good. 
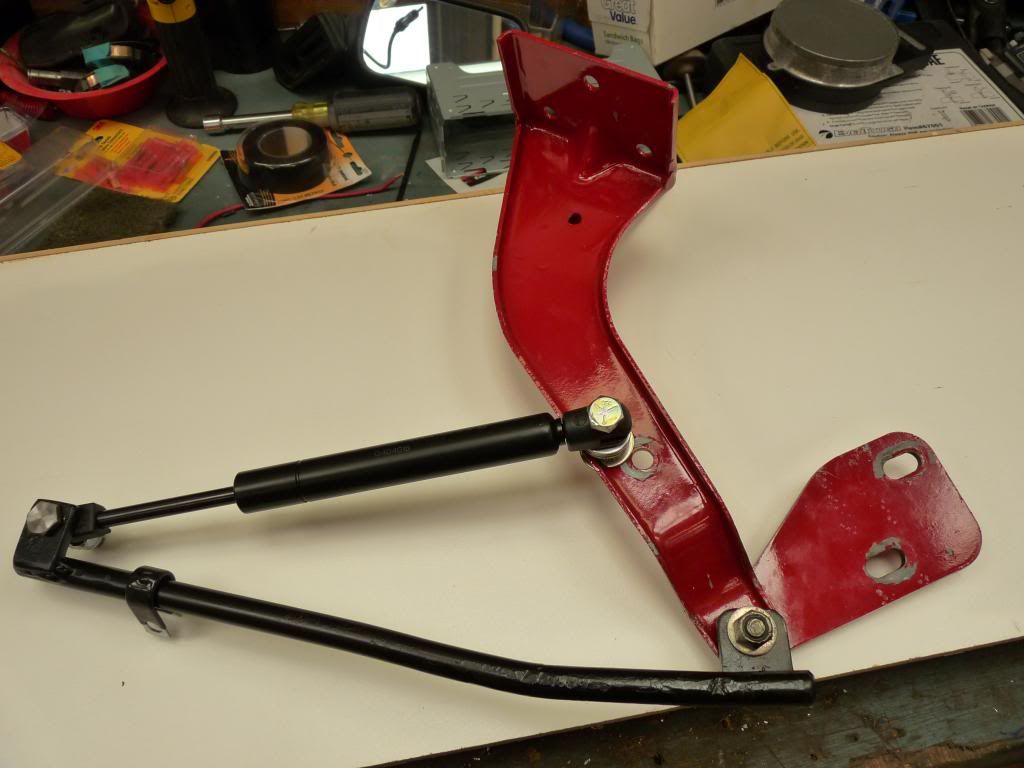
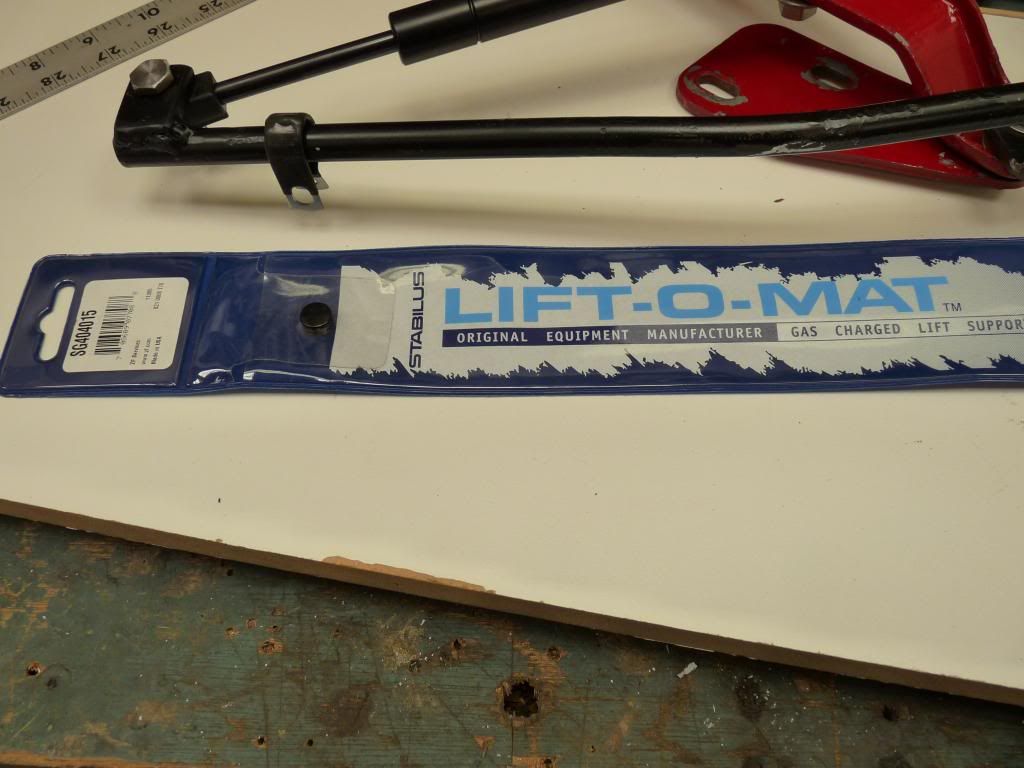
I took the time to take several photo's of the hood support I made. It was my design and I hope it works for you and for me too. Feel free to use the design. I believe the one support will be enough but if it is not I will put one on the other side. The piston came from O'Reily auto parts. If you want any more information contact me. 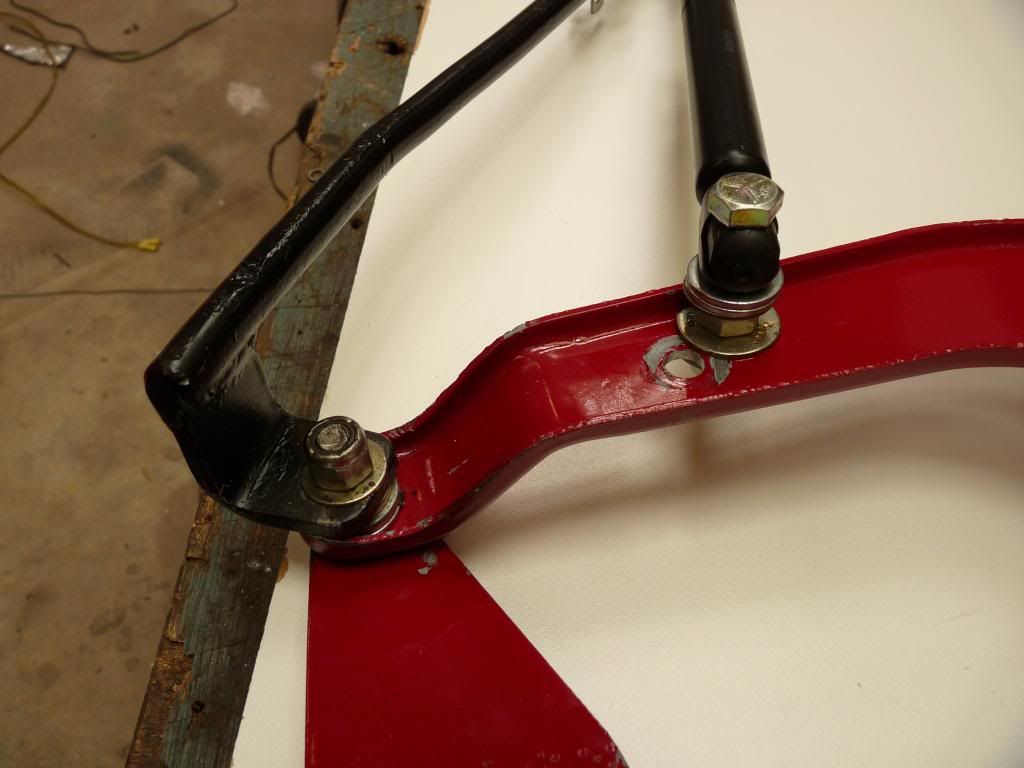
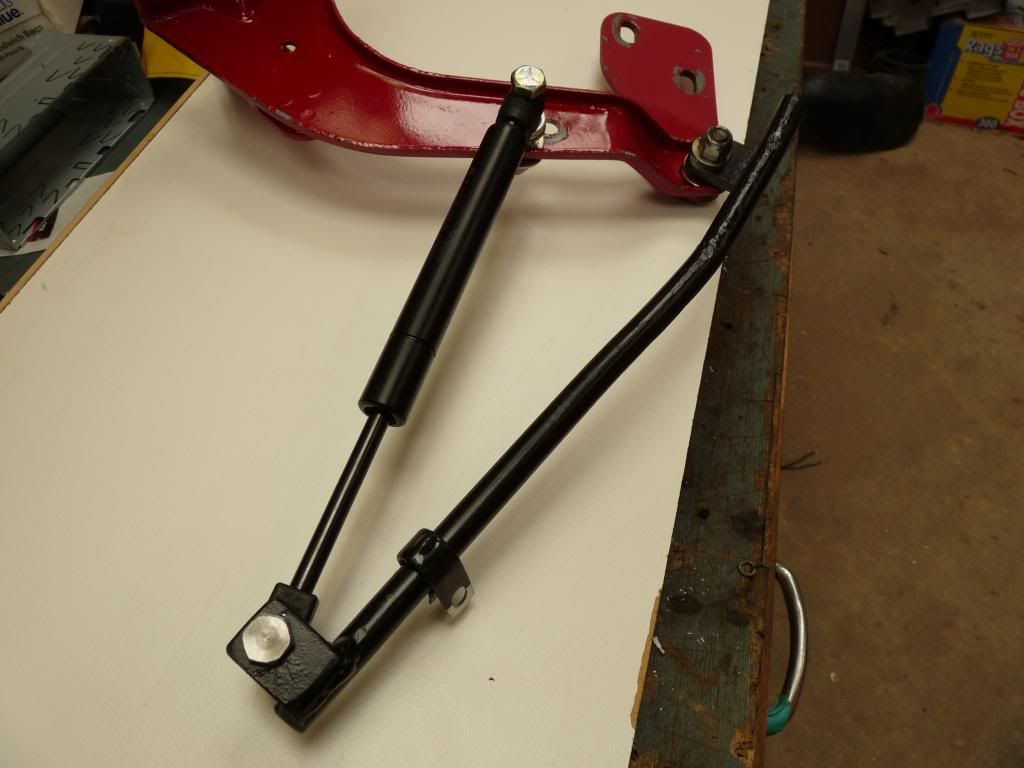
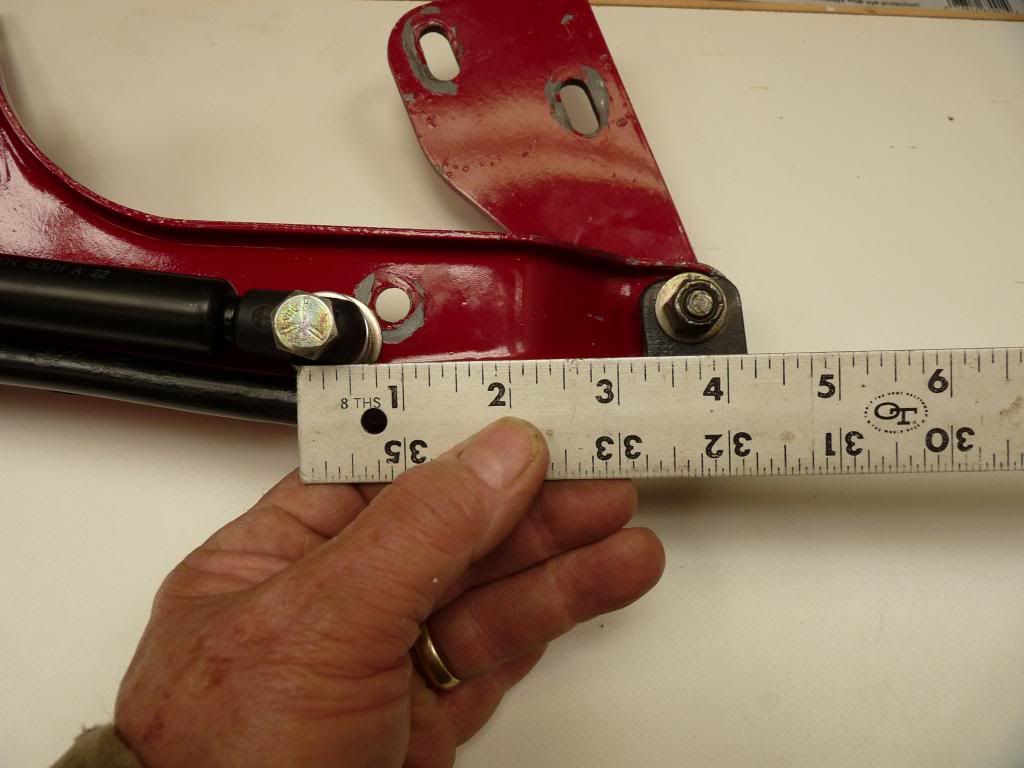
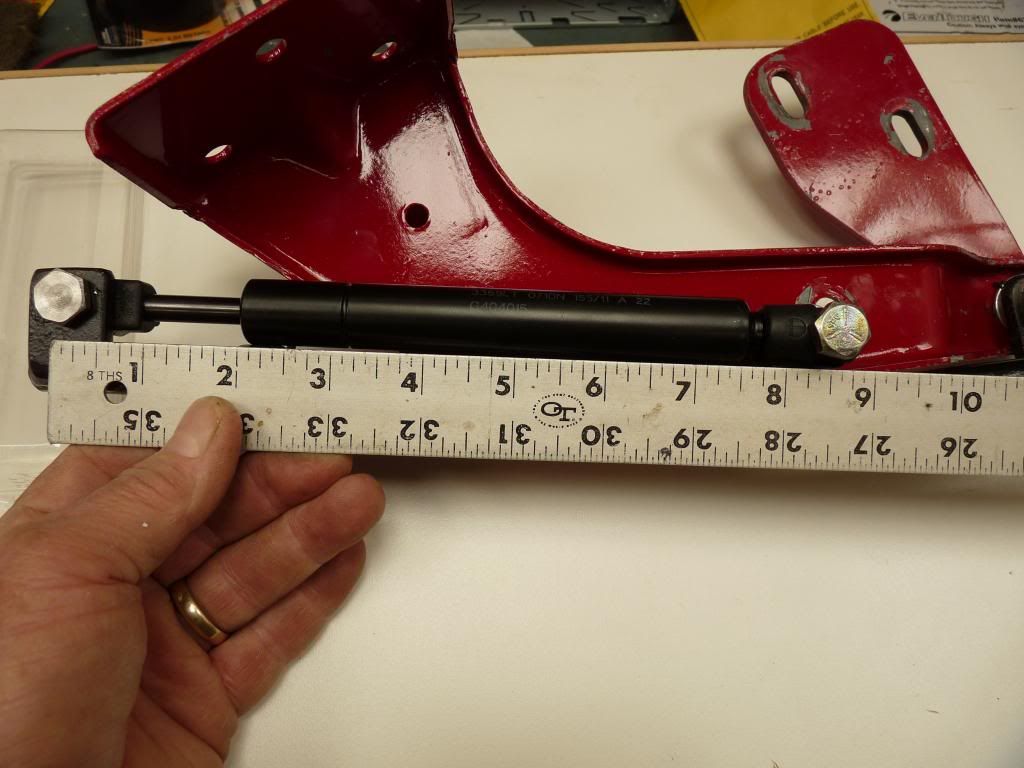
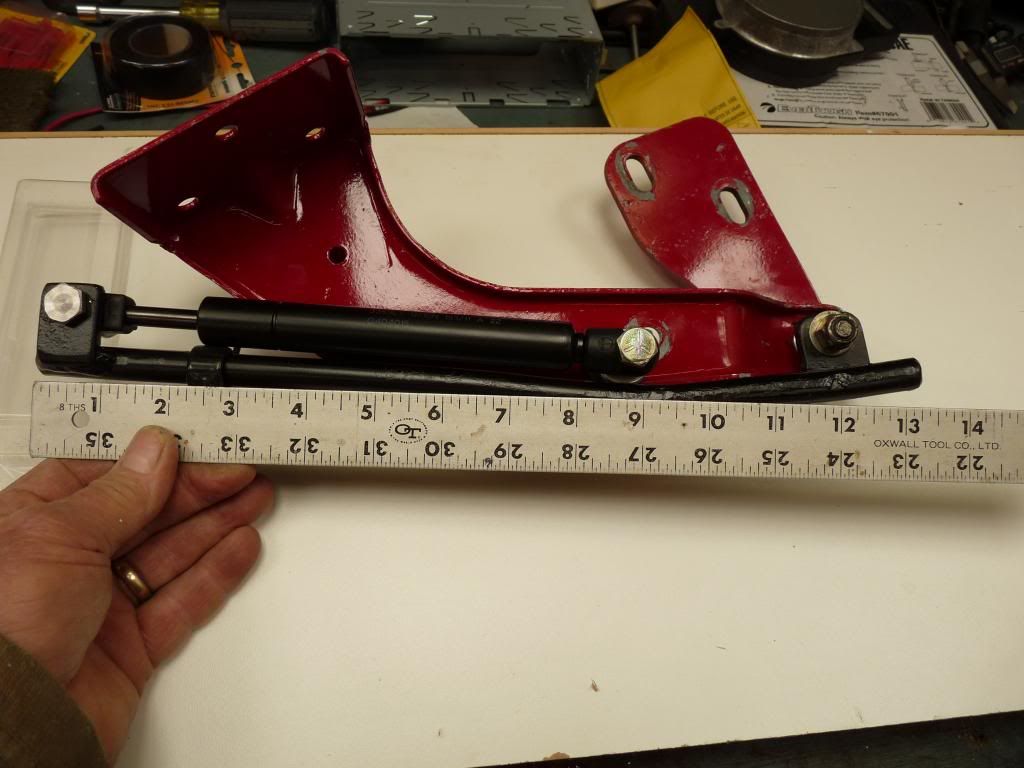
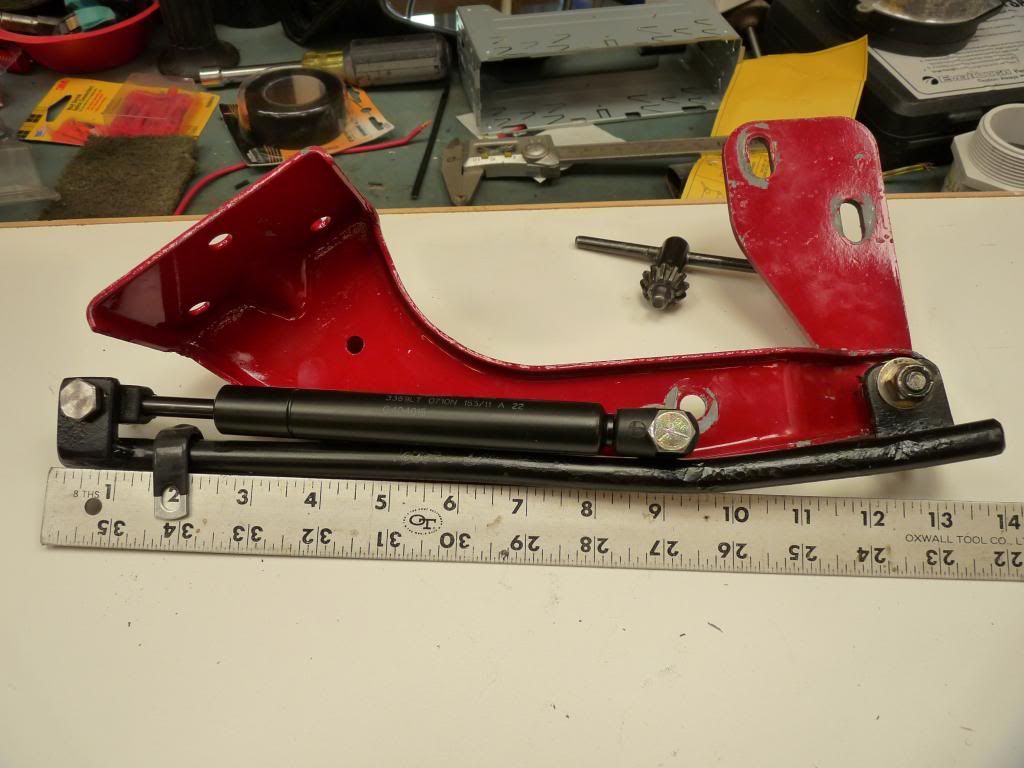
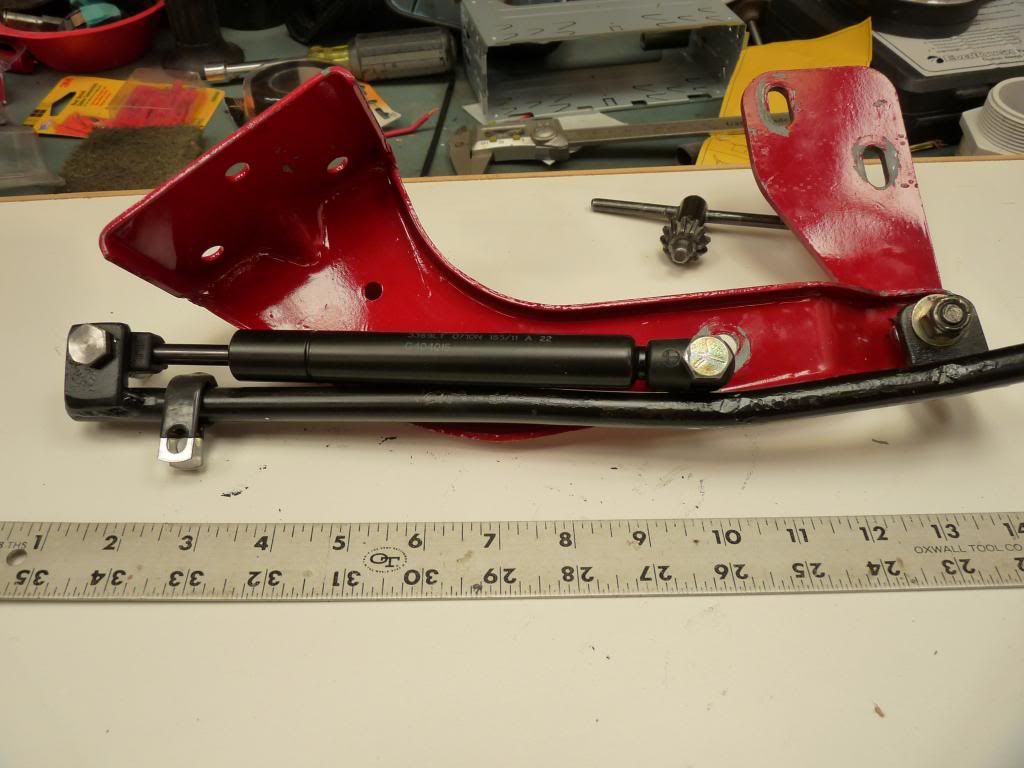
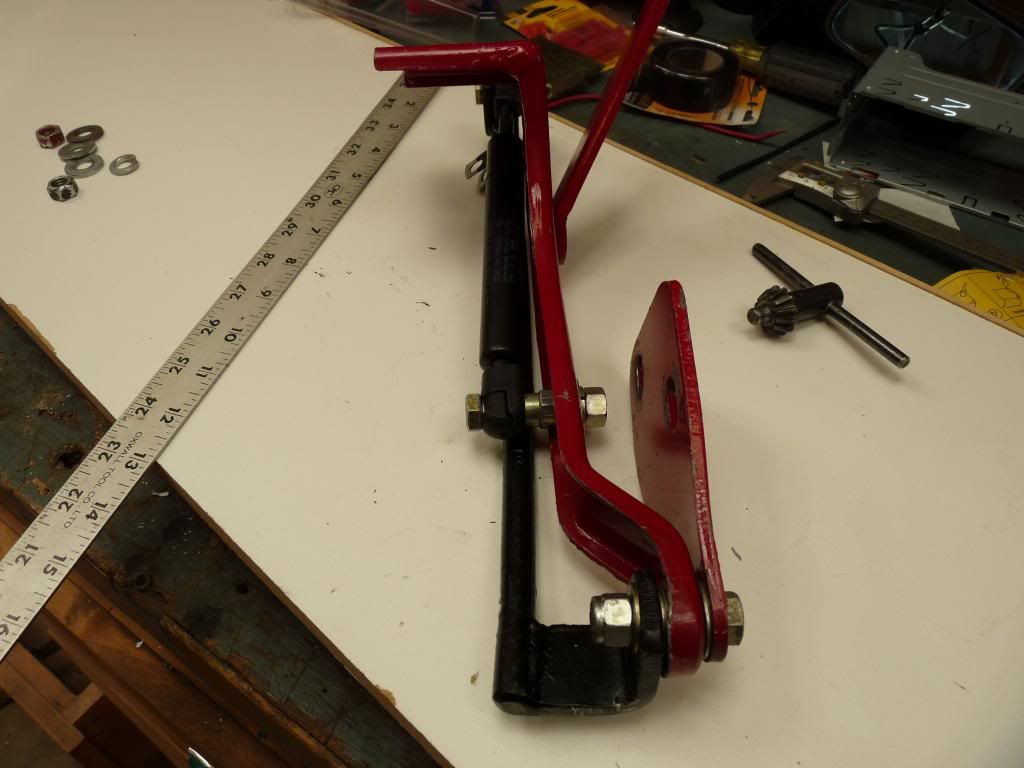

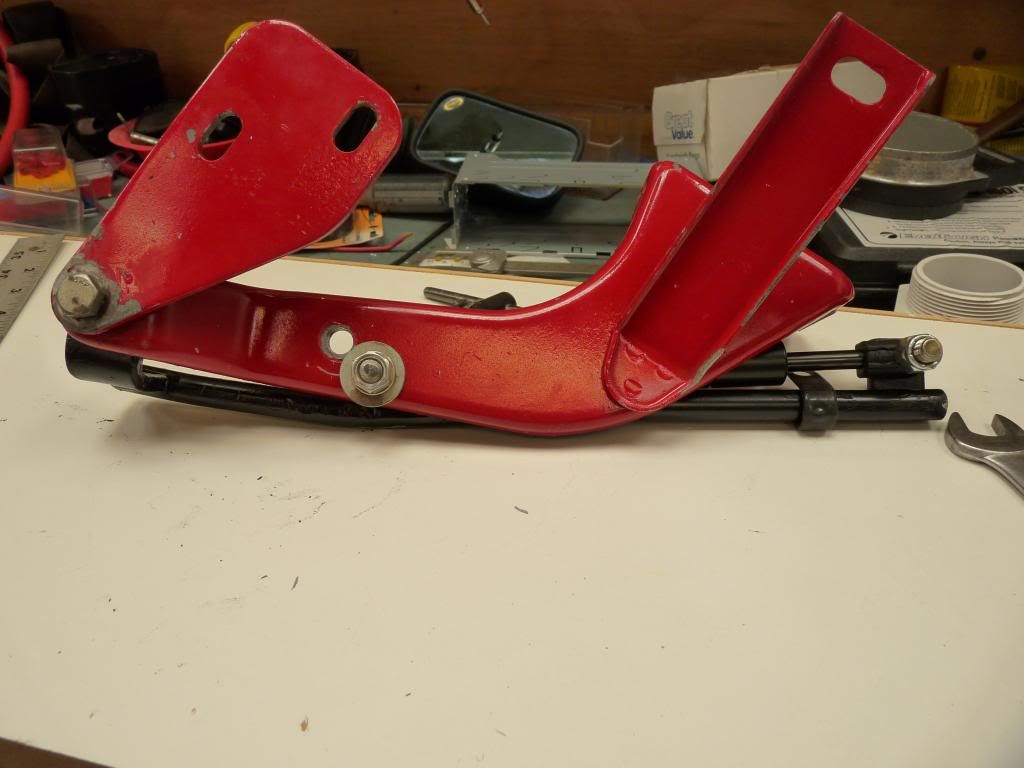

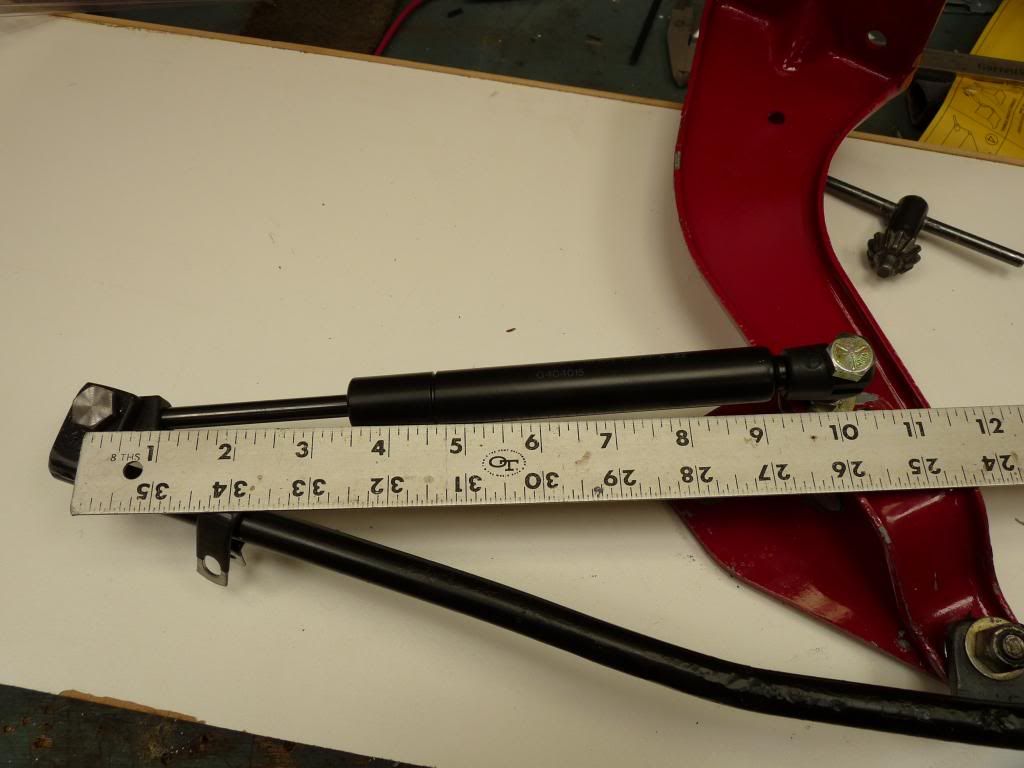
The cable clamp on the left end of the round bar will be mounted to the fender with a 1/4" screw after the hood has been installed and alighned. It doesn't have to have a lot of support. 
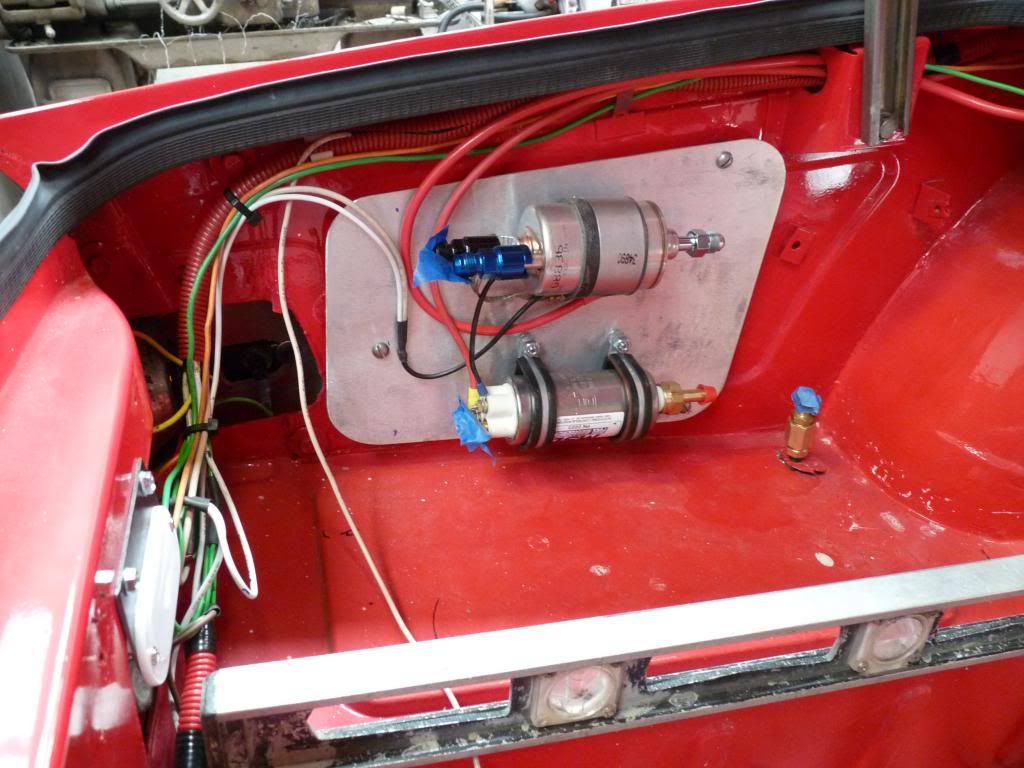
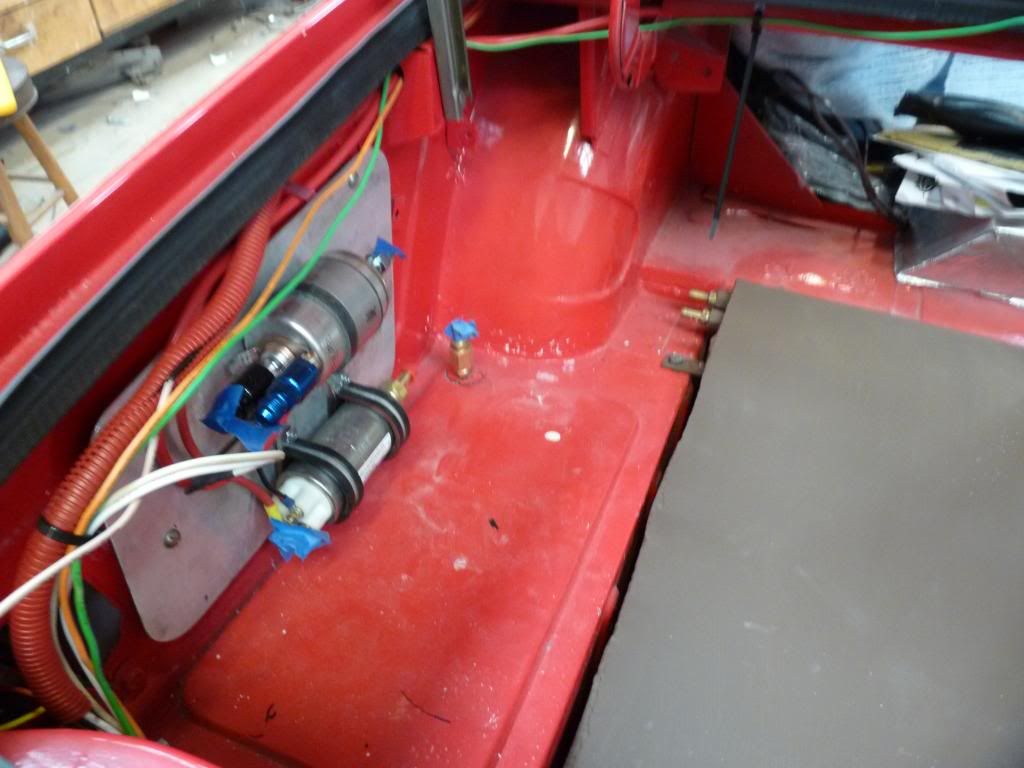
Mounted the fuel pump and filter regulator with return line on an aluminum panel and mounted the panel through 1/2" rubber to try to keep it quite. The fuel line going to the motor comes up just right of the fuel pump. It is hard piped with 3/8" steel brake line all the way to the motor. 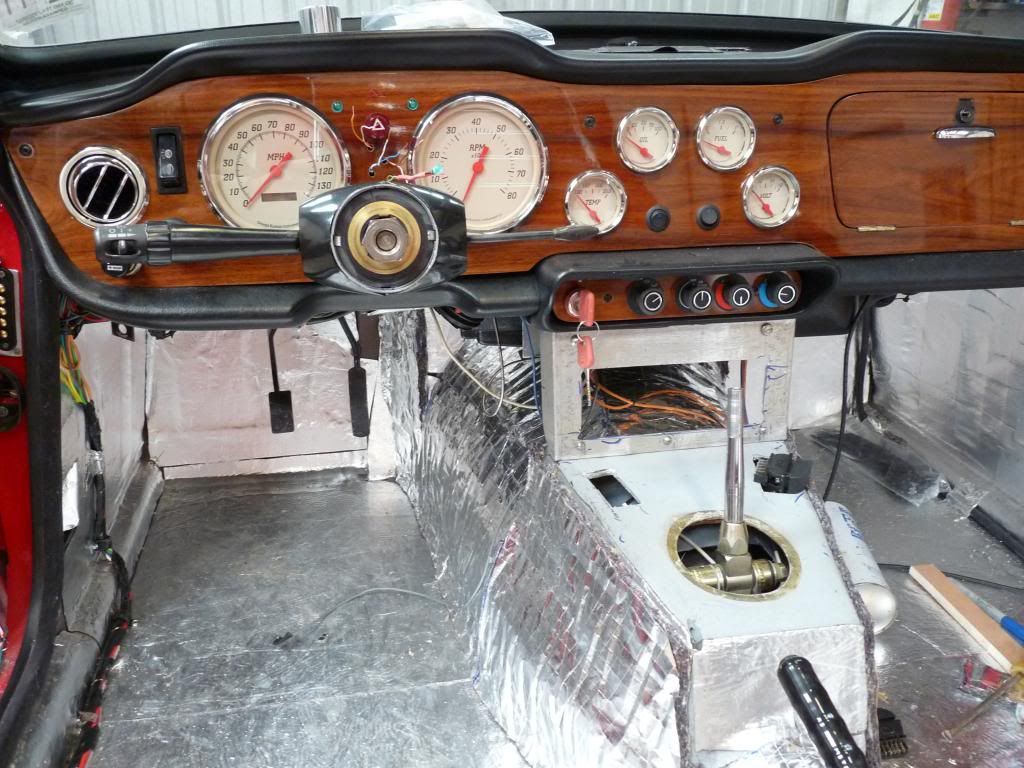
The dash support will also house the radio. I am covering this vertical and horizontal area past the shift lever will be covered with the rosewood. Edited 1 time(s). Last edit at 03/07/2013 07:51PM by Phil Crawford. |
|
dwtr6v8 Don Watson West Virginia (305 posts) Registered: 12/07/2007 07:45AM Main British Car: 1974 TR6 Ford 5.0 HO |
Re: 74 TR6 upgrade
Nice work Phil,
With so many TR6v8 projects with custom frames, it gives me hope for my next project! It can be done! Keep-em-running! |
|
Phil Crawford Philip crawford Bogalusa, La (80 posts) Registered: 02/01/2013 10:38PM Main British Car: 74 TR6 07 4.8L |
Re: 74 TR6 upgrade
Don
Thanks for looking and what is your next project. I Think my next one will be a MG midget with a miata motor and trans. for my daughter who is 13 now. I'm not going to do as much modification on it as I did on the tr6. Tks Phil |
|
|
|
dwtr6v8 Don Watson West Virginia (305 posts) Registered: 12/07/2007 07:45AM Main British Car: 1974 TR6 Ford 5.0 HO |
Re: 74 TR6 upgrade
I have been dreaming about a complete C4 , maybe a GTO, or CTS under a widened TR6 body.Custom sub frame, glass, custom soft top with maybe a little through back look with theTR4 hood bump...maybe 2 bumps.
|
|
Phil Crawford Philip crawford Bogalusa, La (80 posts) Registered: 02/01/2013 10:38PM Main British Car: 74 TR6 07 4.8L |
Re: 74 TR6 upgrade
Don
Sounds llike a plan. I hope it takes place sooner then later. Phil |
|
Phil Crawford Philip crawford Bogalusa, La (80 posts) Registered: 02/01/2013 10:38PM Main British Car: 74 TR6 07 4.8L |
Re: 74 TR6 upgrade
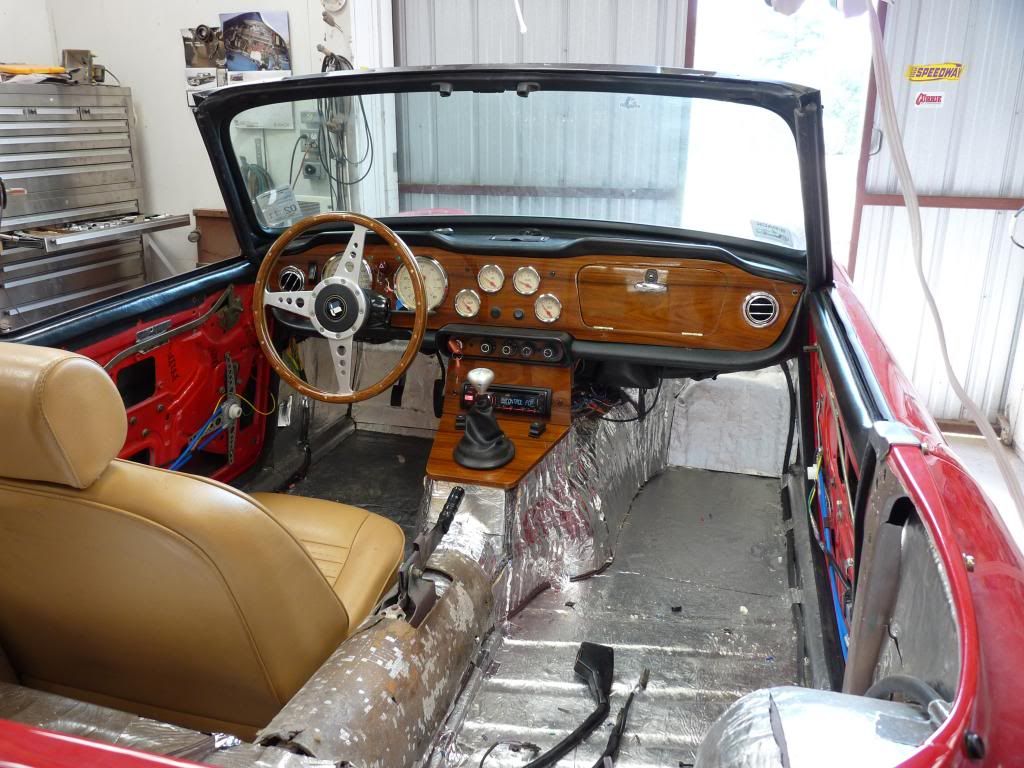
I finally finished the rest of the dash today and it looks good. I have a ring that goes around the base of the shift lever cover will install tomorrow. The electric window controls are in the horizontal part. When I pushed the switches into the hole the wires just pushed it back out. Just not enough room for the heavy wires in that small of area so I had to reconfigure it with 2 relays per window and move it behind the radio. I have just 3 small wires going to the switches now and they didn't pop out this time. 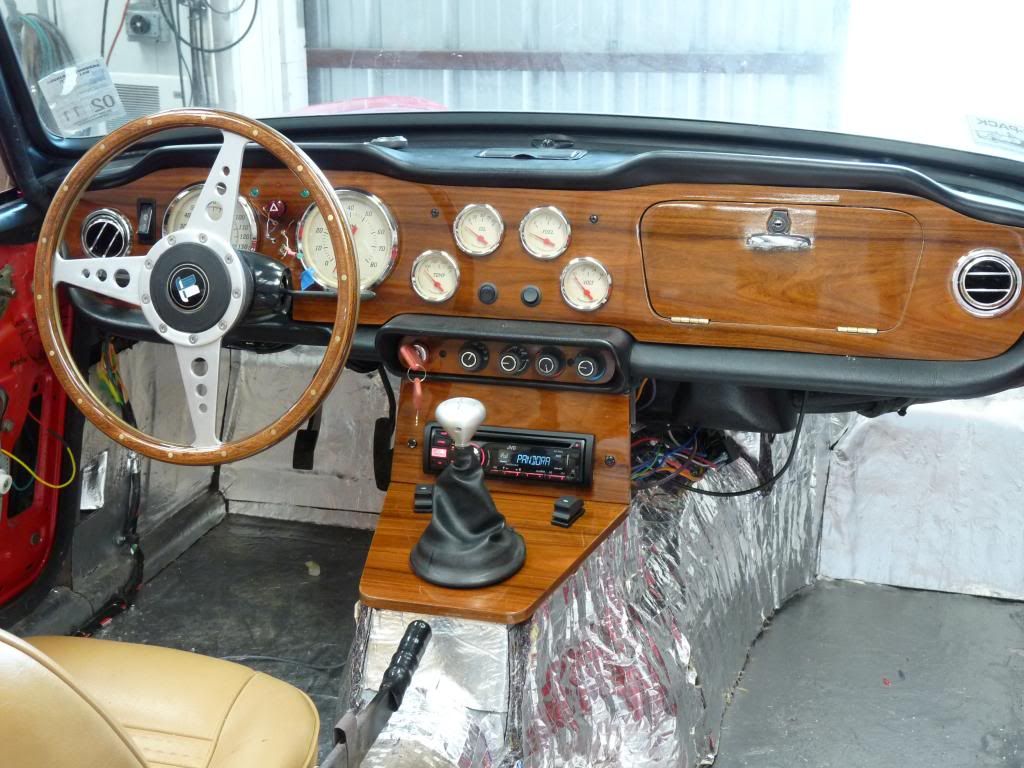
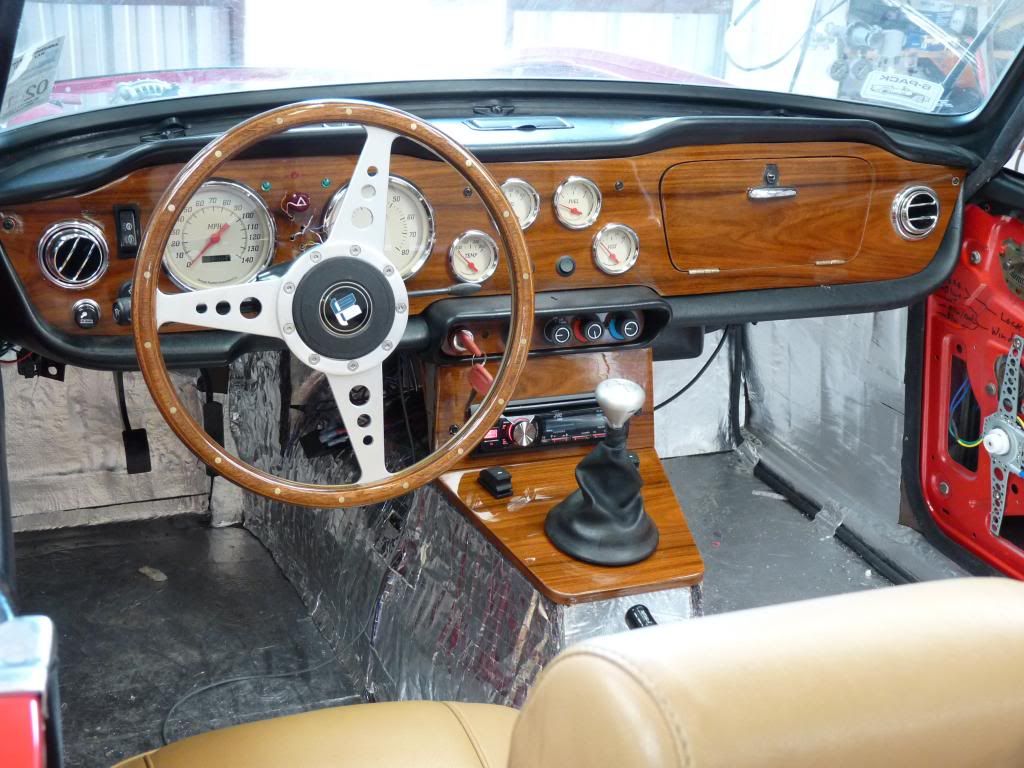
The dash area has been a lot of work but well worth it. When people look inside your car you want to shine and look good. I'm getting closer with just a gas tank and the carpet and seats. |
|
88v8 Ivor Duarte Gloucestershire UK (1041 posts) Registered: 02/11/2010 04:29AM Main British Car: 1974 Land Rover Lightweight V8 |
Re: 74 TR6 upgrade
Those seats look good. What are they from, and will they clear the soft-top mechanism when it's folded?
Ivor |
|
|
|
Phil Crawford Philip crawford Bogalusa, La (80 posts) Registered: 02/01/2013 10:38PM Main British Car: 74 TR6 07 4.8L |
Re: 74 TR6 upgrade
Ivor
These are the tr seats that cam with the car. I may change seats or I might not. Thanks Phil |
|
88v8 Ivor Duarte Gloucestershire UK (1041 posts) Registered: 02/11/2010 04:29AM Main British Car: 1974 Land Rover Lightweight V8 |
Re: 74 TR6 upgrade
Ahhh, yes, that's what the decrepit seats I inherited were supposed to look like!
I changed to Miata, with separate headrests, which for me were more comfortable and, imho, when trimmed to match the interior, don't look out of period. Also, they have the inwards taper to clear the soft-top frame. Getting the seating right can take a lot of time, but is pretty important if one wants to be in the car for any length of time. One unexpected problem with the Miata seats was that the mounts I first used - from TR Trader - lifted the seat an inch or so, and that was enough to put my eyeline near the top of the screen frame. This is a real nuisance in seeing traffic lights and road signs, so I had to revisit the mounts and lower them. That's OK now, but the seat back comes pretty close to the B pillar so it's hard to get the seat belt (inertia reel) around the side of the seat. The only way to know whether seats suit you is to try them for a good long time, so if you buy some new ones I'd run the driver's seat in place for a while before you go to the trouble of recovering them. Be a shame to find you've spent time on a dead-end. Nice that you're approaching the time when things like seats become a consideration. Ivor |
|
Phil Crawford Philip crawford Bogalusa, La (80 posts) Registered: 02/01/2013 10:38PM Main British Car: 74 TR6 07 4.8L |
Re: 74 TR6 upgrade
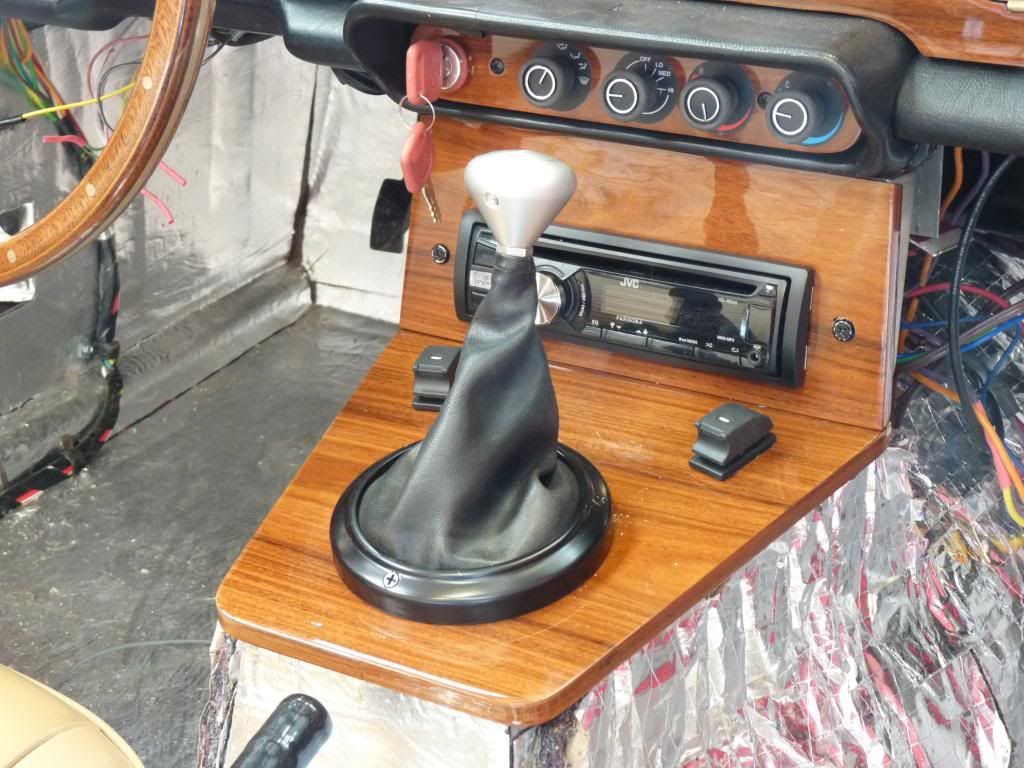
Installed the bezel over the shift lever cover. Made it out of a 4" PVC pipe cap. Didn't have any alum. big enough. May replace it one day before or after it breaks.Ha 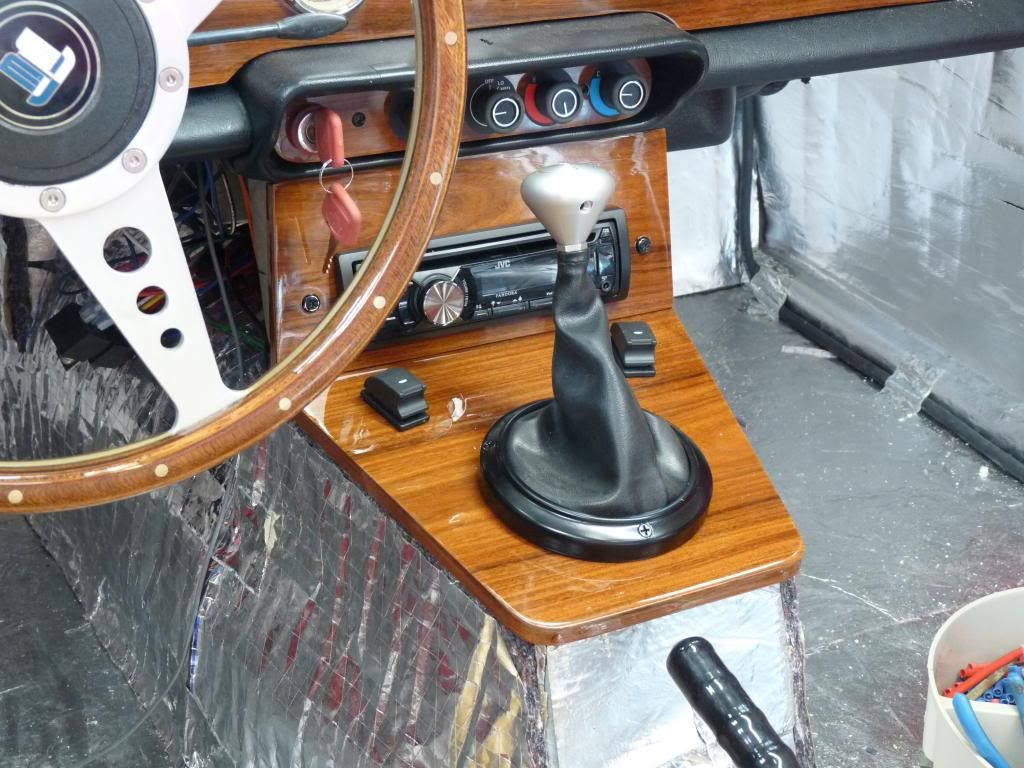 |
|
|
|
Phil Crawford Philip crawford Bogalusa, La (80 posts) Registered: 02/01/2013 10:38PM Main British Car: 74 TR6 07 4.8L |
Re: 74 TR6 upgrade
Thanks Ken it's been fun.
Phil |
|
Phil Crawford Philip crawford Bogalusa, La (80 posts) Registered: 02/01/2013 10:38PM Main British Car: 74 TR6 07 4.8L |
Re: 74 TR6 upgrade
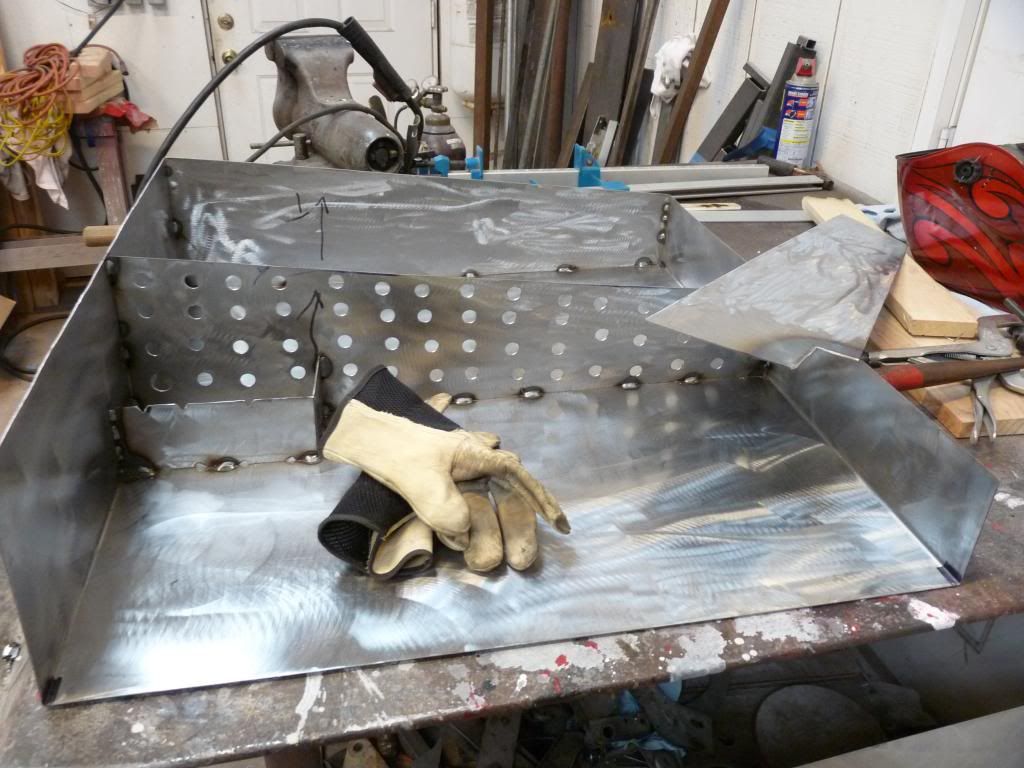
I decided to make my tank out of steel because it was something I could do and cost about $50.00. It was made out of 16 gauge, I wanted 18 gauge but would have to order it so I used the 16 gauge instead. The 18 gauge is about two pounds/sq ft and the 16 gauge is about 2.5 lbs/sq ft. The tank weighs about 40 lbs, heavier than aluminum but about $350.00 cheaper. I welded the tank up with a small acetylene torch with a very fine flame that I borrowed from a friend. It is made to weld sheet metal on car bodies. The tank sits in the tire well. I made the top of the tank level with the ground so there would not have to be a vent in the rear of the tank that wants to spit gas when you really hammer it. There is a baffle front to back with a small basin for the pick up to rest in. 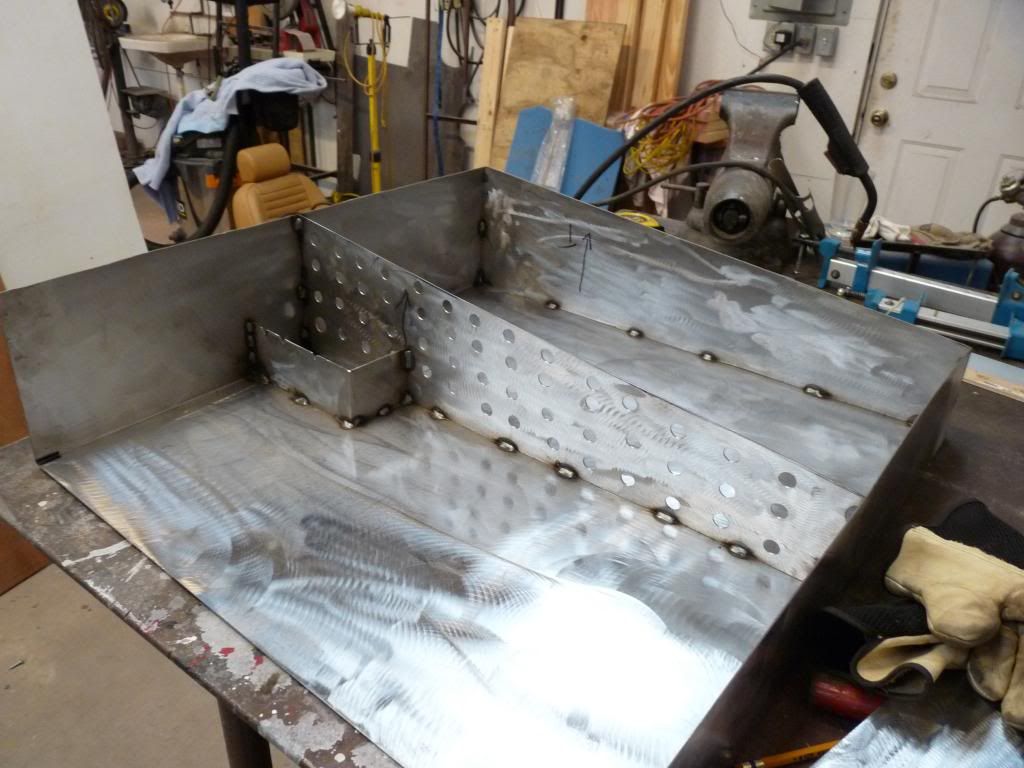
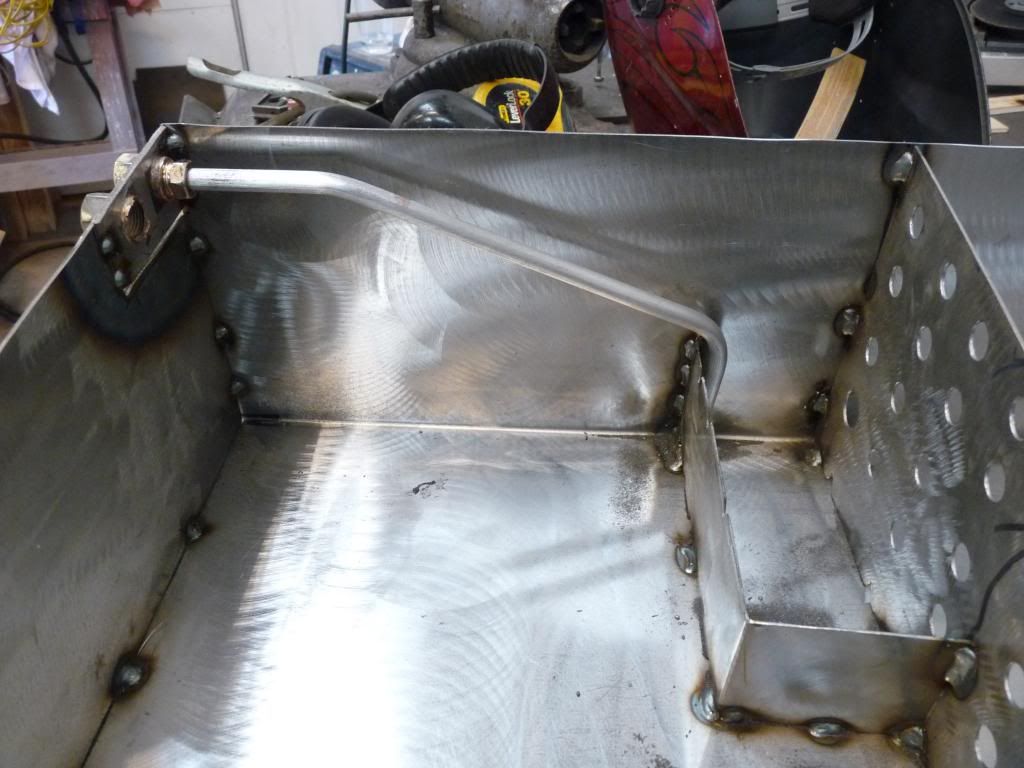
The pickup is 3/8" steel brake line. The fittings are brake line couplings silver soldered in to the tank. The other one is the return line from the filter regulator. If the line should ever be a problem I could unsolder the coupling and do the repair although it would be a royal pain in the but. 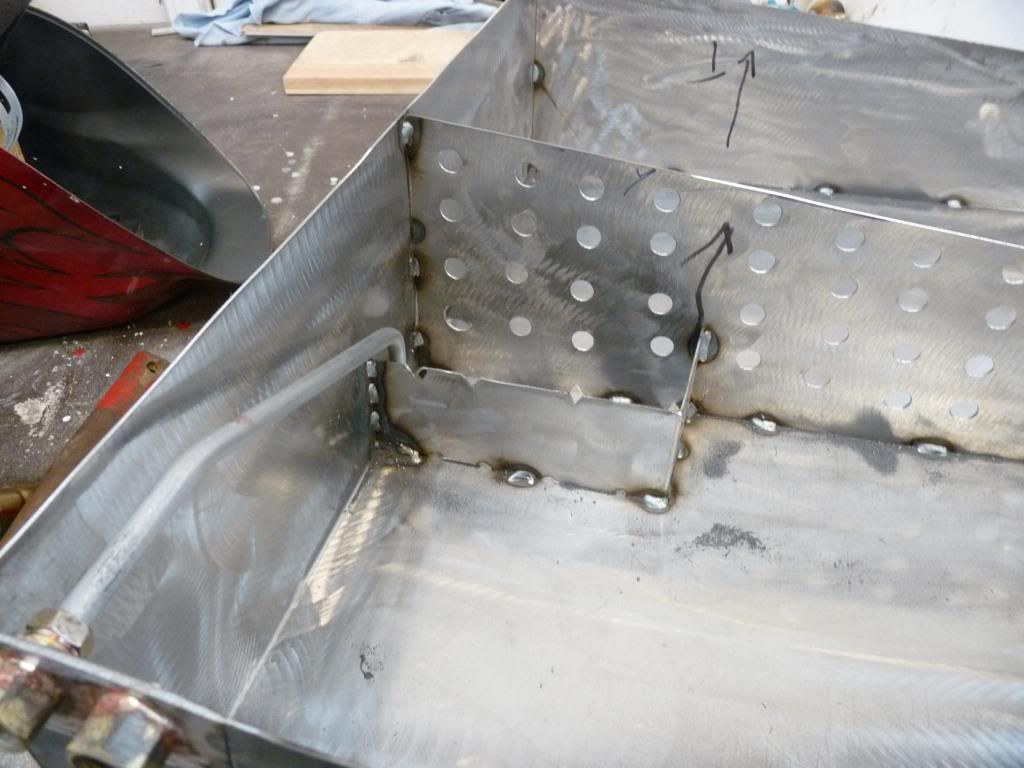
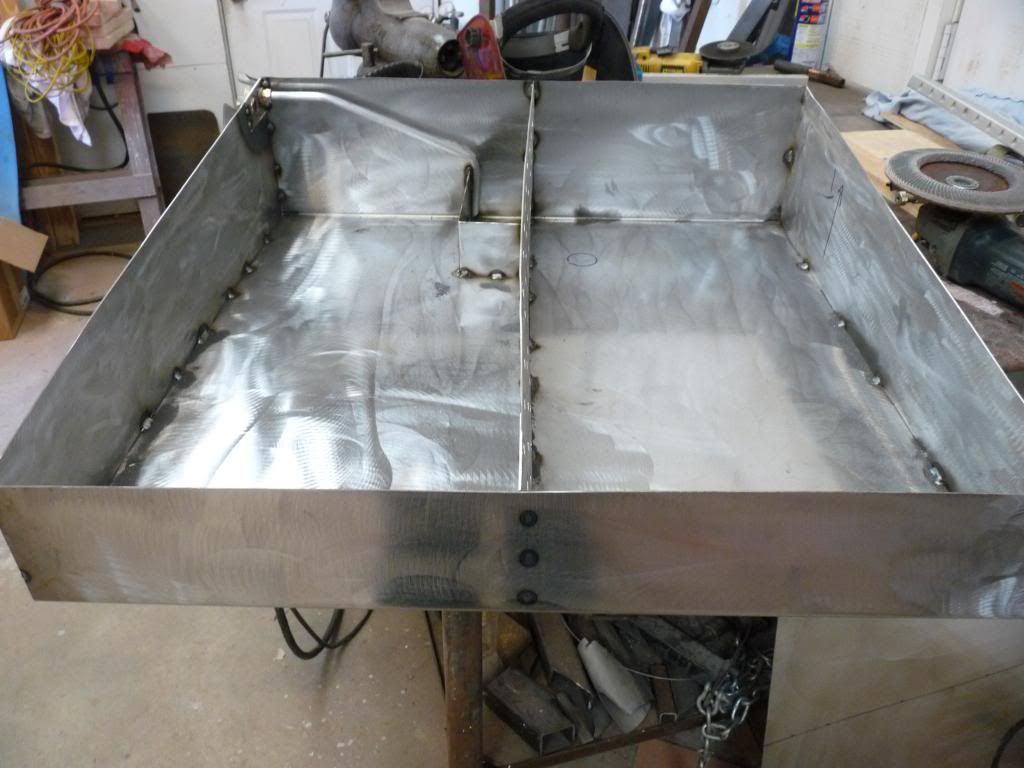
If you look closely you can see the 45 deg cut on the end of the pick up tube. A flat cut would not be the thing to do here and would surely plug itself. I took some close measurements and drilled holes in the top of the tank over the baffle to be welded up later so the baffle would be attached to the top of the tank. 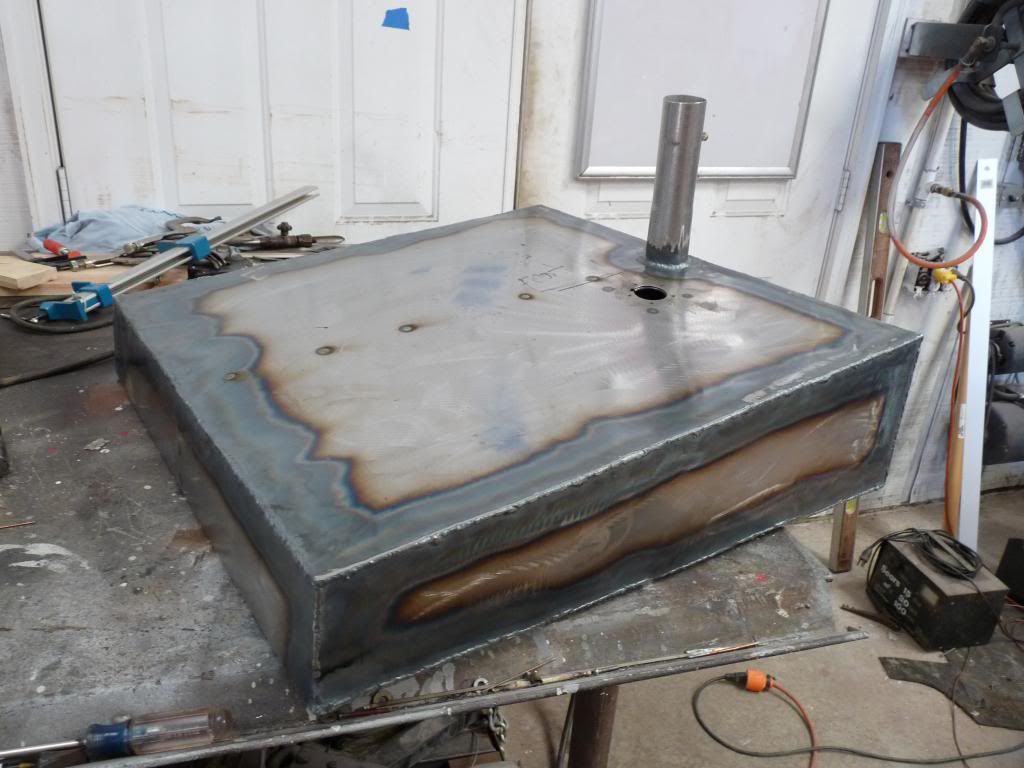
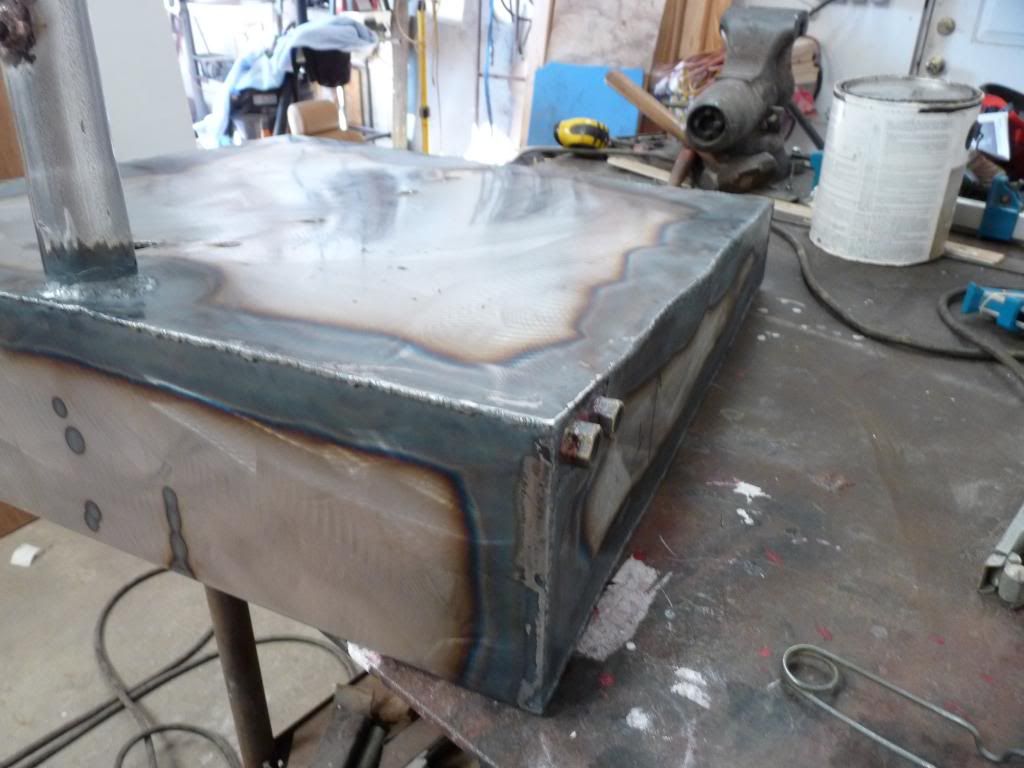
There is some warpage but not enough to be bothersome. The fill neck is made out of 2" exhaust pipe. The vent is up high on the fill neck I don't if you can see it or not. It's a 3/8" barb fitting silver soldered in place. You can also see the fuel gauge sending unit mounting hole and the suction and return lines. I pressure tested the tank and checked for leaks with soapy water. I had one leak just below the suction line ended up silver soldering the leak because the solder had covered the weld and could no longer weld in the area of the solder. 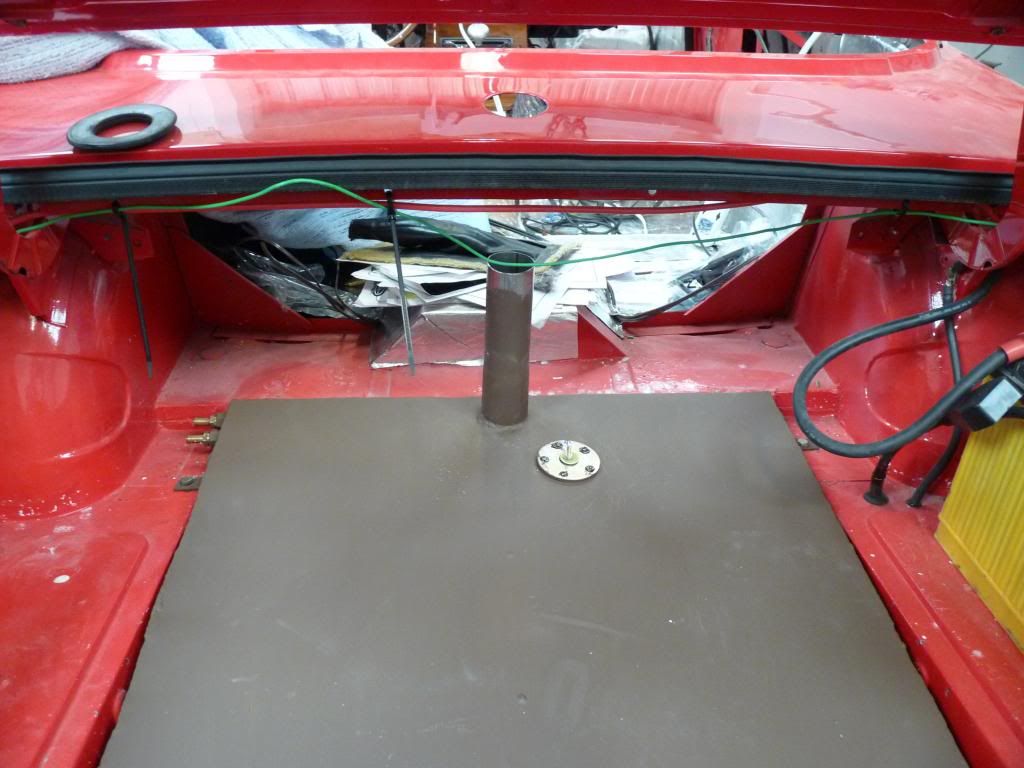
I put the tank in place and tacked the mounting tabs in place then took the tank out welded the tabs up and painted with oil base primer and put the tank back in place. I am pleased with the out come except for the weight. If I had a tig machine I would have used aluminum. Next time maybe.. 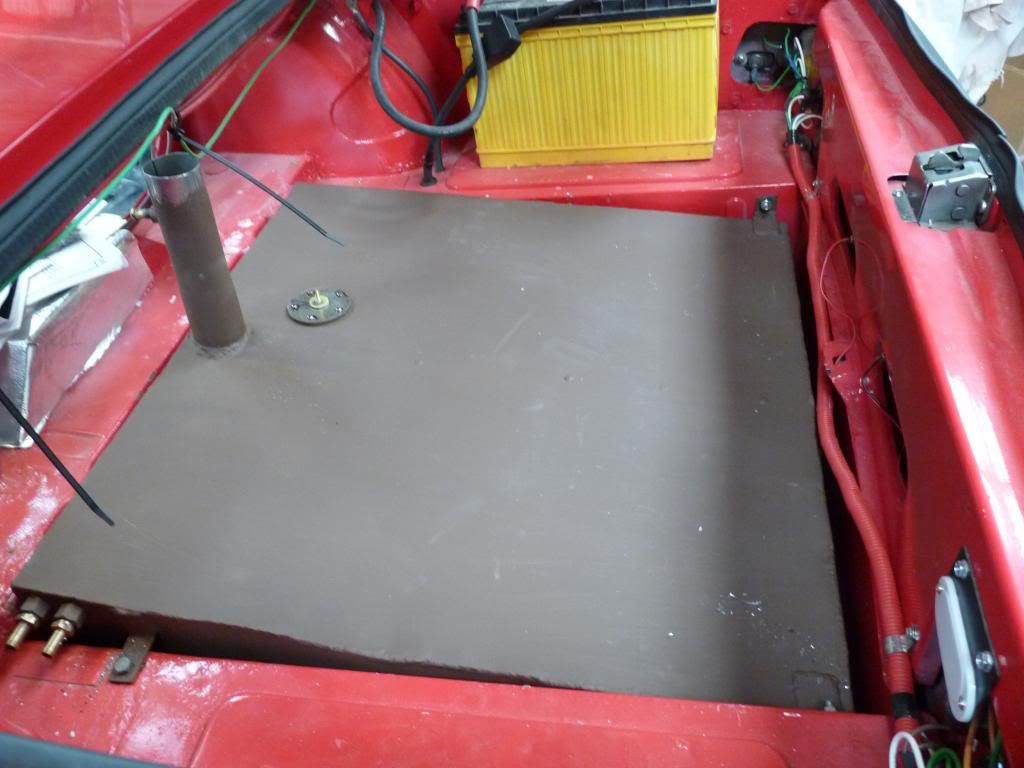
 |
|
Phil Crawford Philip crawford Bogalusa, La (80 posts) Registered: 02/01/2013 10:38PM Main British Car: 74 TR6 07 4.8L |
Re: 74 TR6 upgrade

Made a bracket for the over flow tank and painted the tank. It is getting tight under the hood. 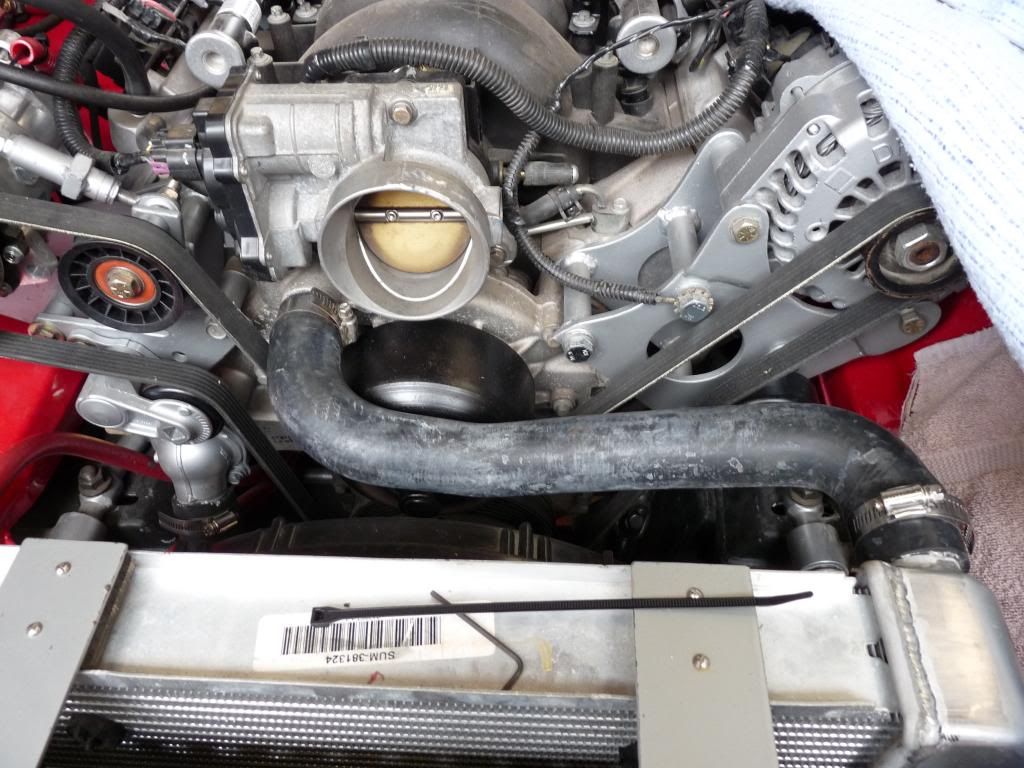
Went grazing around the radiator hose rack at napa and found both of the hoses I needed even though I had to cut both of them to work they are a standard hose I can get anywhere. 
This is the bottom hose. 
It seems the only space left under the hood is in front of the radiator so this is the home of the washer tank. |
|
|
|
Phil Crawford Philip crawford Bogalusa, La (80 posts) Registered: 02/01/2013 10:38PM Main British Car: 74 TR6 07 4.8L |
Re: 74 TR6 upgrade
Ivor
Never gave corrosion from ethanol on a steel tank a second thought. Should I have? Phil |
Sorry, only registered users may post in this forum.
British V8 Home Page
Photo Gallery
Web Forum
Annual Meetings
Contact Info
Site Map
British Race Car

© 2019 British V8™ All rights reserved. Website & graphic design by:
Curtis Jacobson.
BritishV8 Forum is hosted by
SiteWelder LLC,
and is powered by a
Phorum engine.