

Triumph Sports Cars
engine swaps and other performance upgrades, plus "factory" V8s (Stag and TR8)
|
epeppy Ed Peppard Woodlawn, TN (61 posts) Registered: 08/04/2008 08:35PM Main British Car: 1975 TR6 Ford 302 |
Re: Finally Coming Together
Took the tail light assemblies off the shelf to re-install and hadn't realized how bad the lenses looked. They were very dull and had lots of small scratches. I thought I'd just buy some new ones. Also didn't realize Roadster Factory sells one side for $450. Even at $250 on ebay was a lot more than I wanted to spend. So after a little research, got out the 1000 and 2000 grit wet/dry sandpaper and went to work. After a pretty short time sanding and some buffing I was happy to see that they looked good enough to install. Well worth the small time invested vs replacing. Don't throw those old lenses out, they can be brought back to life. Wish I had thought to take a "before" picture. I guess I really didn't think they were going turn out as good as they did.
|
|
epeppy Ed Peppard Woodlawn, TN (61 posts) Registered: 08/04/2008 08:35PM Main British Car: 1975 TR6 Ford 302 |
Re: Finally Coming Together
Am starting to wire the dash components. Had decided to use an aftermarket windshield wiper switch. It has two speed capability and push to wash. Thought it wouldn't be much trouble to wire it up. Got the wiper motor to run on low and high speed but was unable to get the motor to drive the wipers to the "park" position at the bottom of the windshield. After some head scratching and looking at some wiring diagrams, I realized that the aftermarket switch did not have a set of contacts that would allow the motor to continue to drive in the "off" position to get the wipers to "park". Was able to add a relay to the circuit with a normally closed set of contacts that would provide the power to the motor when the wiper switch was "off".
When the switch is in the off position "B" is connected to "5". This provides power to the motor and the relay allows R/LG to be connected to N/LG so the motor drives until the limit switch stops the motor at the park position. Hopefully this will help someone who wants to get away from the original rocker switch. Mine broke a long time ago and I installed an Allen-Bradley switch and kept adding contact blocks until it worked right. Worked ok but didn't look too good. |

|
|
rficalora Rob Ficalora Willis, TX (2764 posts) Registered: 10/24/2007 02:46PM Main British Car: '76 MGB w/CB front, Sebring rear, early metal dash Ford 302 |
Re: Finally Coming Together
Always feels good when you finally connect the dots doesn't it?
I'm probably half crazy, but I actually enjoyed wiring my car. |
|
epeppy Ed Peppard Woodlawn, TN (61 posts) Registered: 08/04/2008 08:35PM Main British Car: 1975 TR6 Ford 302 |
Re: Finally Coming Together
Started cutting the dash. Cut the tach, speedometer and gauge holes first. Plan on using leds for turn signal indicators, high beam, alt warning light, and emergency flasher. That's the 3/8" diameter holes. There will be 4 toggle switches below the gauges. The holes for the aftermarket wiper and headlight switches are also 3/8" diameter.
Cut the rest of the gauge openings and the passenger side vent opening. Used an 1/8" dia end mill to cut these. Switched to a 1/4" end mill and cut the recesses for the tach, speedometer, and gauges. Used the 1/4" end mill to also cut the outside perimeter. All that's left is the glove box door. Was planning on using some 1/32" diameter bits so the door gap would be as small as possible... but the bits have a shank length of only 3/4" and the dash is 1/2" thick. I made a bunch of test cuts and somehow thought the dash was only 3/8" thick. The bit just barely made it through the 3/8" test pieces. I need at least 3/8" of bit length to allow the collet adapter and router collet to grip the bit. So... I ordered a 1/16" diameter bit that has a shank length of 1 1/2". Hopefully it will be in soon and I can finish the dash. Ed |
|
BlownMGB-V8 Jim Blackwood 9406 Gunpowder Rd., Florence, KY 41042 (6590 posts) Registered: 10/23/2007 12:59PM Main British Car: 1971 MGB Blown,Injected,Intercooled Buick 340/AA80E/JagIRS |
Re: Finally Coming Together
Ed, if you dial it in closely couldn't you cut it from the front and then re-cut from the back? Just have to have a couple of accurate reference holes, which you already have.
Jim |
|
|
|
epeppy Ed Peppard Woodlawn, TN (61 posts) Registered: 08/04/2008 08:35PM Main British Car: 1975 TR6 Ford 302 |
Re: Finally Coming Together
Thanks Rob. You need to build one of these. You'll love it.
Yes Jim, I thought about doing that. Right now, I've got the x-axis and the y-axis zeroed in the center of the drivers side vent opening. I could cut the face as it sits now, flip the part with the same zero position and mirror the part in the drawing to re-generate the g-code to cut the backside. Like you said, I might have to change the zero position to one of the smaller holes so I can get the part zeroed accurately when flipped. I still might do this if this new bit I've got coming leaves too big a gap. I'll make a few test cuts with the new bit and decide. The gap on the original dash was about a 1/16", was just kind of hoping to improve on that. We'll see. Thanks for the great suggestion of using the smaller holes. I would have struggled getting the larger vent opening zeroed in. Ed |
|
danmas Dan Masters Alcoa, Tennessee (578 posts) Registered: 10/28/2007 12:11AM Main British Car: 1974 MGBGT Ford 302 |
Re: Finally Coming Together
Ed,
Great job on the dash - I envy your tools. Here's a picture of the dash I made for a TR6 out of a 1/2" solid piece of oak. I cut the gauge openings using an adjustable circle cutter on a drill press. The glove box was cut using a scroll saw. To get the blade started, I drilled a small hole where the hinges would go so they wouldn't show in the finished job. Cutting that opening was nerve racking, as I knew there was no room for error. The edge of the dash was beveled with a table router. Did you make dimensioned drawings of the dash (I'm sure you must have to cut it on CNC machinery)? Would you be willing to make the drawings available to others? For a fee, of course. 
Here's a picture of the dash installed. 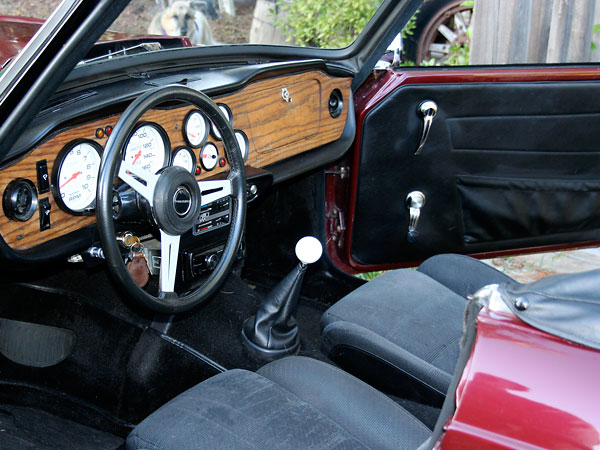 |
|
epeppy Ed Peppard Woodlawn, TN (61 posts) Registered: 08/04/2008 08:35PM Main British Car: 1975 TR6 Ford 302 |
Re: Finally Coming Together
Dan,
That dash looks great. You did a great job cutting the glove box opening. I'm pretty sure mine would have looked terrible if I used a scroll saw. I do have an AutoCad drawing of the dash that I used to generate the g code for the CNC. It's drawn full scale so it currently doesn't have dimensions on it but I could easily add those. I would be willing to make the drawing available. It's also pretty easy to make changes to the gauge layout, switches, lamp openings, etc. Most of the changes that I made only required a small amount of cutting of the metal panel behind the dash. Your TR6 was what got me started down this road many years ago. Have learned a lot from reading about your 302 conversion. This picture sold me on the idea of doing mine. Thanks for the inspiration! |
|
rficalora Rob Ficalora Willis, TX (2764 posts) Registered: 10/24/2007 02:46PM Main British Car: '76 MGB w/CB front, Sebring rear, early metal dash Ford 302 |
Re: Finally Coming Together
RE: Thanks Rob. You need to build one of these. You'll love it.
I've started reading up at the links you sent. Will have to collect parts over time as looks to be about $1k or more in parts. Also watching craigslist for a used one that would work or might be a cheaper source of parts. I like Jim's idea of flipping the dash to use the 3/32 bit. The smaller gap will look so good. |
|
|
|
epeppy Ed Peppard Woodlawn, TN (61 posts) Registered: 08/04/2008 08:35PM Main British Car: 1975 TR6 Ford 302 |
Re: Finally Coming Together
Well, I couldn't wait for the new bit so I decided to use Jim's suggestion and cut the glove box opening halfway through and then flip the part and cut the remainder of the way through on the back side.
This is the cut on the back side The door was only off by just little. The back of the door and dash get beveled so this would get routed off. I was pretty exicted that this was going to work out. So I routed the perimeter edge and cut the glove box door for the hinges. Decided I should see how it fit in car. Well.... it didn't fit. The distance between the vent openings was off and the small hole I made to the left of the steering column notch for the alternator warning light was right in the way of the column mounting. The glove box was also off. So, obviously changes needed to be made. With all the test cuts that I made, I never made a complete dash. I cut lots of holes to check for gauge, switch, led, vents, etc. Made a bunch of drawing changes, and cut a test dash. Still had a few issues and made those changes. Dash number two is on the table now with all the holes cut. Need to cut the glove box again and the perimeter. The new 1/16" bit came in today but I will plan to use the 1/32" bit. The gap looks much better. Just hope when this one gets flipped to cut the back side that it lines up as good as the first one did. Also hoping it fits in car.... |
|
BlownMGB-V8 Jim Blackwood 9406 Gunpowder Rd., Florence, KY 41042 (6590 posts) Registered: 10/23/2007 12:59PM Main British Car: 1971 MGB Blown,Injected,Intercooled Buick 340/AA80E/JagIRS |
Re: Finally Coming Together
That sure beats the jigsaw we used to cut Dan B's cherry dashboard for his TR4-A about 20 years back.
Jim |
|
Dan B Dan Blackwood South Charleston, WV (1009 posts) Registered: 11/06/2007 01:55PM Main British Car: 1966 TR4A, 1980 TR7 Multiport EFI MegaSquirt on the TR4A. Lexus V8 pl |
Re: Finally Coming Together
Jim, I bought the car in 1980. We cut the dash that summer, so it was a little more than 20 years ago! That cherry dashboard has great sentimental value.
Jim and I cut that out with our grandfather, Clyde Miller, who Jim swore to the folks at Speedway Motors was Harry Miller's cousin/nephew/son/brother, depending on who he was telling. ;) |
|
BlownMGB-V8 Jim Blackwood 9406 Gunpowder Rd., Florence, KY 41042 (6590 posts) Registered: 10/23/2007 12:59PM Main British Car: 1971 MGB Blown,Injected,Intercooled Buick 340/AA80E/JagIRS |
Re: Finally Coming Together
You think they'd have liked to have heard about Philo Farnsworth being related to Uncle Dorsey? That makes a pretty good story too...
Jim |
|
|
|
epeppy Ed Peppard Woodlawn, TN (61 posts) Registered: 08/04/2008 08:35PM Main British Car: 1975 TR6 Ford 302 |
Re: Finally Coming Together
Dash No. 2 is getting some finish put on it. This one actually fits. Moved the hole to the left of the steering column, lined up the glove box and got the mounting holes located properly. Turns out the first dash was not that far off. The glove box was about 1/4" too far to the right. Filled in the mounting holes that were off. Might not look too bad. I liked the grain pattern on the first dash.
Received the interior panels from Bob Danielson today. He does outstanding work. Would highly recommend Bob. He's also got a great website where he has documented lots of modifications to his TR6. [tr6.danielsonfamily.org] Ed |
|
epeppy Ed Peppard Woodlawn, TN (61 posts) Registered: 08/04/2008 08:35PM Main British Car: 1975 TR6 Ford 302 |
Re: Finally Coming Together
Started working on the console. The angled piece and the shifter plate is walnut. The sides will get wrapped with either black vinyl or with the seat/panel vinyl. Can't really decide. The kidney panels that Bob Danielson provided in his kit are black so it seems to make sense to make the console sides black. Also planning to put black carpet. I think I'm talking myself out of the black. Need to decide soon. My son told me that I need to cut the opening for the radio into a rectangle if I want to put a new head unit in.
As you can see, I still have all the dash wiring to do. Need to put a couple (maybe more) coats of finish along with some sanding to get it flat. |
|
epeppy Ed Peppard Woodlawn, TN (61 posts) Registered: 08/04/2008 08:35PM Main British Car: 1975 TR6 Ford 302 |
Re: Finally Coming Together
Put some vinyl on the sides of the console and some finish on the wood. Realized I'm not much of an upholsterer so I'm glad I decided not to try to do the interior myself.
Also put a few more coats of finish on the dash and stuck the gauges in it. Had to do some fitting to put the dash pad on. Didn't line up very well with the vent openings. Got that done and put the dash in to see how it was going to look. Using Autometer gauges. At night, the gauges go black and the numerals turn orange. Will have to do some more wiring to see how that looks. Stuck the steering wheel on also. Of course I had to take it all off to work on the wiring. It looks like this now. Ed |
|
Addicted Mike Hagadorn Warren PA (132 posts) Registered: 09/27/2013 03:46PM Main British Car: 1976 TR7 Victory Edition Ford 302 |
Re: Finally Coming Together
Looking great! That wiring looks like a handful. I actually enjoy wiring projects. I like the wire with spiral coloring on it. Is that part of a kit, or just spools of wire?
|
|
|
|
epeppy Ed Peppard Woodlawn, TN (61 posts) Registered: 08/04/2008 08:35PM Main British Car: 1975 TR6 Ford 302 |
Re: Finally Coming Together
Thanks Mike. I contacted Advance Auto Wire and told them I had fabricated my own version of their "power block" (relay panel) and asked if they would just sell me the wire that would come in their kit. He sent more than enough wire, bullet terminals, etc. to do the car. Very easy to deal with. Highly recommend them.
Ed |
Sorry, only registered users may post in this forum.
British V8 Home Page
Photo Gallery
Web Forum
Annual Meetings
Contact Info
Site Map
British Race Car

© 2025 British V8™ All rights reserved. Website & graphic design by:
Curtis Jacobson.
BritishV8 Forum is hosted by
SiteWelder LLC,
and is powered by a
Phorum engine.