

Steering, Suspension, & Brakes
tips, technology, tools and techniques related to non-driveline mechanical components
|
67MGBV8 Chris Jones Denver, Colorado (36 posts) Registered: 10/24/2007 03:11PM Main British Car: 1967 MGB Tourer 215 c.i. Buick |
Panhard rod design: Attn Curtis
One of my improvements to be accomplished while the snow is on the ground is to add a panhard rod to my rear axle setup. Curtis has a very neat looking setup on his car, and I think that that is the way I'm headed with mine. Curtis, do you have ant photos of the axle end of the rod? How about dimensioned drawings for the frame end? Chris in Salt Lake.
|
|
Moderator Curtis Jacobson Portland Oregon (4636 posts) Registered: 10/12/2007 02:16AM Main British Car: 71 MGBGT, Buick 215 |
Re: Panhard rod design: Attn Curtis
Thanks for kind words Chris. I actually don't have a photo of the axle bracket. It's just a short piece of 2" by 2" by 1/8" wall mild steel box tubing, cut with a fishmouth at one end and MIG welded to the Ford axle housing (outboard of the leaf spring). The centerline of the rod end ended-up about 5.75" behind axle centerline.
The rod itself is nominally 37" long (spherical bearing center-to-center), and it runs with its centerline parallel to the ground and about 4" below the trunk floor. The height could easily be moved 0.75" higher or lower at the chassis-bracket end by enlarging pilot holes that are kinda hard to see in the snapshot below. |
|
Re: Panhard rod design: Attn Curtis
Moderator Wrote:
------------------------------------------------------- > Thanks for kind words Chris. I actually don't have > a photo of the axle bracket. It's just a short > piece of 2" by 2" by 1/8" wall mild steel box > tubing, cut with a fishmouth at one end and MIG > welded to the Ford axle housing (outboard of the > leaf spring). The centerline of the rod end > ended-up about 5.75" behind axle centerline. > > The rod itself is nominally 37" long (spherical > bearing center-to-center), and it runs with its > centerline parallel to the ground and about 4" > below the trunk floor. The height could easily be > moved 0.75" higher or lower at the chassis-bracket > end by enlarging pilot holes that are kinda hard > to see in the snapshot below. > ^Hi Curtis, I have a B GT V8 with a 4.6 liter engine and I need to modify my rear axle as well and I quit like your design! Would it be possible to get a few more pic from the complete Panhard rod design? Cheers, Volker (Moderator: Volker, I removed your personal e-mail address from your post because it was an invitation to spammers...) Edited 1 time(s). Last edit at 12/04/2008 09:14AM by Moderator. |

|
|
Moderator Curtis Jacobson Portland Oregon (4636 posts) Registered: 10/12/2007 02:16AM Main British Car: 71 MGBGT, Buick 215 |
Re: Panhard rod design: Attn Curtis
The two parts shown above look like this installed:
I don't have pics of the axle end... and anyhow, if I did it again I'd make it look more like this: (on Les Gonda's car) 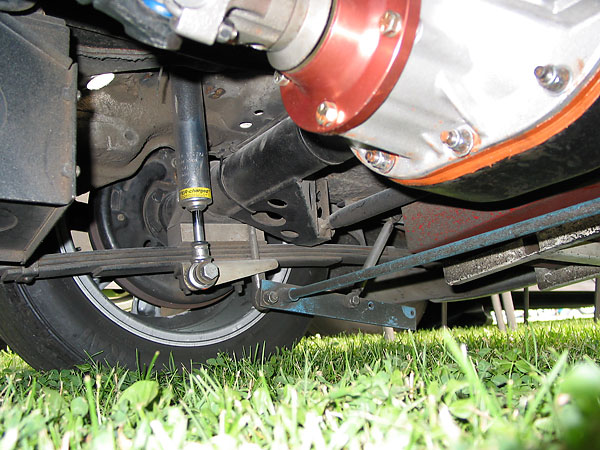 |
|
madmax Max Fulton Durham, NC (186 posts) Registered: 10/19/2008 07:45PM Main British Car: 1974 1/2 MGB 1972 MGB 1977 V8 project 1972 B r 1860 cc |
Re: Panhard rod design: Attn Curtis
Curtis:
Hate to be critical, but the double reinforcement of the trunk floor doesn't look like it would be nearly butch enough to handle a panhard that really had to work. You are still limited by the strength of the trunk FLOOR (now 38 year old metal?). Our racecar runs a 1.5" square tube welded to the chassis rail (in that corner where yours is attached.) It drops down to provide the chassis mounting point. It's then a 3/4" pipe with LH and RH rod ends at each end for easy adjustment. (Long turnbuckle, basically.) It then had a small gusset (sheet metal) from the back of the floor to the square tube (triangulating about 5".) There is a bracket that attaches with longer bolts to the back of the brake backing plate for the axle location (longest run, basically). All this on a stock MGB axle. It ran parallel to the ctrline of the axle, behind it. (Low things get HIT on racecars!) Well, after 4 years of "racing" (say, about 3000 miles) we started to RIP OUT THE TRUNK FLOOR. And rub the LR tire in the fast right handers at Road Atlanta. While we couldn't make it flex or see it flex, it obviously was. All we had as evidence were stress cracks in the trunk floor and paint removed from wheel wells!. The "sheet metal" aspects of the installation were letting us down. :-( We've now BOXED the trunk floor with 1" tubing between the chassis rails and there is a much longer 1/2" tube for trangulation, from lower on the 1.5" tube to the 1" box tubing. (Thus, the FLOOR has NOTHING to do with the panhard anymore.) This, 1000 miles on, has been fantastically better! (Has held it's 'adjustment".) So, don't trust your trunk floor. It has, by now with it's age, virtually no structural stiffness whatsoever. You really want to make the attachment contingent on the two chassis rails that run either side of the trunk floor. This is the strongest part of the car that you'll find back there... We see similar problems with the aftermarket rear swaybars that mount with 'sandwich" brackets through the trunk floor. Ultimately, they tear out the metal in those corners. :-( Anyone intending to run bigger tires and corner hard *should* run a panhard! (Note Ingram's MGC tires rubbing extensively while doing the Dragon!) Also note that use of panhard means MUCH smaller rear bar is needed (if ANY at all!) The racecar, for instance, runs a 1" front bar but only a 9/16" rear bar in conjunction with the panhard. :-) The rear bar is for tuning OUT the "push" of the front bar. Running a 7/8" front bar needed NO rear bar, but the car still had some initial roll into tight corners.... (This despite being a good 2" lower than stock C/B!) $.02 Max |
|
Bill Young Bill Young Kansas City, MO (1337 posts) Registered: 10/23/2007 09:23AM Main British Car: '73 MG Midget V6 , '59 MGA I6 2.8 GM, 4.0 Jeep |
Re: Panhard rod design: Attn Curtis
Good point Max, but the cornering forces on a race car running slicks is far more than most street tires can generate. Curtis took me for a ride when we were in Wisconsin and I never noticed any sort of unstableness from the rear, it stayed firmly planted even in some pretty heavy corners so his installation seems to be working without problems for now and he's running some pretty sticky tires for a street car as well. As you know his GT doesn't have any sort of "interior" carpets so visual inspection of that area is very easy. I'd like to see photos of the race car trunk area to see exactly how you guys reinforced that area though, sounds like a relatively easy thing to do and good insurance.
|
|
Moderator Curtis Jacobson Portland Oregon (4636 posts) Registered: 10/12/2007 02:16AM Main British Car: 71 MGBGT, Buick 215 |
Re: Panhard rod design: Attn Curtis
Sincere thanks for some really constructive comments, guys!
Max, this community/website would benefit hugely from mixing more with racers (like you and your team)... so I'm keen to start publishing something similar to "How It Was Done" articles in a racecar-specific photo gallery (with no restriction on engine type). I know you've got a lot on your plate already, but any help you can give with that would be greatly appreciated. Just one idea: "How many Gold Cup Race participants could we possibly lure down to Durham for some sort of a show-and-tell-social on the first day of our upcoming meet?" How can we get a "critical mass" of racers to switch over to our message board? There are probably a thousand things I'd do differently on my car if I were building it today. The Panhard rod has been one of my favorite mods because it made an immediate and quite noticeable difference. Still, I'd construct it differently based on your feedback and also based on looking at cars like Les Gonda's: 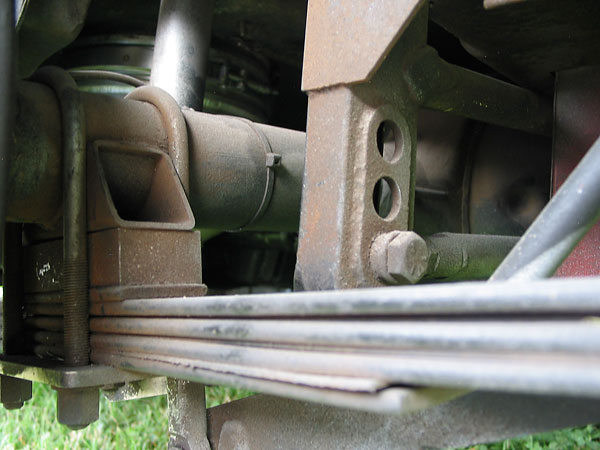
When my Panhard rod went on (over ten years ago now!), I didn't have any access to welding equipment or any personal welding skill. I cut and bent the parts, made a little fixture to hold them together, and took them to a professional welding shop. The Panhard rod bracket could certainly be stronger, better anchored, and even lighter - especially if it were welded-in instead of bolted-in. I can't testify if its effectiveness is diminishing (e.g. with metal fatigue in the trunk floor) but it certainly hasn't stopped working! I fitted much wider/stickier tires last year and they're not rubbing. (Yet! Knock on wood.) Also, last winter I removed the bracket and doubler, and sent them to Pete Mantell (Mantell Motorsport) for powder coating. While I had everything apart, I didn't note any distortion in the trunk floor or any cracked paint. Probably I'm not driving hard enough!!! Another point - if I slid sideways into a curb one day - all bets would be off as to whether the trunk floor would take the load. Lots to think about! |
|
|
|
67MGBV8 Chris Jones Denver, Colorado (36 posts) Registered: 10/24/2007 03:11PM Main British Car: 1967 MGB Tourer 215 c.i. Buick |
Re: Panhard rod design: Attn Curtis
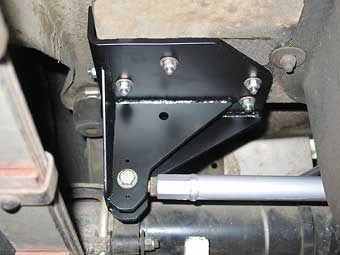
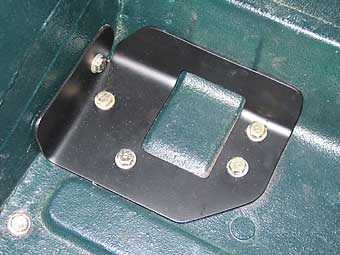
Wow, time flies. It's been almost a year since this thread was started. I finished my Panhard rod and traction bar improvement last spring, and the improvement was fantastic. I would recommend this modification for anyone planning to add power and larger tires. I had previously centered my fuel tank, so I had less boot floor mounting area to work with. Realizing that the strength of this location is in the box corner of the boot I devised a doubler that would work in all three planes of the corner. I believe this will reduce the flexing of the boot floor which will lead to cracking from fatigue. I built the floor section to ride up and over the embossed reinforcement that Curtis cut-out to clear. On the underside, I notched the doubler to clear the rebound strap bracket. I used 1/8" mild steel plate for the doubler and 3/16" for the rod mounting bracket. 1/2" Heim joints were mounted to 1" dia. chromemoly tubing. I cut a section from a piece of 3" x .120 steel tube and welded a bracket with a rod end pocket devised to get the bolt in double shear. All parts were thedn powder coated. Since I didn't want to pull and drain the axle to weld to it, I raised one end to allow the axle lube to drain away for the weld area and TIG welded the 3" tube section to the axle. I touched up the area with chassis paint.
Edited 3 time(s). Last edit at 12/12/2008 01:11PM by 67MGBV8. |
|
Moderator Curtis Jacobson Portland Oregon (4636 posts) Registered: 10/12/2007 02:16AM Main British Car: 71 MGBGT, Buick 215 |
Re: Panhard rod design: Attn Curtis
Very, very nicely done Chris!
Can you please post some more pictures of the brackets? Pictures of the traction bar installation too? |
|
67MGBV8 Chris Jones Denver, Colorado (36 posts) Registered: 10/24/2007 03:11PM Main British Car: 1967 MGB Tourer 215 c.i. Buick |
Re: Panhard rod design: Attn Curtis
Here are some more photos:
Edited 1 time(s). Last edit at 12/14/2008 10:31PM by 67MGBV8. |
|
67MGBV8 Chris Jones Denver, Colorado (36 posts) Registered: 10/24/2007 03:11PM Main British Car: 1967 MGB Tourer 215 c.i. Buick |
Re: Panhard rod design: Attn Curtis
Here are some pictures of the traction bars I built and installed at the same time. These are modeled after the Cal-Trac concept and incorporate larger 1/4" thick retainer plates to better fit the larger diameter of the Dana 44 axle tube and larger u-bolts. The front pivot has a nylon take-up block to allow the bar to float without any effect until increased torque twists the axle under strong acceleration. The front of the bar is a simple tee joint and is bushed with Nylatron bushings of the same type used in the rear spring shankle. The amount of take-up slack is adjustable in the Hiem joint at the rear of the 1" diameter chromoly tube.
Edited 1 time(s). Last edit at 12/14/2008 11:00PM by 67MGBV8. |
|
|
|
TR6-6SPD Ken Hiebert Toronto Ontario (255 posts) Registered: 04/23/2008 11:43AM Main British Car: 1972 TR6 1994 5.7 L GM LT1 |
Re: Panhard rod design: Attn Curtis
Chris,
Nice work there. Even though this started out as a "panhard bar" thread, I don't think it hurts to add some notes on traction devices. I just wanted to include here another variation of the Cal-Trac that you patterned off of. I ended up using the Slide-a-Link system. They're both good choices. I can't remember why I ended up with the one and not the other. If anyone is interested, have a look at the exploded view in the "instructions", item #C2100. [www.competitionengineering.com] Totally eliminated the wheel hop. Keeps the fillings in my teeth. 


 |
|
TR6-6SPD Ken Hiebert Toronto Ontario (255 posts) Registered: 04/23/2008 11:43AM Main British Car: 1972 TR6 1994 5.7 L GM LT1 |
Re: Panhard rod design: Attn Curtis
The biggest difference between the two is the sliding shock bushing and the front mount. The front mount requires a free floating assembly attached to the spring only and a solid alluminum eye bushing.. According to Bill Guzzman, the solid eye bushing has it's drawbacks but I'm living with it.


Negatives: Took alot of measuring and it does add weight. |
|
TR6-6SPD Ken Hiebert Toronto Ontario (255 posts) Registered: 04/23/2008 11:43AM Main British Car: 1972 TR6 1994 5.7 L GM LT1 |
Re: Panhard rod design: Attn Curtis
John,
The actual item, Slide-a-Link #C2100, I'm most certain would not be a straight bolt on affair to anything other than what they list in the cataloge as fitting. There's alot of suspension variations out there, let alone the LBC family, but the design concept will work. Just work with the dimensions you have in your application. Ken |
|
|
|
WedgeWorks1 Mike Perkins Ellicott City, Maryland (460 posts) Registered: 07/06/2008 08:07AM Main British Car: 1980 Triumph TR8 3.5 Litre Rover V8 |
Re: Panhard rod design: Attn Curtis
Here are some picture of the Group 44 MGB rear Suspension set up.
It has some wild traction bars, sway bar ans watts-linkage arrangement! |
|
BlownMGB-V8 Jim Blackwood 9406 Gunpowder Rd., Florence, KY 41042 (6571 posts) Registered: 10/23/2007 12:59PM Main British Car: 1971 MGB Blown,Injected,Intercooled Buick 340/AA80E/JagIRS |
Re: Panhard rod design: Attn Curtis
Pretty cool. I might try some variation of that swaybar on the Jag IRS if I can figure out a way to fit it in.
Jim |
|
Moderator Curtis Jacobson Portland Oregon (4636 posts) Registered: 10/12/2007 02:16AM Main British Car: 71 MGBGT, Buick 215 |
Re: Panhard rod design: Attn Curtis
Quote: Thanks for posting those VERY interesting photos. I understand that car will be at "The Mitty" race, at Road Atlanta in May. I'd love to be there and photograph the heck out of it for the proposed new "race car" section of our photo gallery. |
|
britcars Phil Ossinger New Brunswick, Canada (346 posts) Registered: 02/02/2009 07:58PM Main British Car: 1977 MGB Roadster, Rover 3.5 ADVENTURE BEFORE DEMENTIA! |
Re: Panhard rod design: Attn Curtis
Here's my bracket for the axle end of my panhard rod. Mounted to the back right side axle flange.
|
|
|
Sorry, only registered users may post in this forum.
British V8 Home Page
Photo Gallery
Web Forum
Annual Meetings
Contact Info
Site Map
British Race Car

© 2025 British V8™ All rights reserved. Website & graphic design by:
Curtis Jacobson.
BritishV8 Forum is hosted by
SiteWelder LLC,
and is powered by a
Phorum engine.