

MG Sports Cars
engine swaps and other performance upgrades, plus "factory" and Costello V8s
|
Keith Keith Tanner Grand Junction, Colorado (92 posts) Registered: 10/31/2008 01:45AM Main British Car: For the purpose of this forum, 1972 MGB GT 5.7l Chevrolet LS1 |
LS1-powered 1972 MGB GT build thread. Heavy picture content.
The full build diary of the car can be found at [www.slowcarfast.com]. This should be fun, I've never told the whole story at once before.
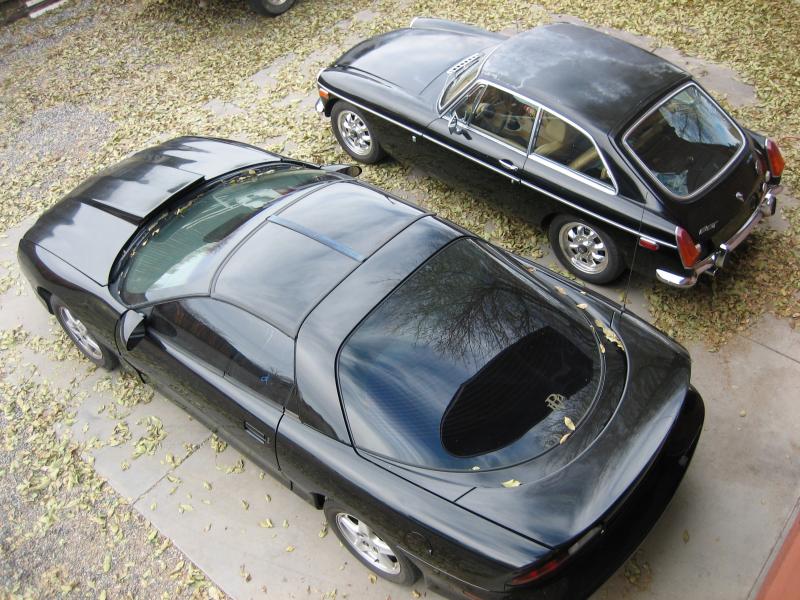
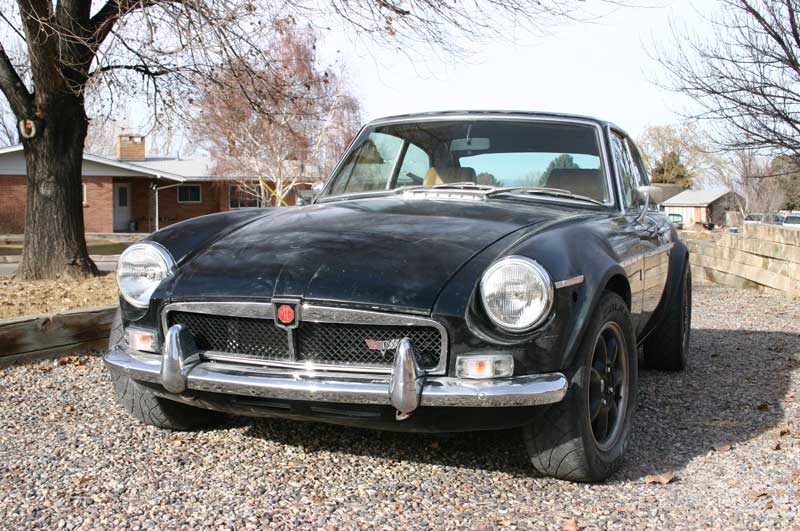
Back in March 2008, I took my Miata to a track day for some shakedown testing before the Targa Newfoundland. And while I was unloading, a dark little coupe rumbled into the pits. It was Curtis and his Rover-powered GT. I've always liked the looks of the GT, and my wife (and rally navigator) Janel latched right on to it. She told me to build her one. Well, who am I to turn down that sort of request? The design brief was for "a cool little car with a big rumble". I spent some time poring over Curtis' car and even got the chance to take it on the track for a few laps. A month later, there was a black GT in my driveway. It was a California car with bad paint but a very clean body. Originally Aqua, later painted red and then black. It had all sorts of problems, but the original plan was to sort it into a driveable car for a few months until after the Targa, then swap in a Ford 302. The car was a little rough and had some wiring problems, including a massive draw that kept killing the battery and made the car difficult to start due to some sort of short. I got to the point after a couple of months where I'd sorted out some of the problems such as rebuilding the brake master and making the suspension work. Still, I only managed about 10 miles in the car before the short became so bad I couldn't start the car anymore. No big deal, I didn't bother to diagnose it because 1) it was time to concentrate on the race and 2) I knew the engine was coming out. Our patient. 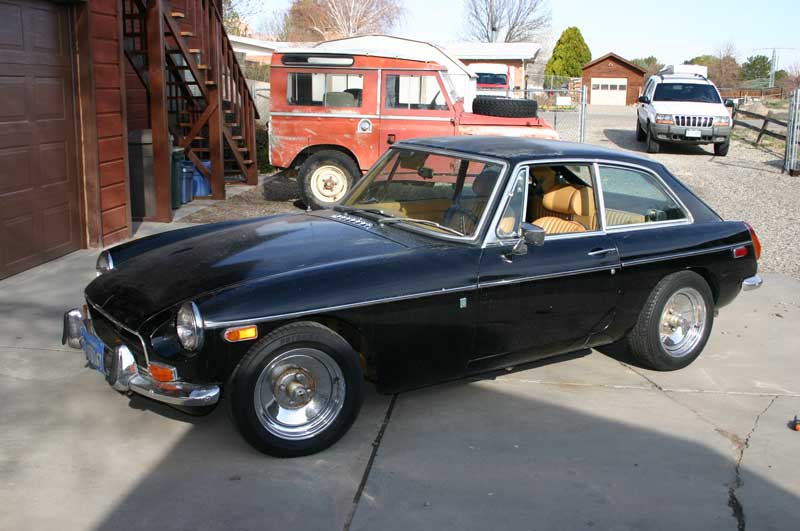
The tan interior turned out to have been spray-painted. I have to admit I didn't know as much about MGs as I should have, or I would have realized this when I saw the ad! 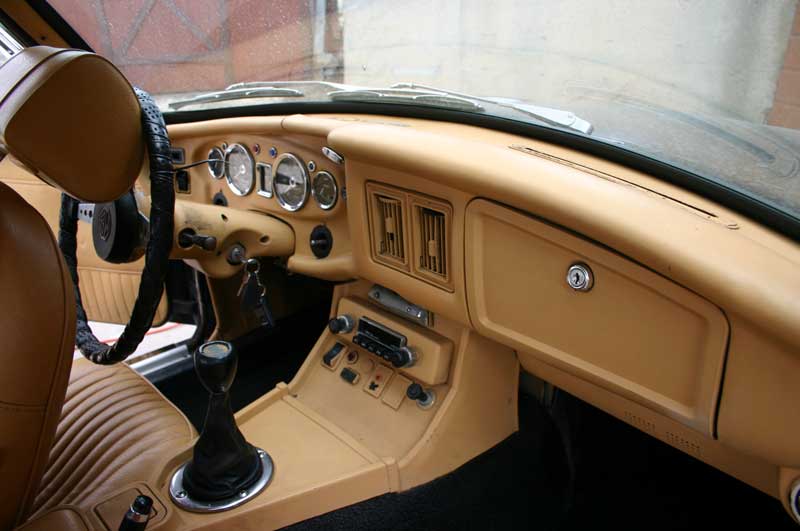
I swapped out the grille, added some SAAB wheels and then had to park the car for the race. 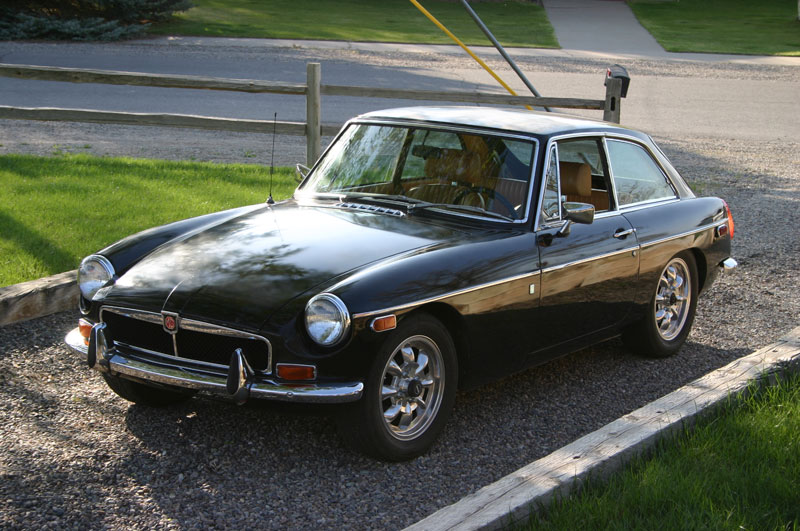 Edited 1 time(s). Last edit at 01/06/2011 01:45AM by Keith. |
|
Keith Keith Tanner Grand Junction, Colorado (92 posts) Registered: 10/31/2008 01:45AM Main British Car: For the purpose of this forum, 1972 MGB GT 5.7l Chevrolet LS1 |
Re: LS1-powered 1972 MGB GT build thread
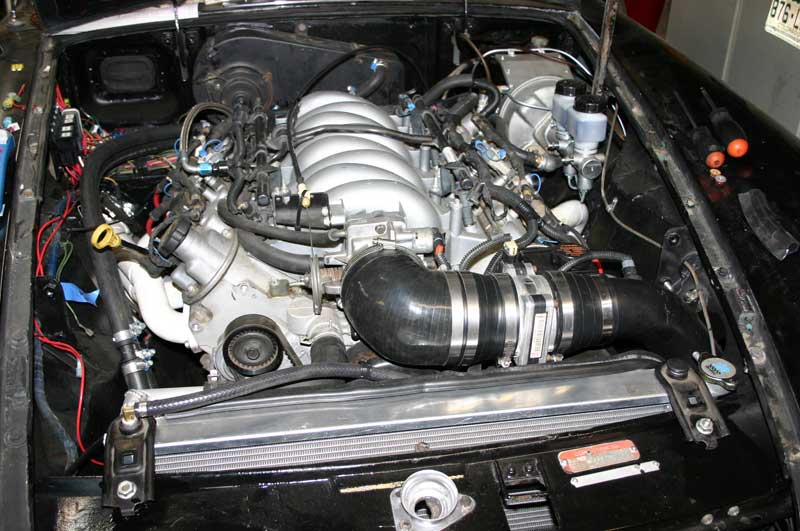
In October 2008, I was back at work on the car. Plans had changed, though. Over the summer, my employer (Flyin' Miata) had done an LS1 conversion on a Miata and was starting to build more cars for customers. When I saw the LS engine on a stand, the packaging sold me. Not only was it all-aluminum, but everything was just so tidy and tucked away! No distributors or pumps sticking out at weird angles to deal with. So I decided the car would get an LS1. The fact that this meant more horsepower was a bonus.
This meant I'd have to change the rear of the car, and I wasn't too keen about the MG's suspension. So I decided to swap in a Miata suspension up front. After some consideration, I dropped my idea to graft a Miata IRS into the car and went with a live axle instead. Curtis sent me some pre-article pictures of Dan Masters' car and I liked the three-link design. The drivetrain donor was purchased in November - a 1998 Camaro Z28 with the T-56 6-speed and a limited slip rear. 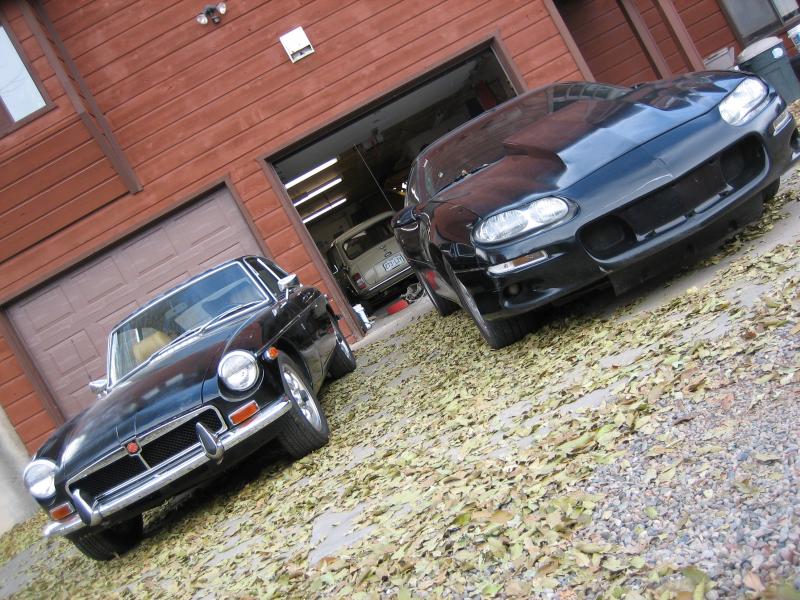
Less than a month later, the MG went into the garage and I yanked the drivetrain. Meanwhile, I registered the Camaro and started driving it so I could make sure the car was healthy. Terrible car, awesome engine. 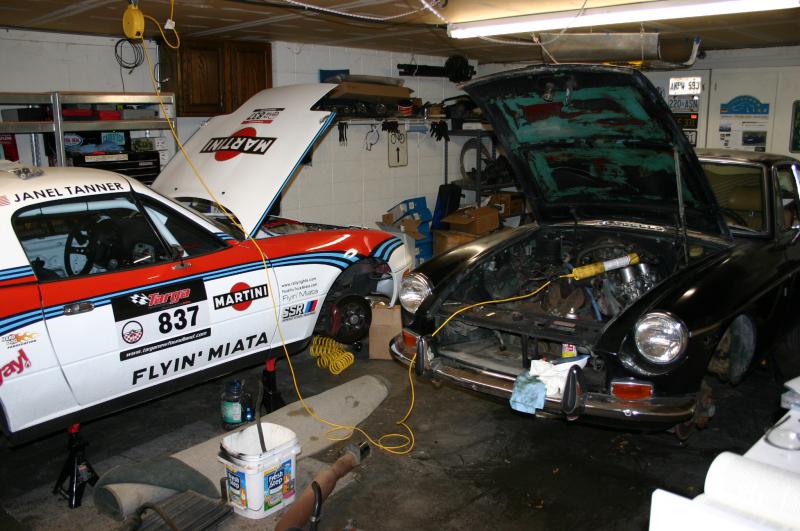
I bought a plastic LS1 block to use for mocking up the engine fit. It was a big help. 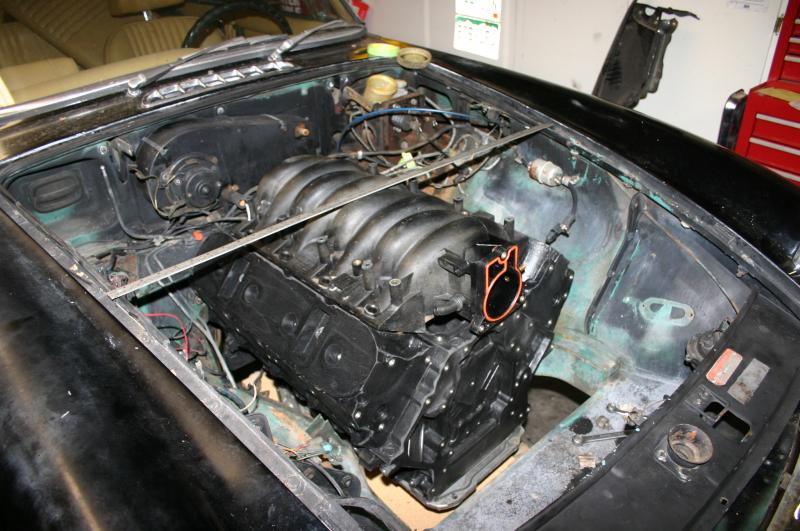 Edited 1 time(s). Last edit at 01/06/2011 12:50AM by Keith. |
|
Keith Keith Tanner Grand Junction, Colorado (92 posts) Registered: 10/31/2008 01:45AM Main British Car: For the purpose of this forum, 1972 MGB GT 5.7l Chevrolet LS1 |
Re: LS1-powered 1972 MGB GT build thread
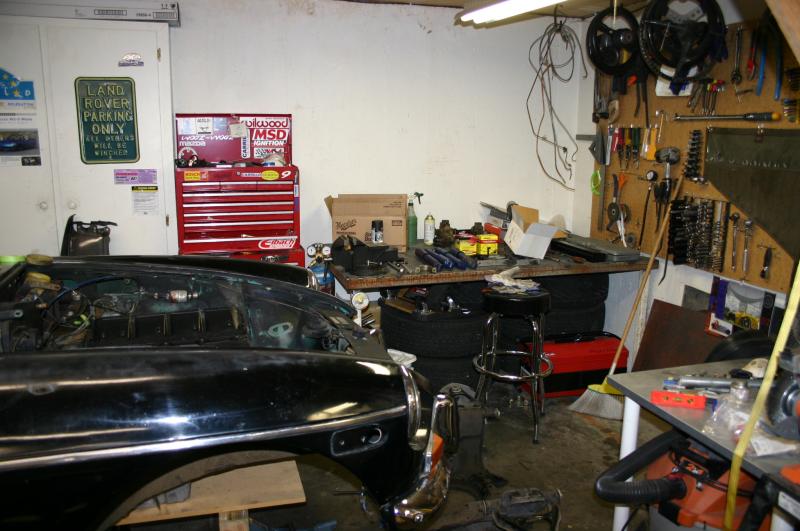
The car snuggled into it's home for the next couple of years. A 16'6" x 8" spot at the front of the garage, which included the welding bench. This forces a pretty high level of organization!
Here's an LS3 engine. All it's missing is the accessories. This is a nice clean crate motor, but it shows how compact the whole thing is. 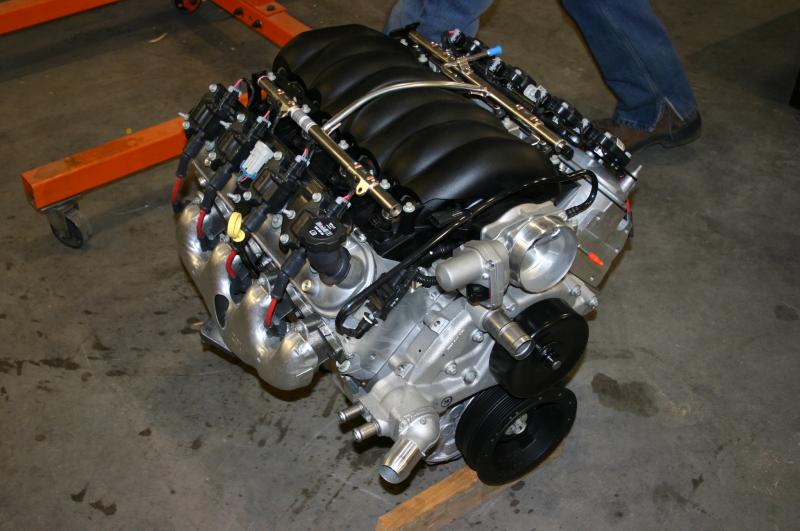
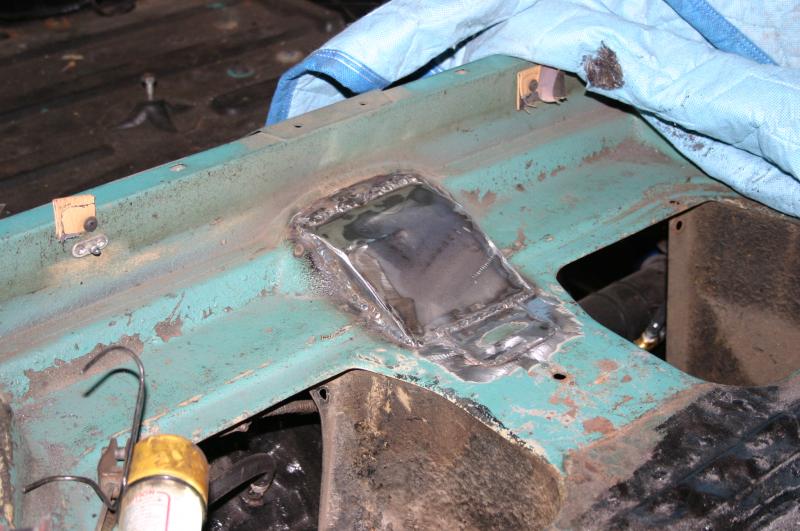
New Years 2009, we stripped the interior so I could start making the required sheetmetal modifications. We found the car was very solid, with only one small problem area in the passenger's footwell. We also got an eyeful of Aqua! 
We also started cutting on the engine bay. Janel was demanding big exciting changes, not my careful suspension fabrication. So I handed her the Sawzall. 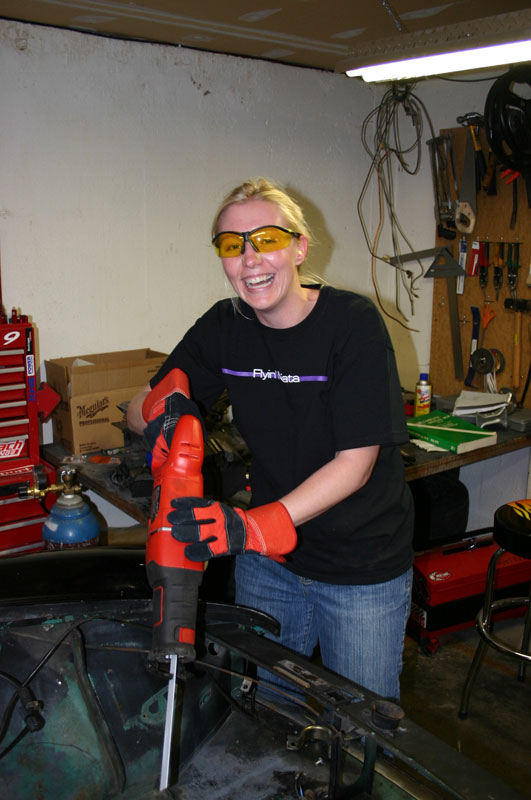
Better. The tape marks the front wheel lines. 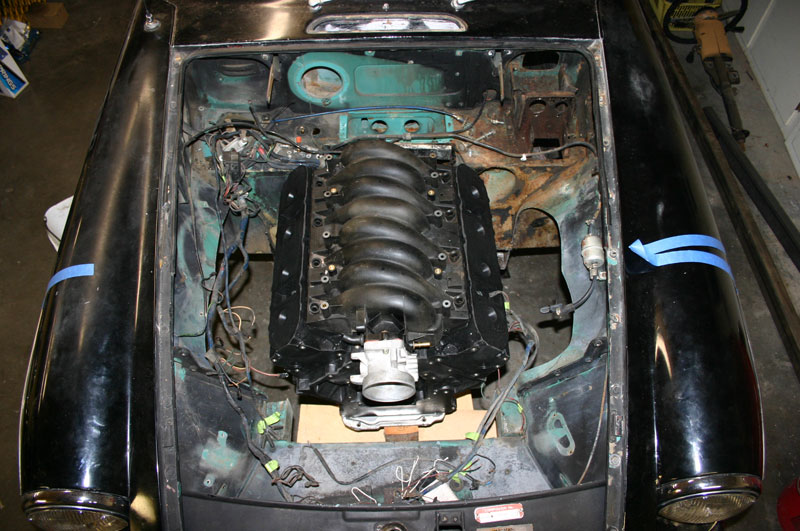 |

|
|
Keith Keith Tanner Grand Junction, Colorado (92 posts) Registered: 10/31/2008 01:45AM Main British Car: For the purpose of this forum, 1972 MGB GT 5.7l Chevrolet LS1 |
Re: LS1-powered 1972 MGB GT build thread
For the front suspension, I decided to copy the Miata's geometry on some new frame rails. These were run all the way back to the cross bar on the MG unibody to add some extra strength. First, I built a fixture using a Miata front subframe.

The suspension pickup points (which include alignment cams) were cut off the Miata part and welded on the new frame rails. 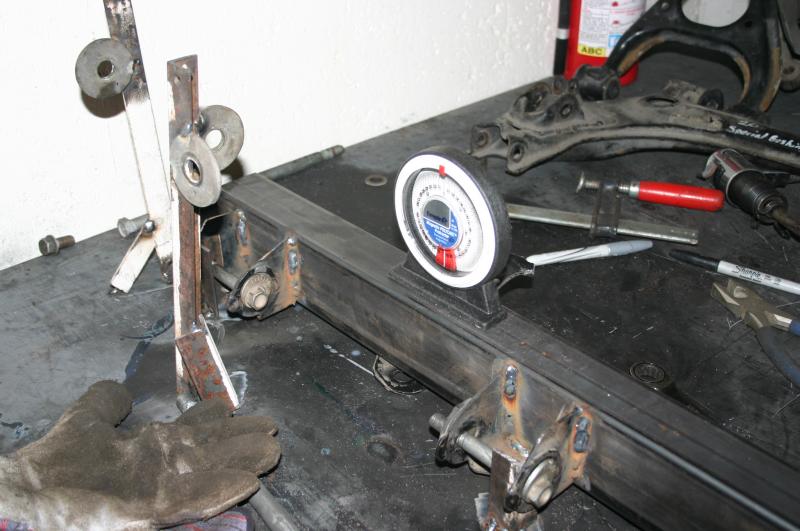
A crossmember was added for the steering rack, which had to be trimmed for clearance of the oil pan and the pinion. The car uses a Miata steering rack, control arms and uprights. There's a 1" "impact bar" welded to the bottom of this, providing protection for the oil pan from debris. It makes a good jacking point too! 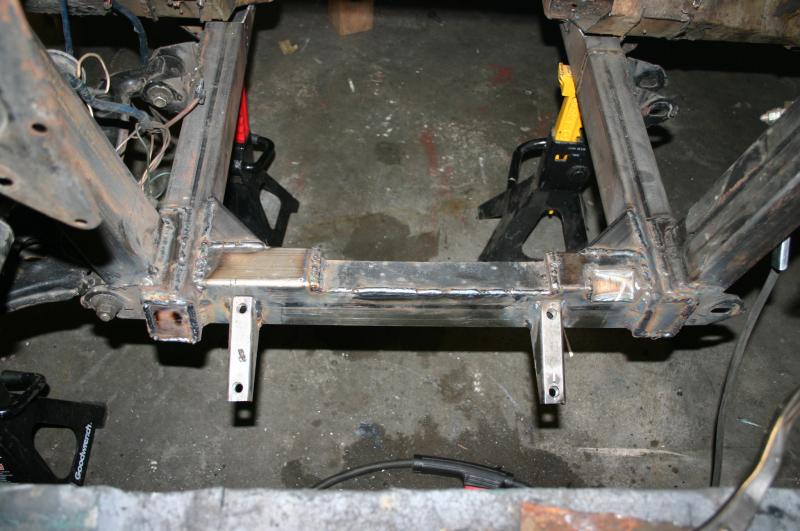
For the rear, I had the axle from a 4WD S10 Blazer. This was chosen because it was a relative of the axle in the Camaro, which allowed me to use the Positraction limited slip from the Z28. It was also the exact width I needed, so there was no reason to modify the housing. In retrospect, it probably would have worked just as well to cut down the Camaro part. But so it goes. First, I cleaned it up and cut off the stock brackets. 
Brackets based on the Fast Car suspension were welded on to the axle. I added multiple mounting points so I could fine-tune the handling if required. 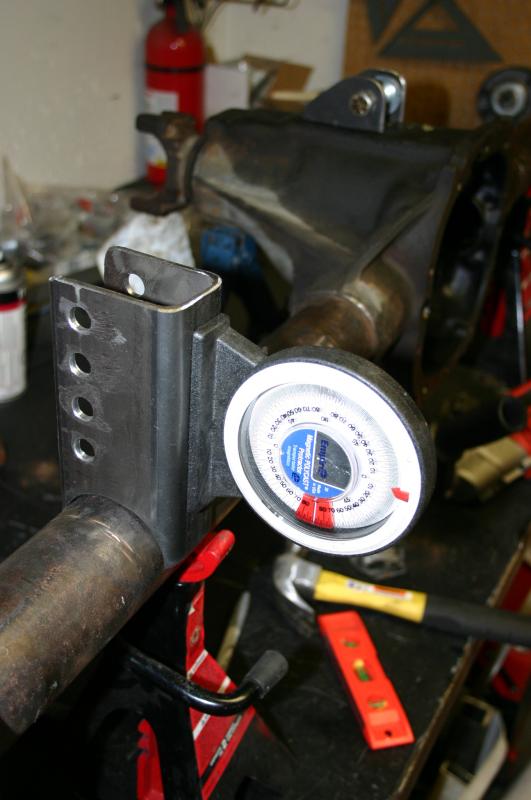
Mosler provided some custom axles that were basically standard S10 parts with a Miata 4x100 bolt pattern. This let me mount Miata brakes to the axle. Why so many Miata parts? Because I literally wrote the book (actually three) on the car and I have a garage full of parts. The ability to swap wheels and tires between cars is very valuable. Here's the rear end with the trailing arms and the brakes installed. The arms don't use rod ends, but have urethane bushings for a more street-friendly setup. 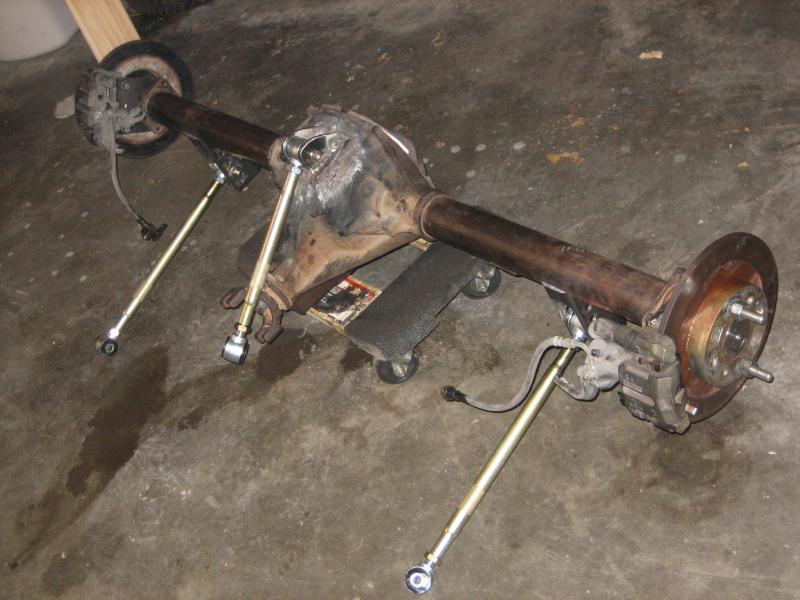
A reinforcement was added to the top of the tunnel, as seen on Dan's Fast Car setup. A big plate was also welded to the back of the rear bulkhead for the upper suspension bracket. 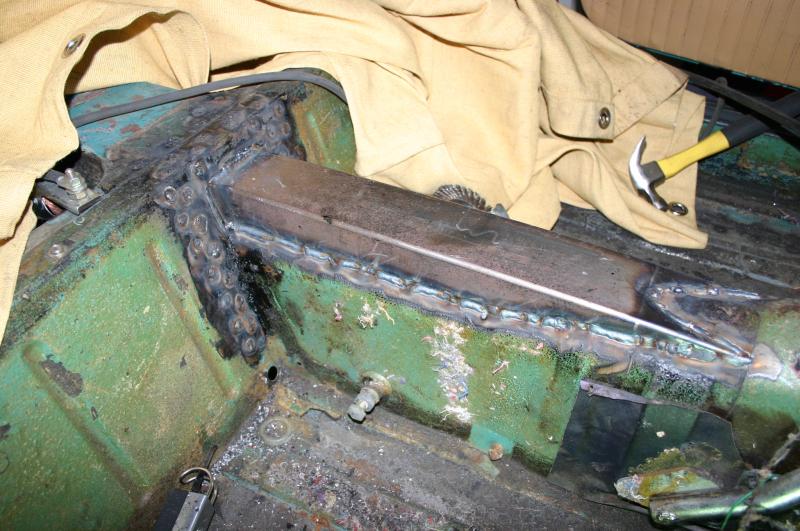
The lower mounting points were cut into 2"x2"x1/4" bar, which was welded to the bottom of the car and ran up to the crossmember for extra strength. 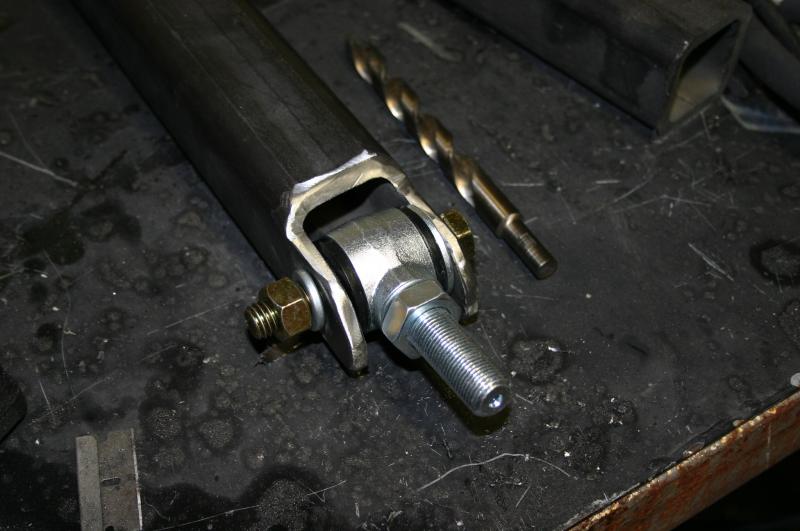
Unlike the Fast Cars, I decided to mount the Panhard bar behind the axle. It was a bit of a squeeze, but it meant I could use a stronger straight bar and the bracket mounting was much stiffer. 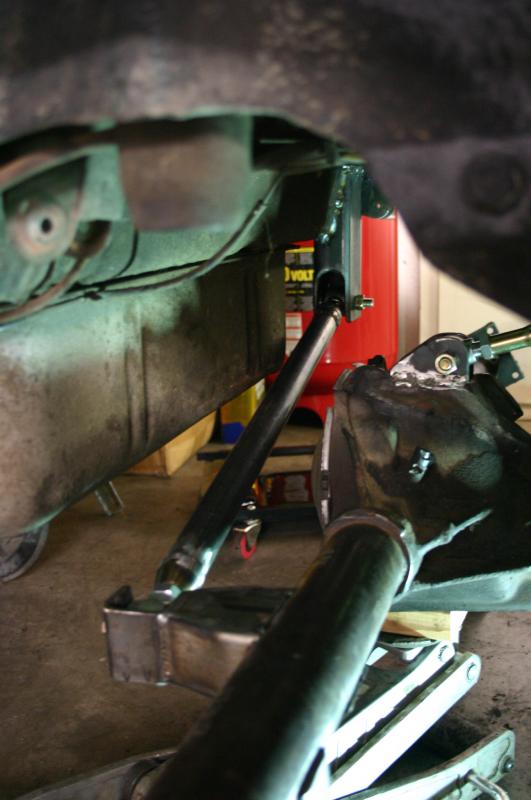
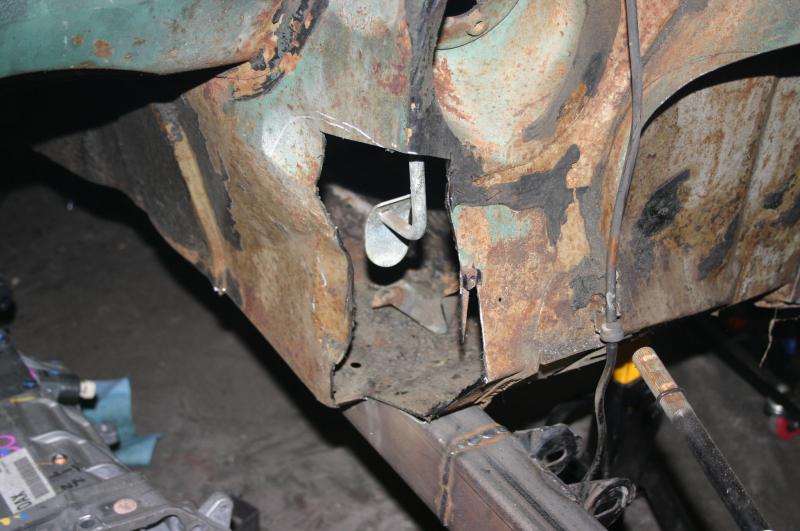
In order to clear the bracket on the axle, I needed to add a bit of clearance to the body in the trunk. I also had add a similar bump on top of the axle to clear the new upper trailing arm bracket when the suspension was at full compression. 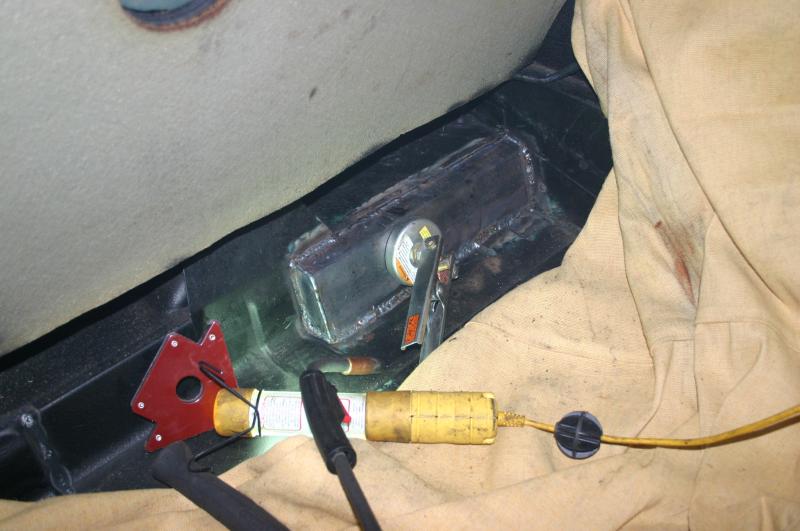
The shocks are AFCO single-adjustable aluminum units. I used AFCOs on the rally car and they worked beautifully. I had them valved to the same rates as my rally car because I knew they worked well. I can add rebound adjustment later if needed. They have 5" of travel in the rear and something like 6" in the front. In the rear, I decided to mount them in the wheel well for a couple of reasons - my wider track meant that tire clearance shouldn't be a concern and I felt there was more structure both on the axle and on the car. It took a long time to come to this decision and there are definitely some clearance sacrifices involved. It's possible this will change someday in the future. 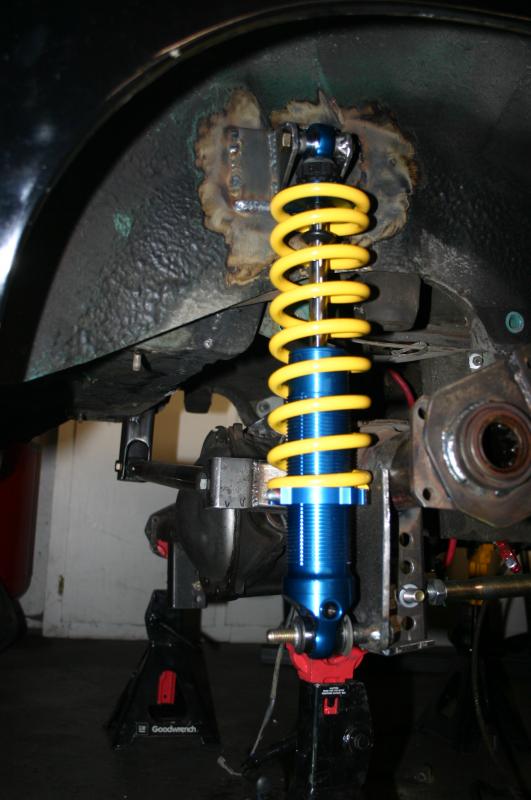
One of the things I do for a living is write technical books about cars. And I had a contract for a book, and an editor who had lost his sense of humor about my approach to deadlines. So work slowed down pretty dramatically. But I did sneak into the garage once in a while to get to this point. And in the meantime, a 1968 GT appeared in the backyard, a payment for a bit of engine work on a Midget.  Edited 4 time(s). Last edit at 01/06/2011 03:41AM by Keith. |
|
Keith Keith Tanner Grand Junction, Colorado (92 posts) Registered: 10/31/2008 01:45AM Main British Car: For the purpose of this forum, 1972 MGB GT 5.7l Chevrolet LS1 |
Re: LS1-powered 1972 MGB GT build thread
Taking a bit of a step backwards here...
I borrowed a T-56 transmission from work to check clearances. I bolted it up to the plastic engine, and determined the final drivetrain location. 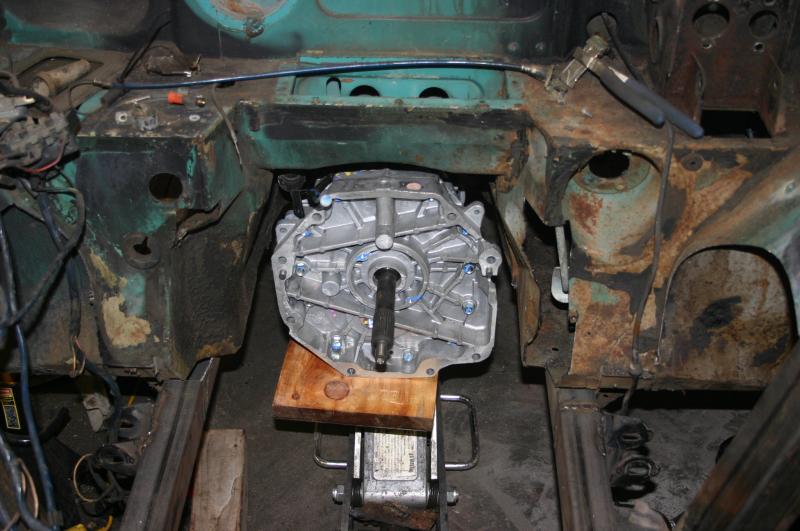
The engine was pushed as far back as I could go without cutting out the cross bar in the engine bay for the heater. This gave me tight but workable clearance between the oil pan and steering rack. With the oil pan about 3/4" below the new frame rails, I had enough hood clearance. I did have to cut out the driver's footwell a bit to match the other side, but not so it would impede the gas pedal. 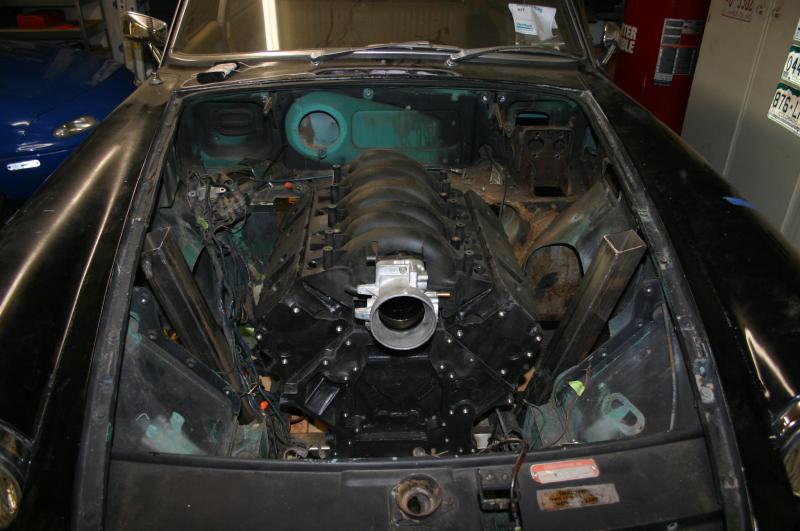
Now that's what I call a perfect shifter position. Amazingly, there were very few tunnel modifications required to get to this point. You can see a hole I had to cut at the top of the tunnel in the picture, and the reverse lockout solenoid isn't installed. But still! I also had to move the bottom of the heater ducting up slightly, not enough to affect the heater installation. 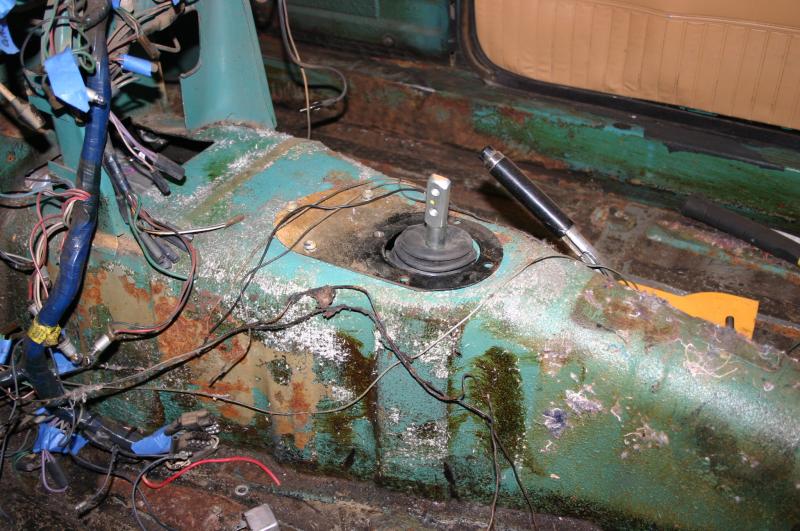
Here's the access panel I built later to install and clear the solenoid. This picture was taken with my transmission in place, which is fitted with a taller Hurst shifter. 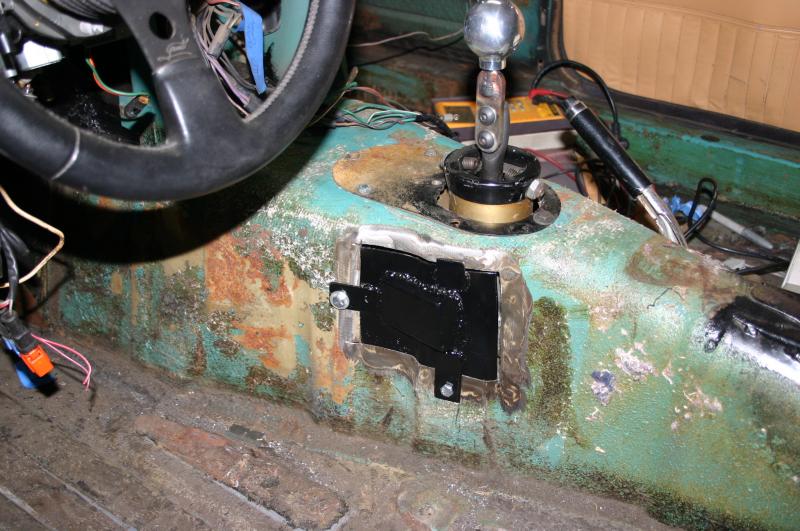
From this point on, it became obvious that I was building a ship in a bottle. Clearances were tight. For example, here's a mockup of how the steering column would, umm, interact with the motor mount. 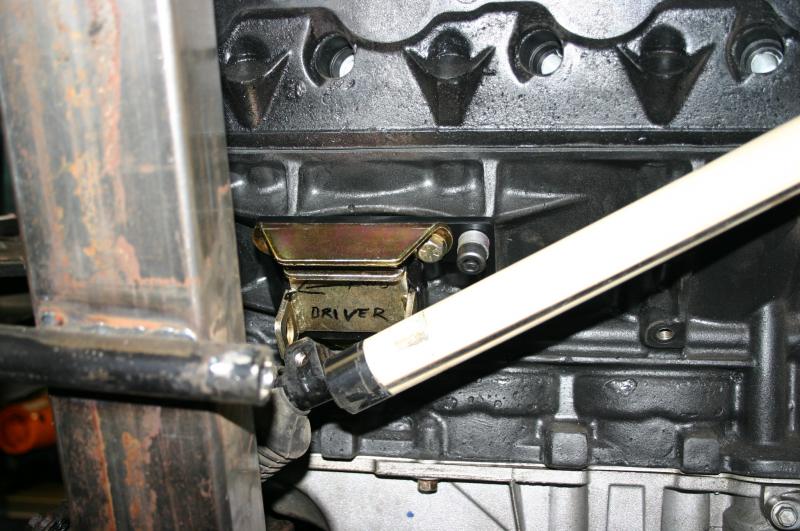 Edited 1 time(s). Last edit at 01/06/2011 03:42AM by Keith. |
|
Keith Keith Tanner Grand Junction, Colorado (92 posts) Registered: 10/31/2008 01:45AM Main British Car: For the purpose of this forum, 1972 MGB GT 5.7l Chevrolet LS1 |
Re: LS1-powered 1972 MGB GT build thread
Now it's Christmas 2009, a year after the interior came out. The book is done, and I've done all I can without the real drivetrain. The car is basically at the point where it can sit on its wheels. So it's time to kill the Camaro.
It turns out, the easiest way to get the drivetrain out of a 1998 Camaro is to pull it out the bottom. Ironically, that's also true of the Mini parked beside it. After about 9 hours of work (including shoveling the Camaro out of a snowbank), the engine was out. I then spent a couple of days pulling out wiring - more than I needed, it turns out. But that's better than not enough. 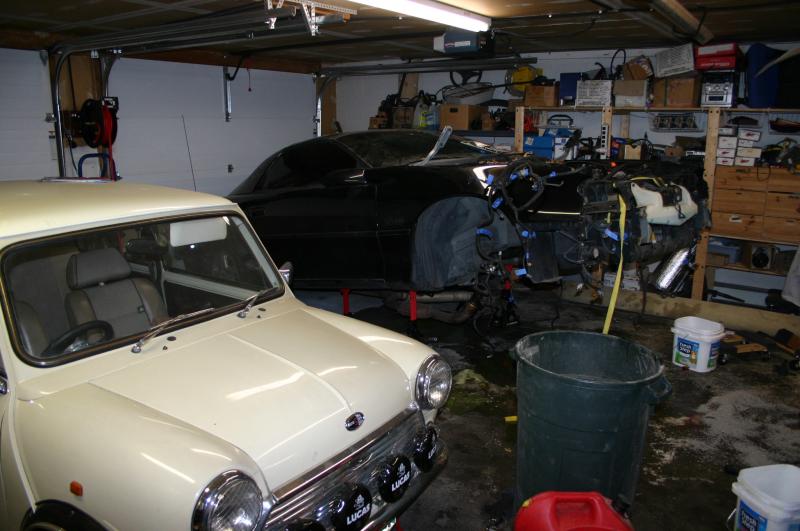
Right away, the engine went into the MG for a real test fit with all the accessories. 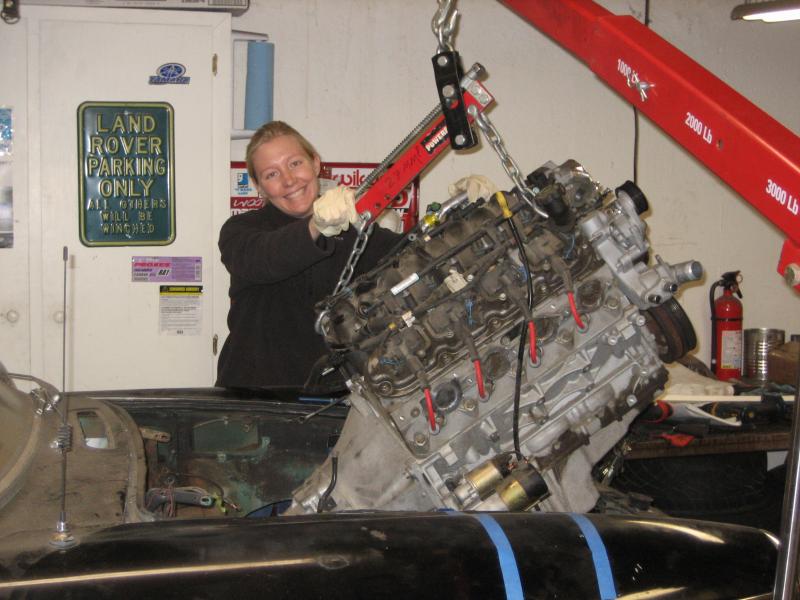
Clearance at the front of the engine. Obviously, the stock MG radiator positioning is ancient history. 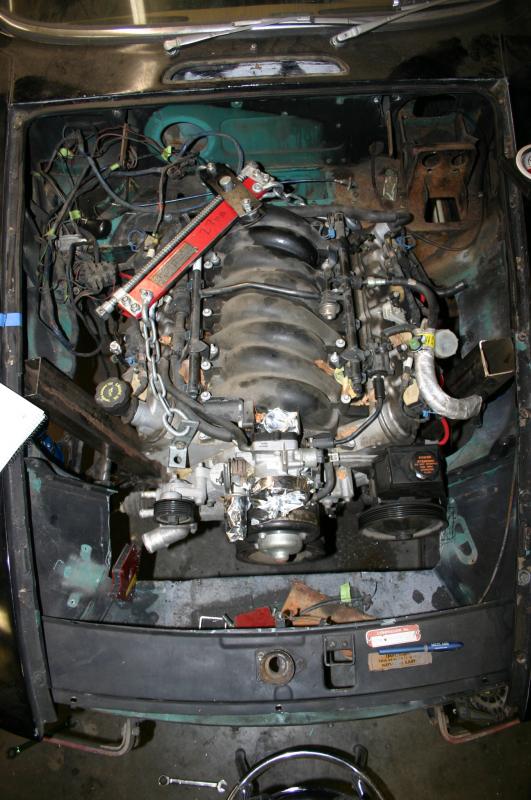
Clearance to the steering column - not so good. The big universal joint here made this impossible. 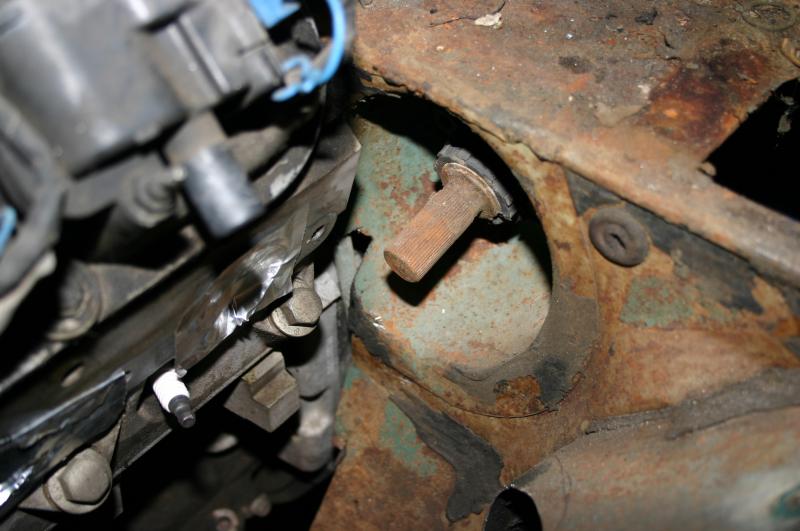
A bit of measuring, and I discovered a Miata column was the perfect length with a smaller joint a bit higher up the column. It runs just below the exhaust port so the headers could run over top. Of course, with a Miata steering rack that made the lower connection easy. So I ditched the MG parts completely. 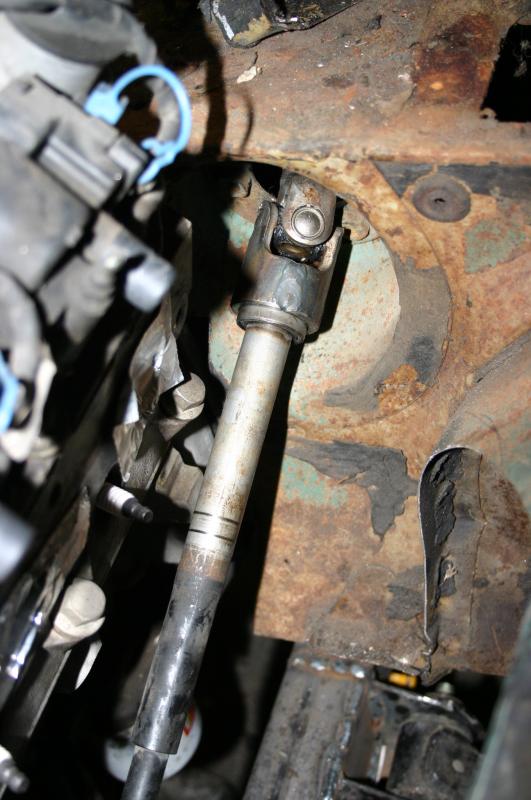
Of course, it was still tight. Here's the driver's side motor mount, with the column poking through the middle. There is clearance here and no relative movement, but it's as close as it looks. I welded the bracket from the MG column to the Miata one so I could bolt it to the factory mounts. 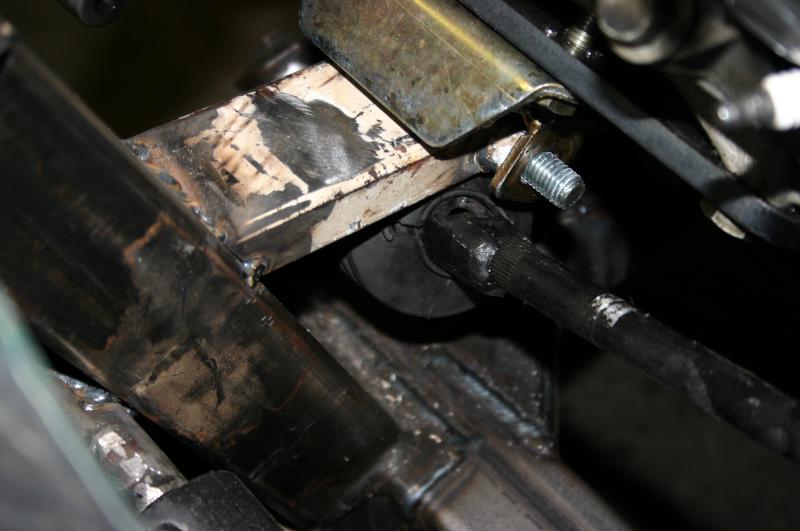 |
|
Keith Keith Tanner Grand Junction, Colorado (92 posts) Registered: 10/31/2008 01:45AM Main British Car: For the purpose of this forum, 1972 MGB GT 5.7l Chevrolet LS1 |
Re: LS1-powered 1972 MGB GT build thread. Heavy picture content.
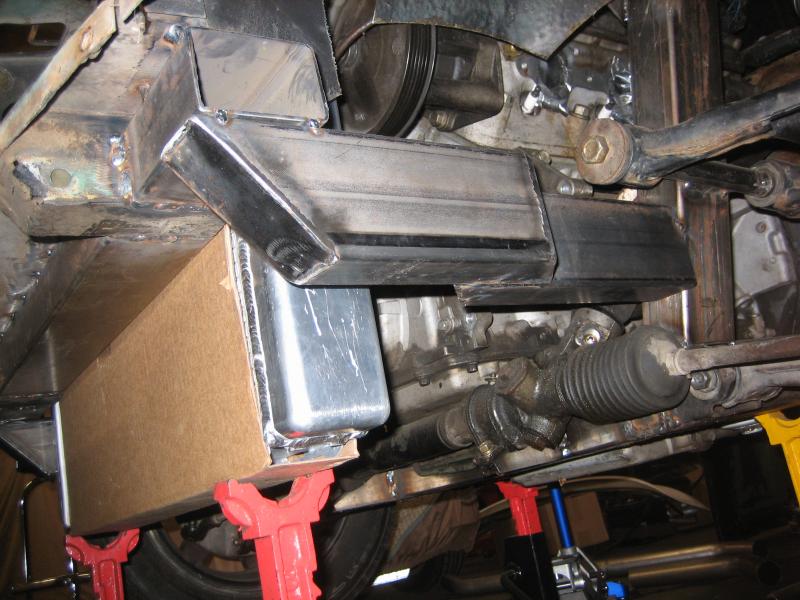
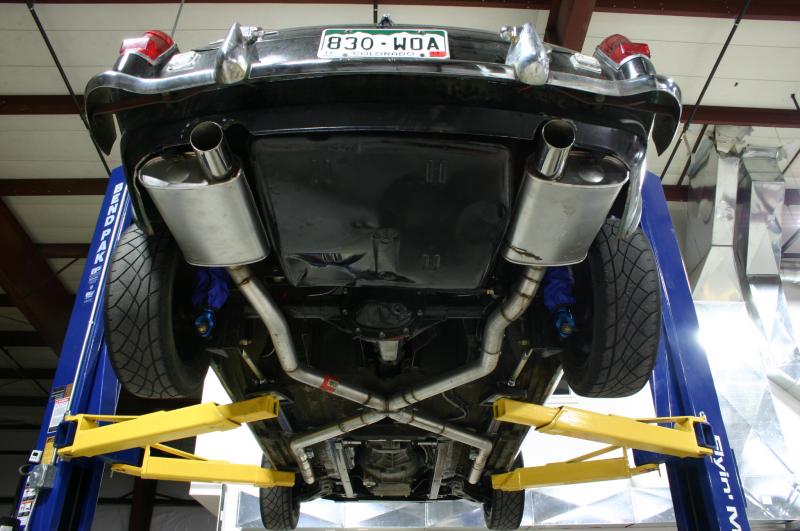
Exhaust system. The goal for this car was to make, well, a GT. I wanted something reasonably quiet for long trips, and the closed body makes that harder than with a roadster. So I spent a lot of time looking for mufflers. I eventually decided on a pair of Dynomax Super Turbos with 2.5" piping. To make sure I could make things fit before ordering the mufflers, I made a mockup. In order to fit one muffler on each side of the fuel tank, I had to move the latter over by 3". That's easily accomplished, of course. Even then, I had to trim out some of the wheel well. With the stock track width, this wouldn't have worked.
With the general layout figured out, I started at the front. The first step is flexible pool hose to figure out the basic routing. Through the wheel well was a given, due to the tight fit of the engine and the extra room afforded by the 4" wider track. But even then, there wasn't room for long tube headers. So I abandoned all hope of an equal length tuned setup, and just went for free flow. 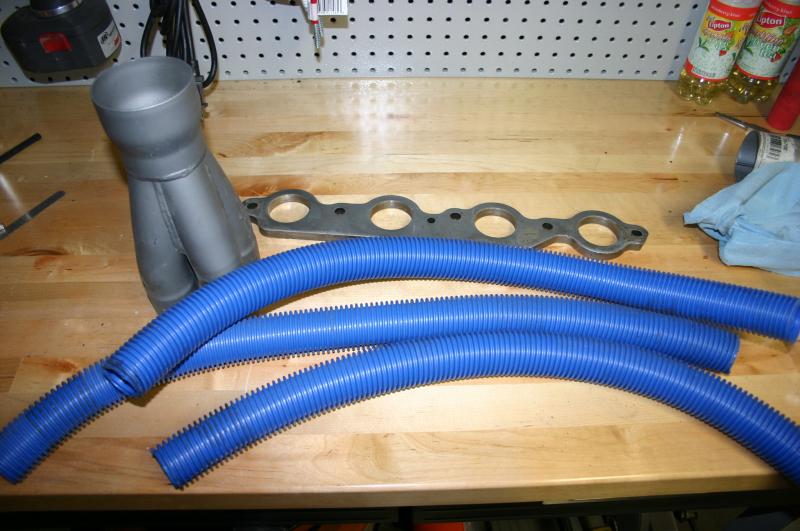
I used a tool from IceEngineWorks.com that I like to call "header lego". Great for building equal length headers, they're plastic blocks that are the equivalent of 1" of tube length and come in different radii. You click them together and twist them around until you figure out what's going to work, then duplicate in steel. 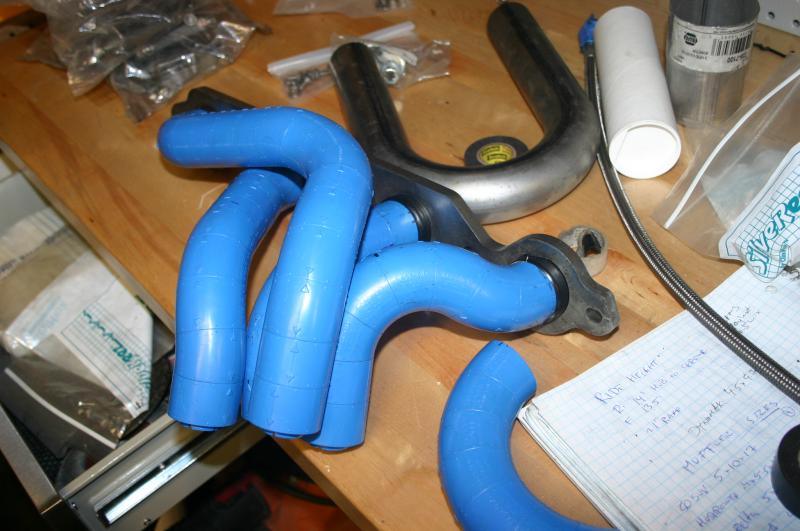

The final headers weren't works of art, but they fit. 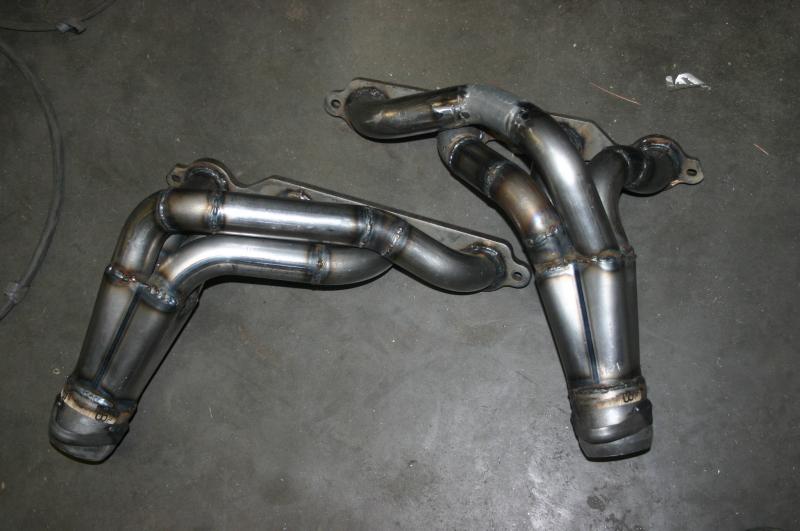
In order to get more room, I cut out the footwell a bit. There's a lot of useless space in the B's footwell, and I simply flattened the end of it. You can see how close the bellhousing sits here as well. 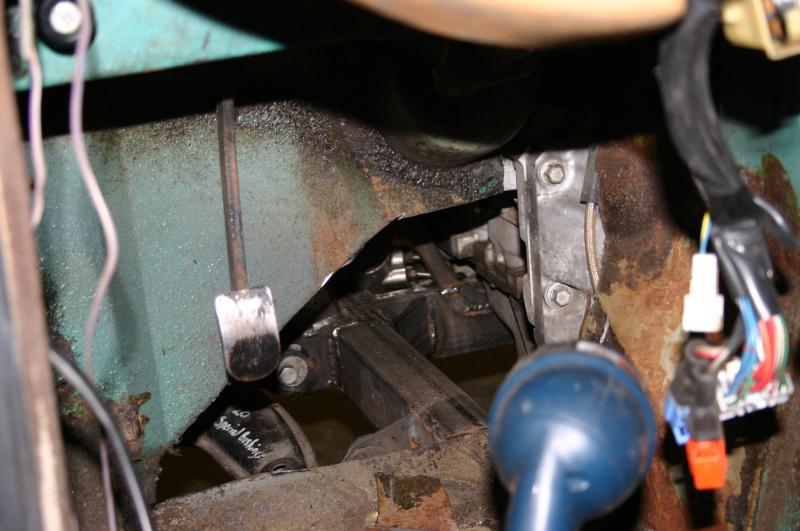
Because the new pipes were so much bigger than stock, I had to add a new pass-through on the frame crossmember. To make things more interesting, in order to make my X pipe design work, the pipes had to go through at a 45 degree angle. 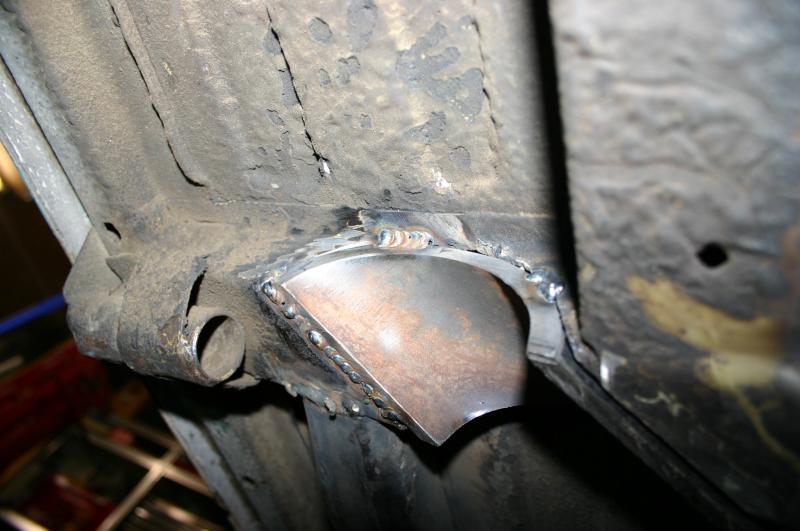
Sneaking the exhaust around the axle at full droop was a bit of a challenge, especially on the passenger's side with the Panhard bar bracket to deal with. 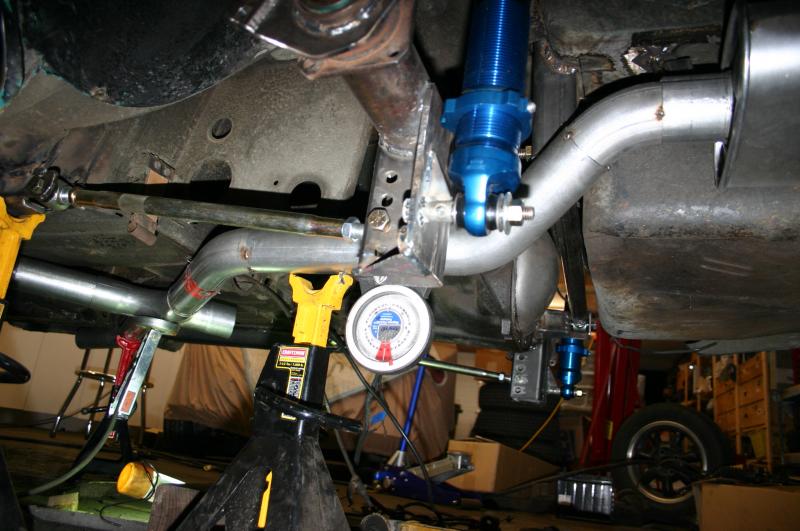
The complete exhaust system. 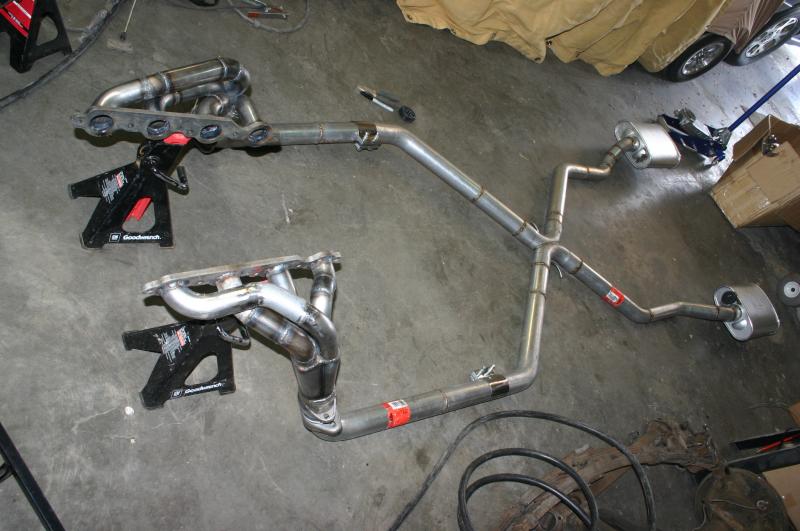
Eventually, I added some nice dual-wall tips. Not overt, but a subtle hint at what's underhood. 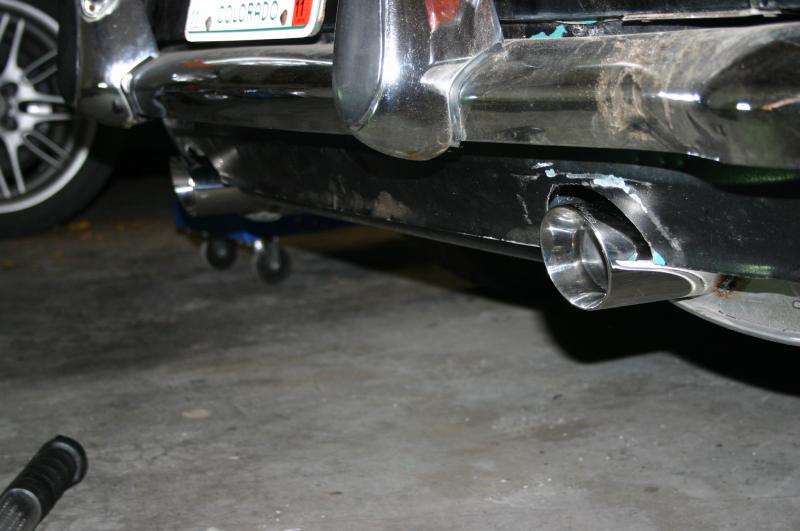 Edited 2 time(s). Last edit at 01/06/2011 11:55AM by Keith. |
|
|
|
Keith Keith Tanner Grand Junction, Colorado (92 posts) Registered: 10/31/2008 01:45AM Main British Car: For the purpose of this forum, 1972 MGB GT 5.7l Chevrolet LS1 |
Re: LS1-powered 1972 MGB GT build thread. Heavy picture content.
Cooling system. The radiator I picked out for the car was an AFCO part, the smallest dual-pass they made. Still, it was something like 20" tall. Packing it into the nose of the car took some work.
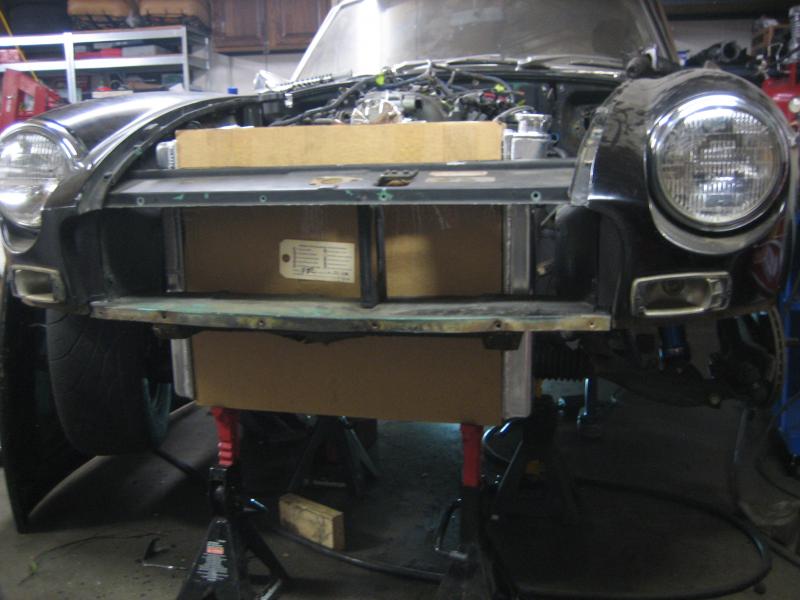
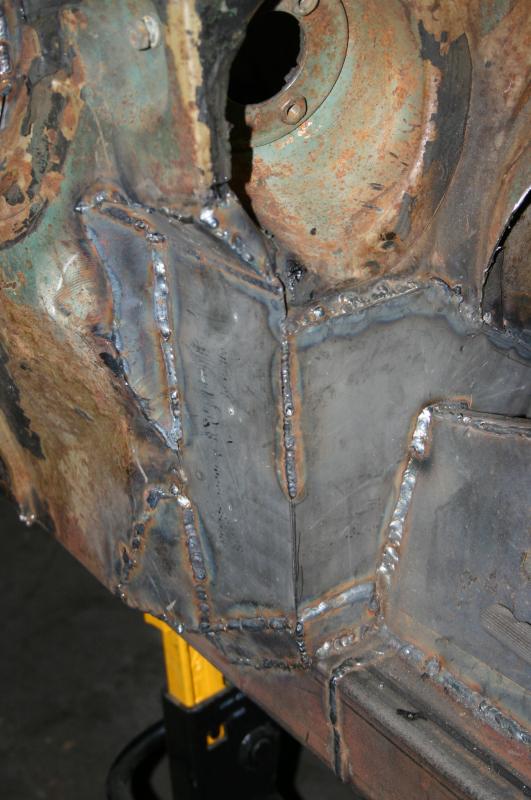
First, more of the front structure was cut out. Before extending the frame, I welded a reinforcement between what was left of the frame horns. 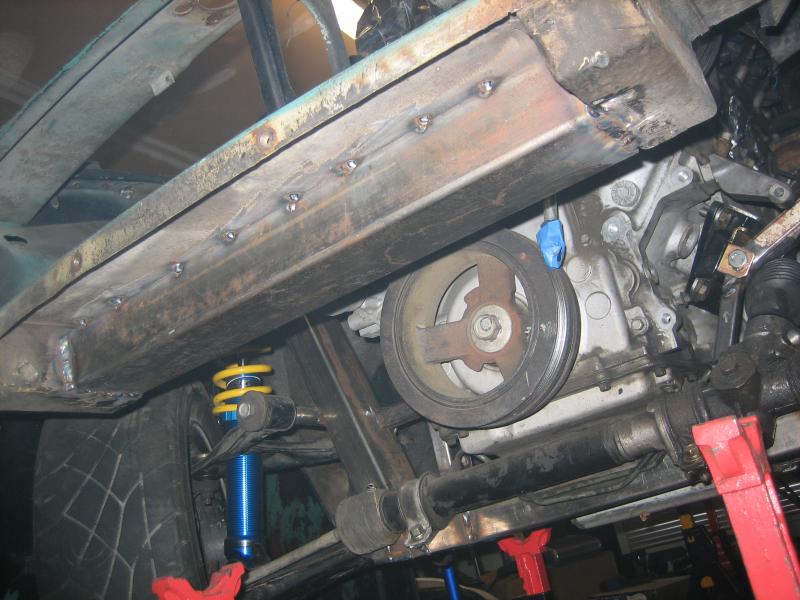
When I was done, the radiator cleared the hood (barely!) and the bottom was level with the Special Tuning air dam I had on hand. A bit big, but it fits. 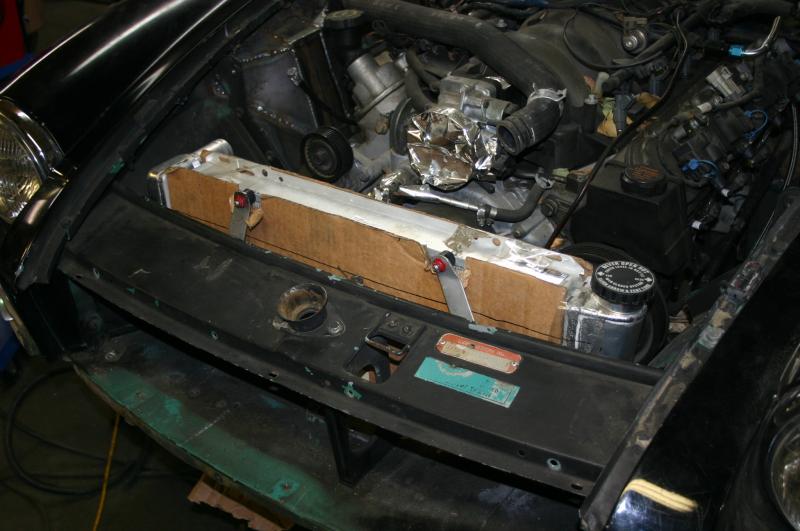
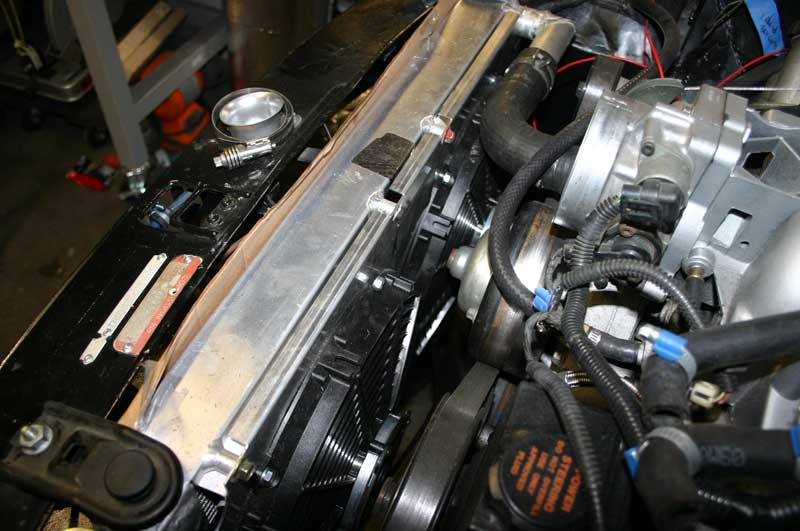
The input was modified to make it easier to route the cooling lines. Space was at a real premium here, with very little space between the engine and rad. 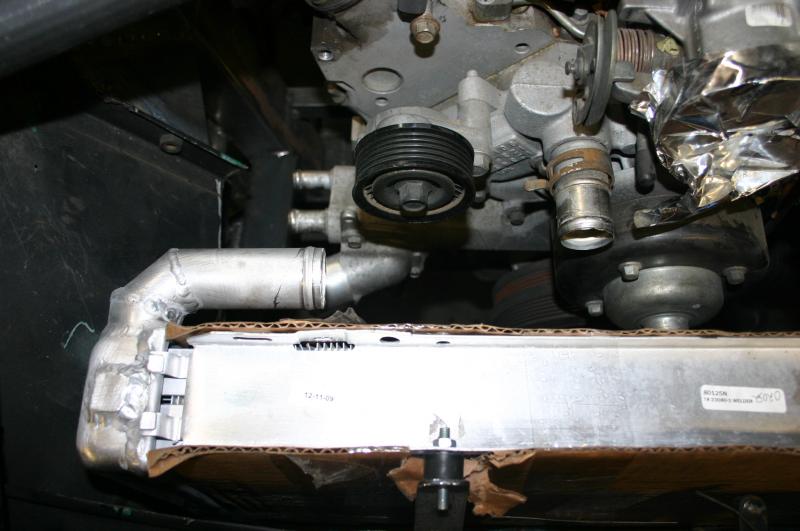
It was a big radiator. 20" x 26". 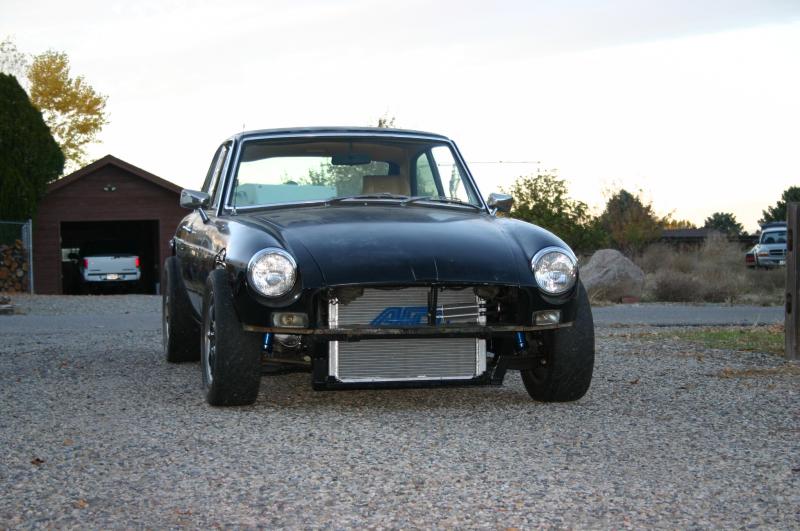
Now, we're going to step out of the rough chronology for a bit to follow the cooling system. Six months after this point, we developed a radiator at Flyin' Miata intended for Miata V8 swaps. It had all the fittings I needed, and we'd done a bunch of dyno testing to find the most efficient radiator core. There was even a fan shroud. So I pulled out the huge radiator right after the first drive of the car (pictured above) and put in the smaller one, improving packaging and probably cooling. The new one was around 5" shorter and 1.5" narrower. Two beefy high-torque SPAL fans pull air through the efficient core. 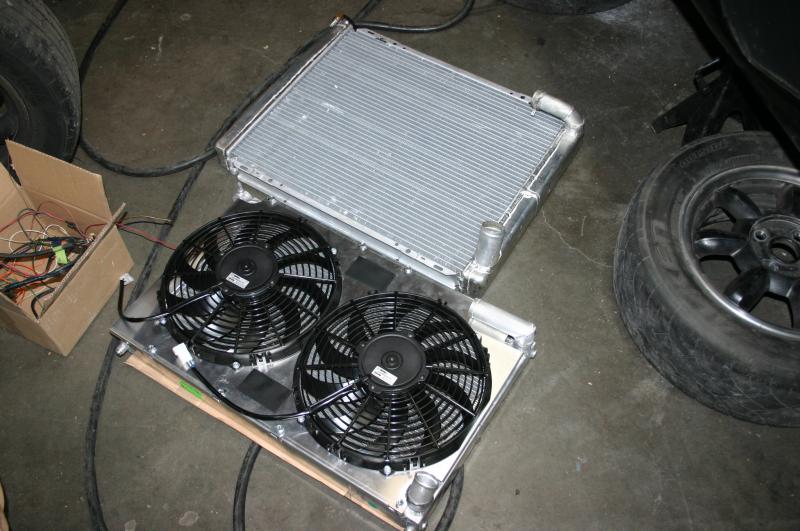
 Edited 3 time(s). Last edit at 01/06/2011 11:57AM by Keith. |
|
Keith Keith Tanner Grand Junction, Colorado (92 posts) Registered: 10/31/2008 01:45AM Main British Car: For the purpose of this forum, 1972 MGB GT 5.7l Chevrolet LS1 |
Re: LS1-powered 1972 MGB GT build thread. Heavy picture content.
Fuel. Obviously, a 5.7 V8 with fuel injection needs a different fuel system from a carbureted 1.8. Since my car had a vapor recovery system, there were already two fittings on the tank. Perfect. A modern Corvette fuel filter with an integral regulator was installed in the same location as the stock fuel pump and fed with a Pierburg high-pressure pump. I like these pumps over most aftermarket ones because they're made to OE quality levels and are far more reliable than most. They're also easy to mount inline. Here, it's loaded into the bracket that was welded in beside the filter.
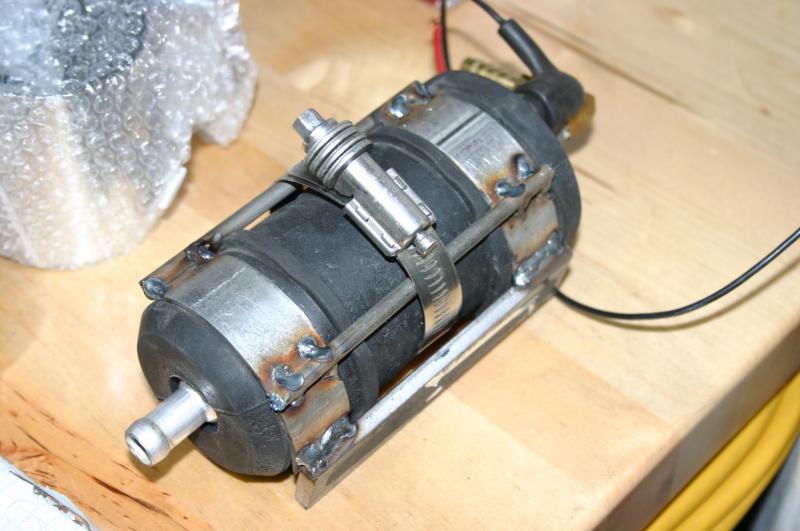
The rest of the system was converted to AN fittings, and a braided line runs up to the engine. I used rubber lines to mate to a very short stub of the original MG lines so I could hook up to the tank. The old vapor recovery line is used as the fuel return. The sealed gas cap got replaced by a vented one, donated by the 1968 parts car. 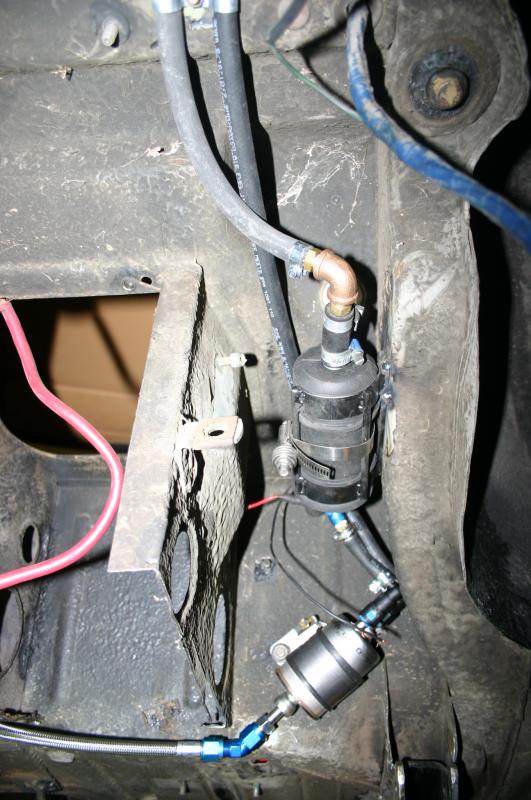
It seems simple now, but there was lots of fooling around to get this to work. All the correct AN fittings at the right angles, figuring out how to mate it all to the tank - lots of doodling on sketch pads! |
|
Keith Keith Tanner Grand Junction, Colorado (92 posts) Registered: 10/31/2008 01:45AM Main British Car: For the purpose of this forum, 1972 MGB GT 5.7l Chevrolet LS1 |
Re: LS1-powered 1972 MGB GT build thread. Heavy picture content.
Wiring! This will be fun. I have Miata parts (the combo switches on the steering column, including the ignition switch), GM parts (the engine harness) and of course the MG harness which is being retained to run the instruments and housekeeping. I decided to center most of the wiring around the passenger's footwell, in large part because that's similar to the location of the engine computer (PCM in GM-speak) in the Camaro and it meant I could use most of the GM harness unmodified.
The massive PCM - only used in the 1998 Camaro and Firebird, later cars got a smaller one - was mounted at the end of the footwell. The panel just about the PCM was removed for wiring runs. I also ran the factory harness through the interior of the car and up into the engine bay through this hole. With that huge hot exhaust snaking back and forth under the car, it was a real challenge to run anything front-to-back underneath. 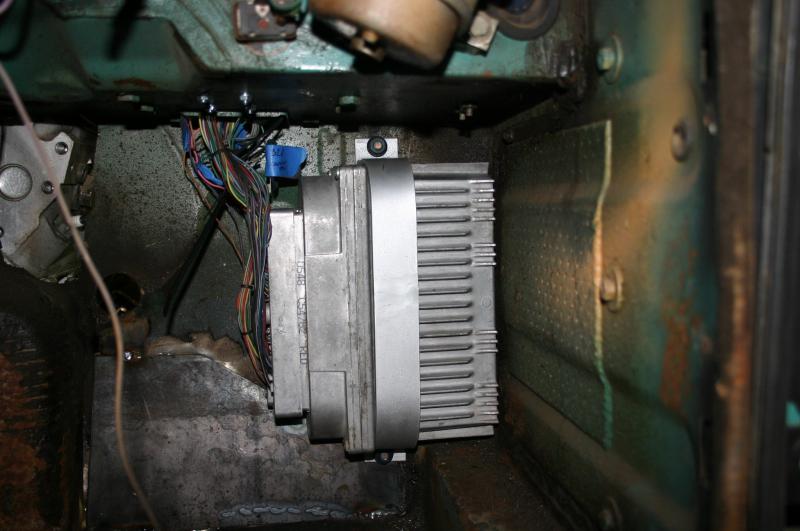
A new fusebox is above the footwell for switched power. There's also a big circuit breaker for a main fuse and a secondary fusebox for constant power circuits. 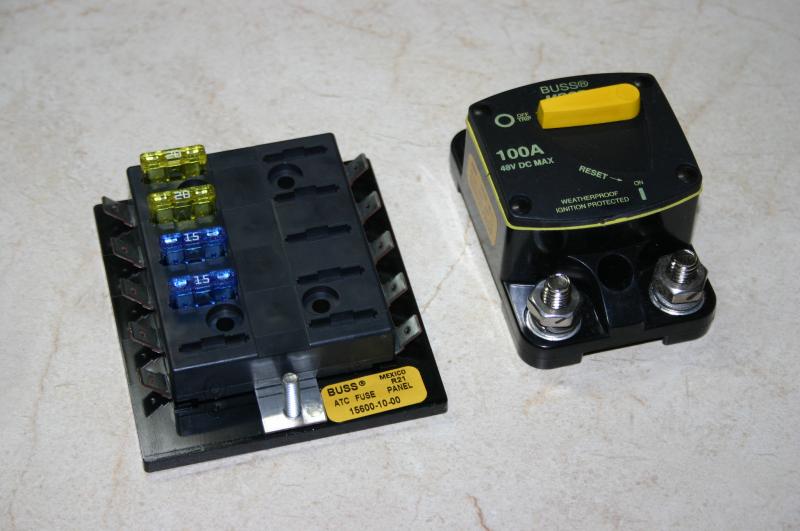
The GM engine harness was stripped down and all non-essentials were removed. This car won't have air conditioning, a number of emissions controls and various other bits, so I traced them and pulled them out. The GM parts are extremely well documented so this was a lot easier than it sounds. After only a couple of hours of work, I had a much simpler harness ready to plug into place. 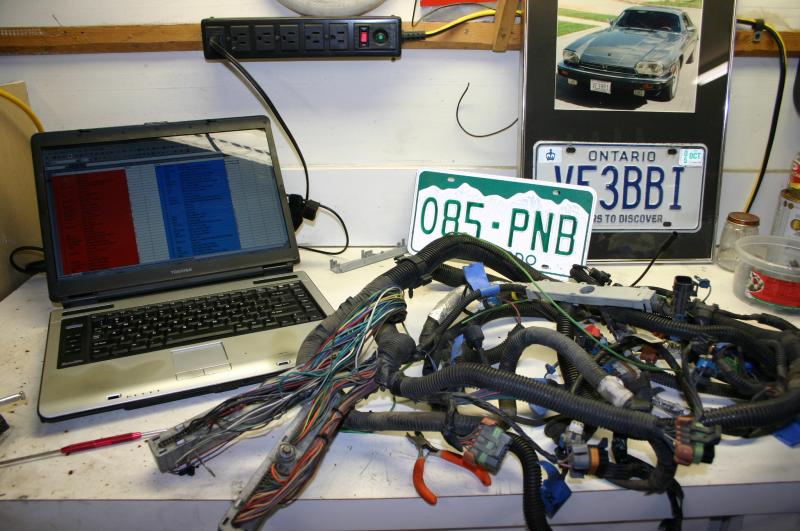
The battery was mounted in the trunk for weight distribution and packaging reasons. It's an Optima, which can be laid down like this. That's a Miata space-saver spare back there as well, a nice fit to the MG sub-basement. 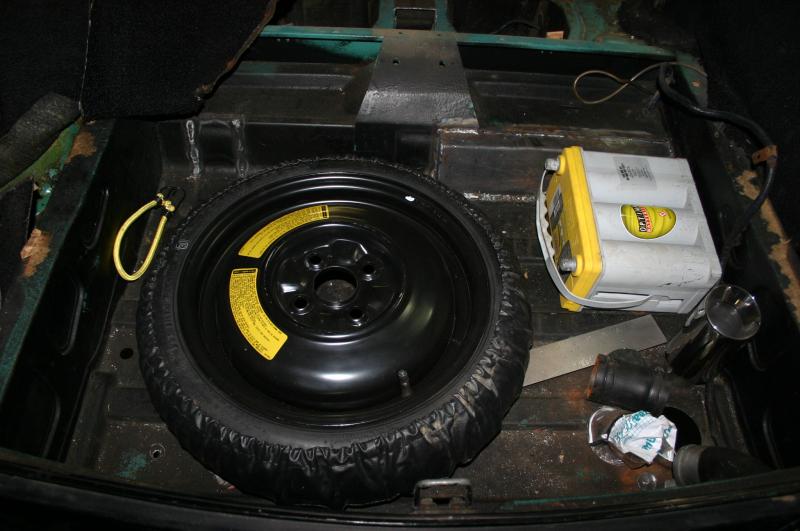
Naturally, wiring took a lot of research. 
And was ugly as things progressed. 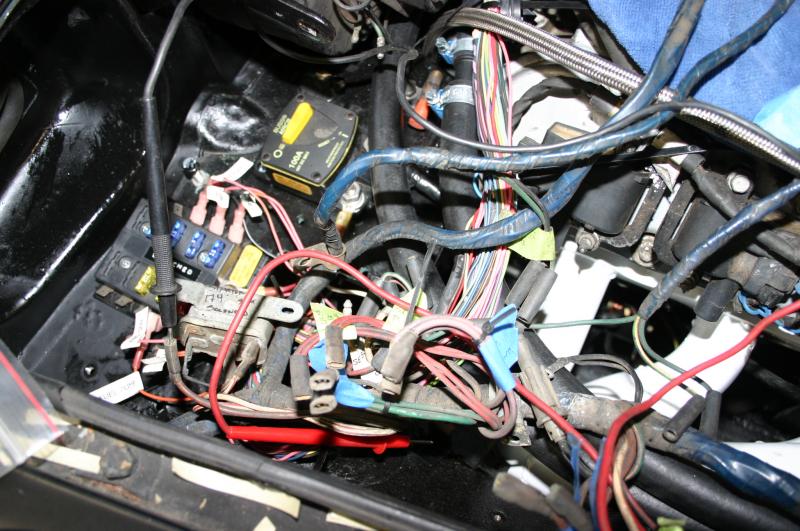
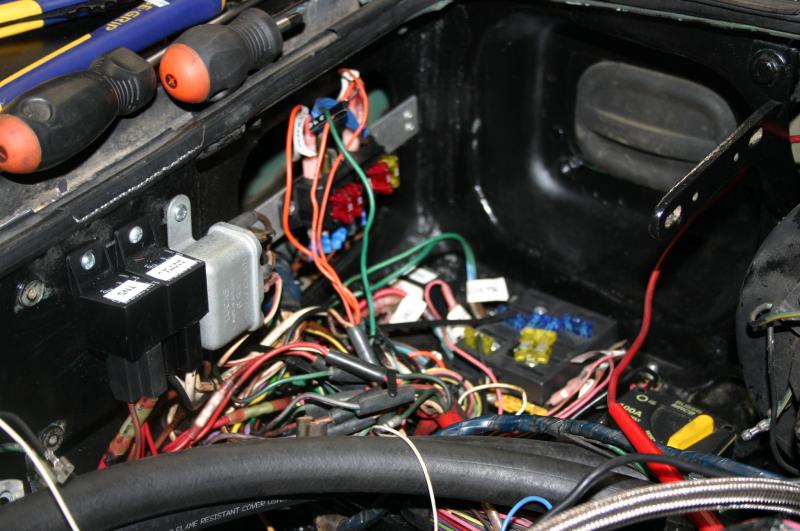
It did get better, but it's still a bit rough. I'll clean it up once I'm done troubleshooting. Right now, easy access is most important. 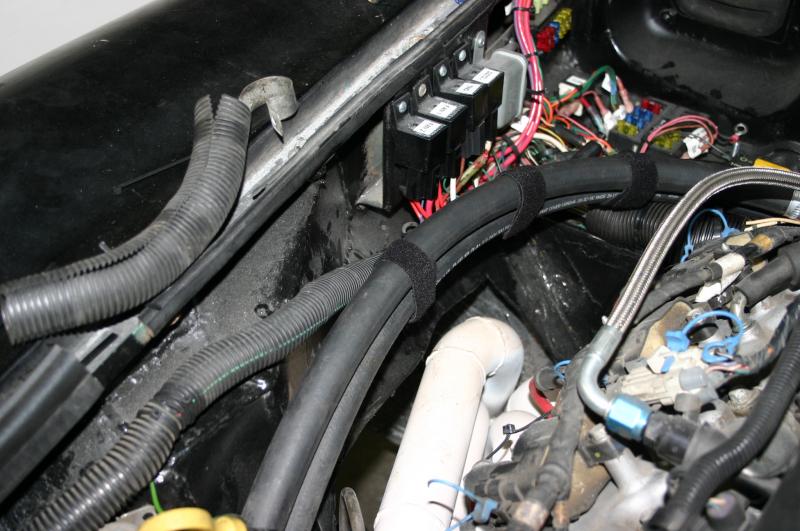 |
|
Keith Keith Tanner Grand Junction, Colorado (92 posts) Registered: 10/31/2008 01:45AM Main British Car: For the purpose of this forum, 1972 MGB GT 5.7l Chevrolet LS1 |
Re: LS1-powered 1972 MGB GT build thread. Heavy picture content.
Partway through the wiring, I realized I needed to finish the engine bay and painting, or I'd have to remove all the wiring again later. So the drivetrain came out again. Step one was to panel the engine bay, covering up all the holes I cut.
And more. As you can see, the whole car was basically rebuilt from the firewall forward. 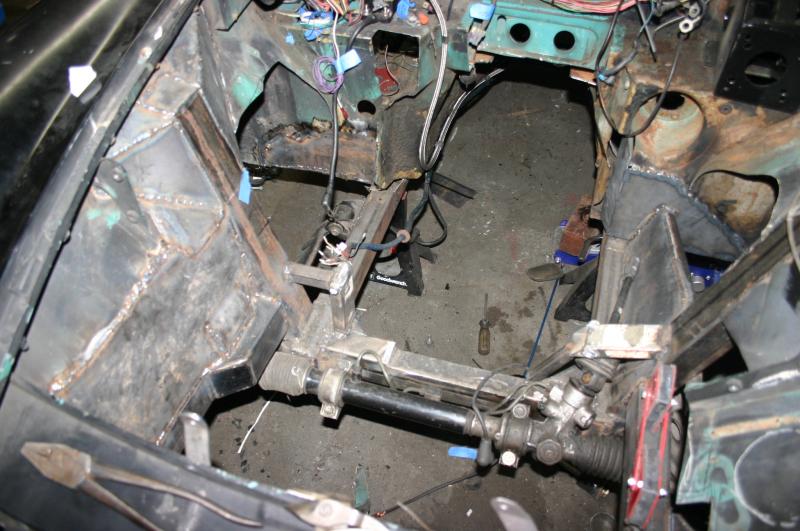
The shock towers were tied into the unibody for maximum strength. The Miata has a double-wishbone suspension, so there aren't any cornering loads fed into the top of the shocks. But they still need to well anchored. After welding all seams were sealed with seam sealer and the engine bay was painted with POR-15. 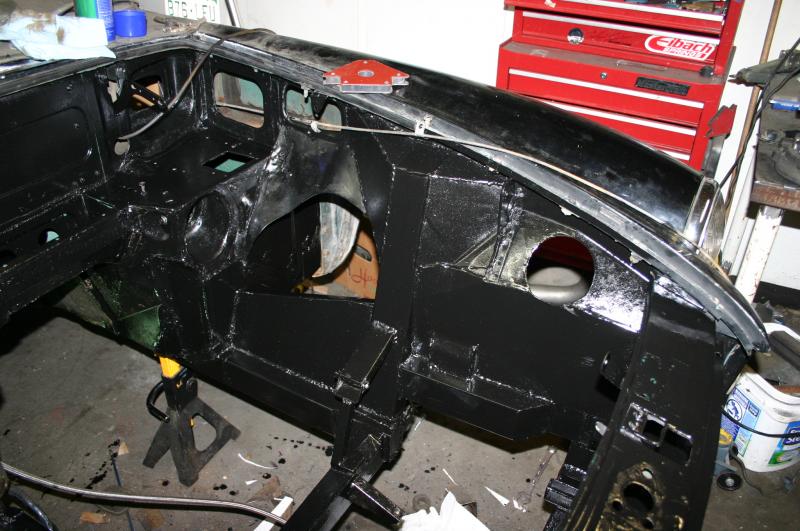
While the engine was out, I installed a new clutch slave cylinder and clutch lines. Then it went back in for the final time. 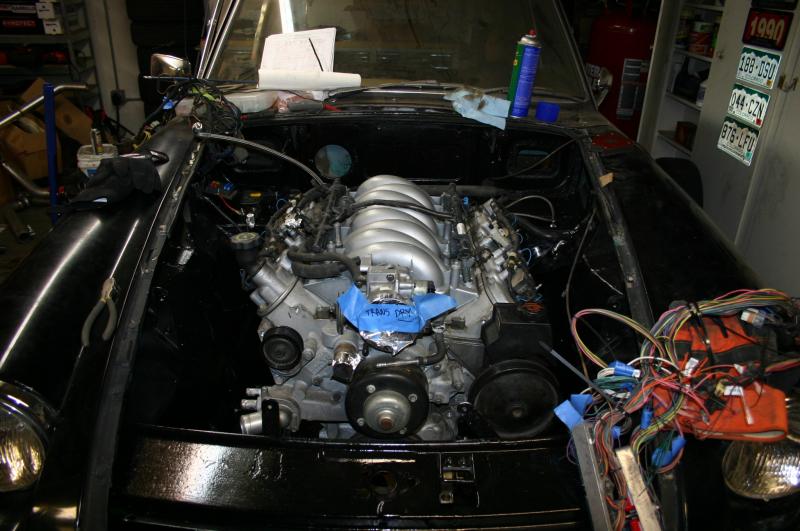 |
|
|
|
Keith Keith Tanner Grand Junction, Colorado (92 posts) Registered: 10/31/2008 01:45AM Main British Car: For the purpose of this forum, 1972 MGB GT 5.7l Chevrolet LS1 |
Re: LS1-powered 1972 MGB GT build thread. Heavy picture content.
Brakes. I knew I wanted power brakes - this was turning into a quick, quick little car. After rebuilding and reinstalling the 1972 master, I really didn't want anything else to do with that! So I picked up a pedal box, booster and master cylinder from a 1974 MGB and started playing with options.
Since I was using Miata brake parts at the wheels, I considered using a Miata booster and master cylinder. There are three different boosters and two master cylinder sizes used on various Miatas, with the possibility of a third master size (7/8, 15/16 and 1") if I used a Mazda 929 part. I knew this was a good booster and I had access to al the parts. Unfortunately, despite my best efforts, I could not make it fit to my satisfaction. 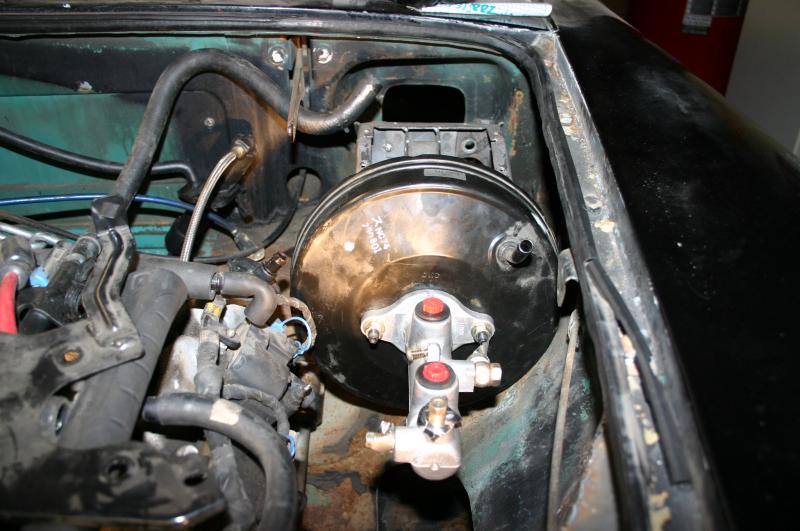
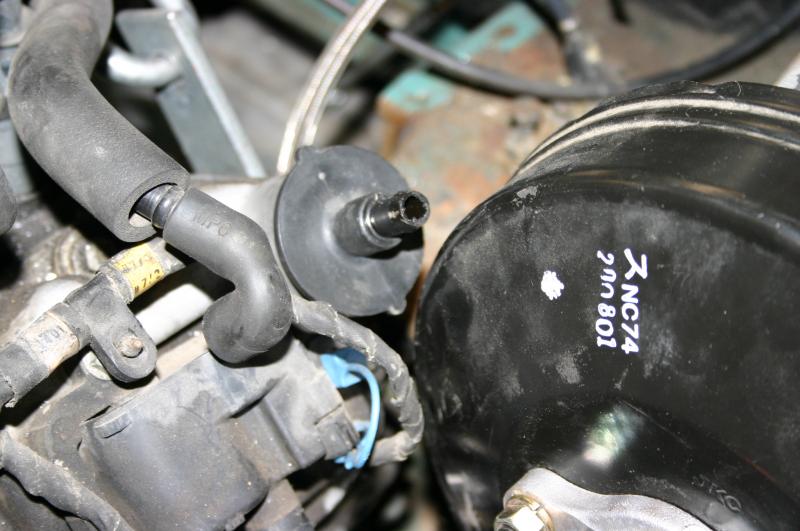
Thanks to a post on the BritishV8 site, I knew about the potential to use a 1" Wilwood dual master cylinder with the MG booster. Based on my calculations, that should give a nice firm pedal, just slightly beefier than my race Miata. The question was how much boost was offered by the MG booster, but I decided to gamble on that. The fit was much better. 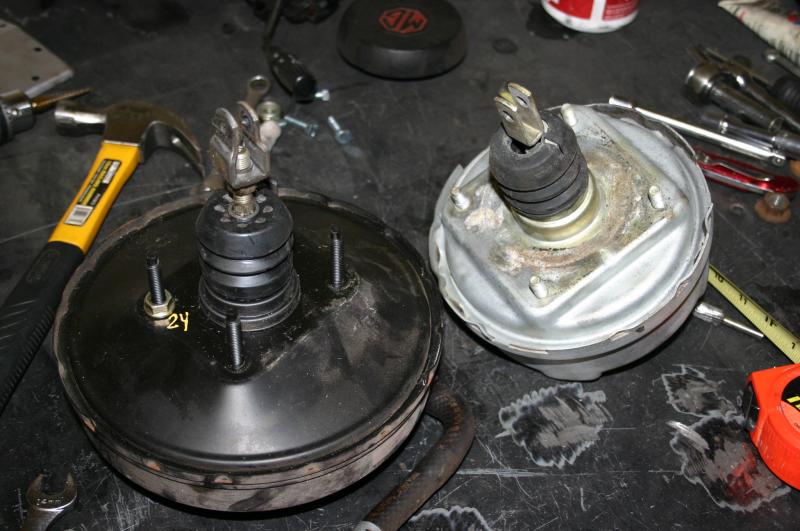
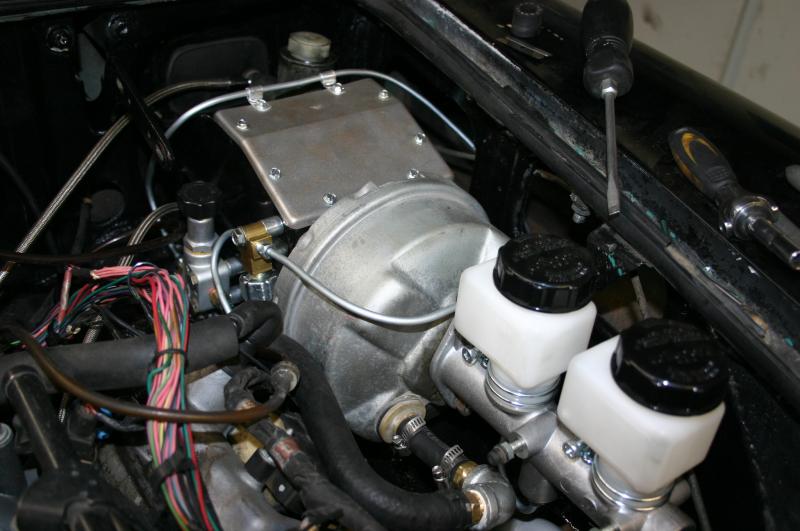
I built all new brake lines for the car, including an adjustable proportioning valve that will be used to fine-tune the car's braking behavior. It can be seen in the above picture. The lights are triggered from a pressure switch on the rear line, pre-valve and also visible in the above picture. Because I have Miata parts at the wheels, I have a number of brake upgrades available should this be necessary. The car is under-braked for hard track use, but that's fine. |
|
Keith Keith Tanner Grand Junction, Colorado (92 posts) Registered: 10/31/2008 01:45AM Main British Car: For the purpose of this forum, 1972 MGB GT 5.7l Chevrolet LS1 |
Re: LS1-powered 1972 MGB GT build thread. Heavy picture content.
Those are the major systems I think. Let me know if I missed something or if you want me to cover something in particular. There are no secrets here.
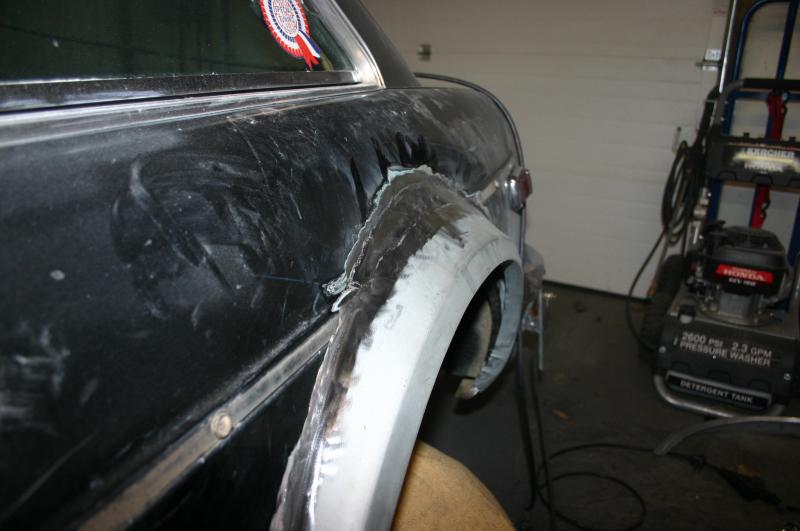
Body. Thanks to my wider track, I had to do surgery on the wheel wells to clear my tires. I figured out the basic cut by putting my suspension to full compression and using a sharpie on a cleverly sized piece of string to trace out the tire circumference . 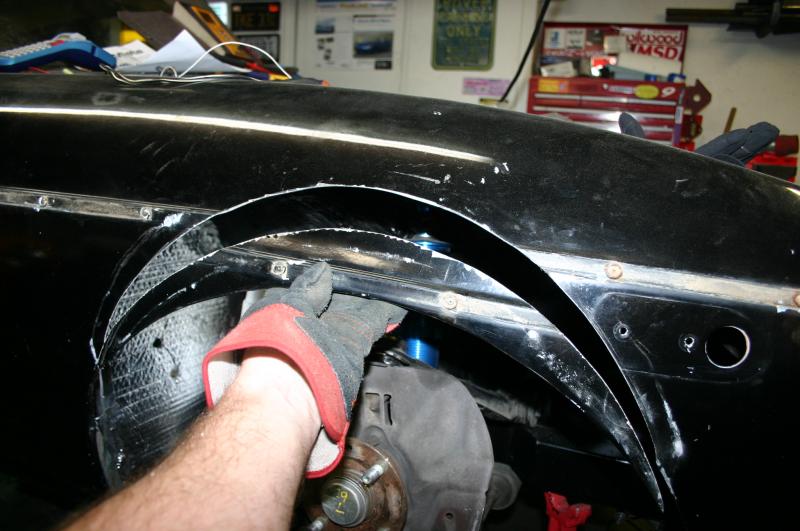
Now I could drive the car (and I did!), but this obviously was not good enough. 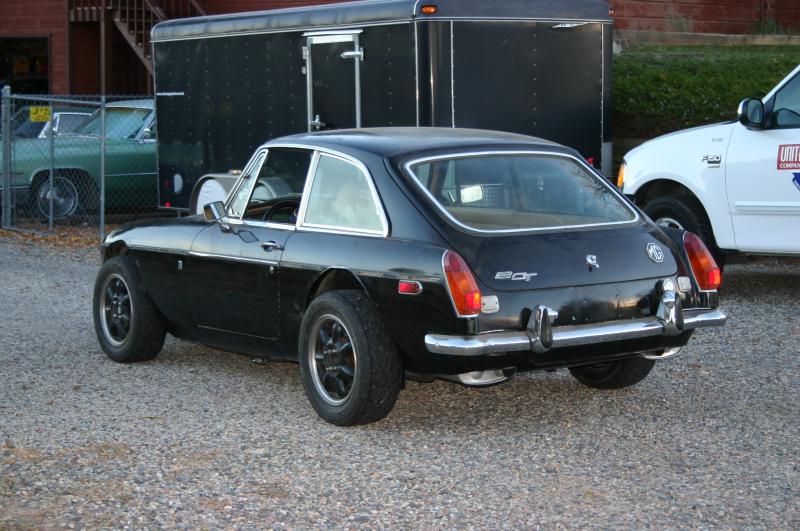
So I installed a set of Rabbit flares. I started a separate thread on the subject, hopefully it'll help someone else and I'd recommend questions and discussion of the flares go there so it's easy to find. So I'll just post some pictures here. 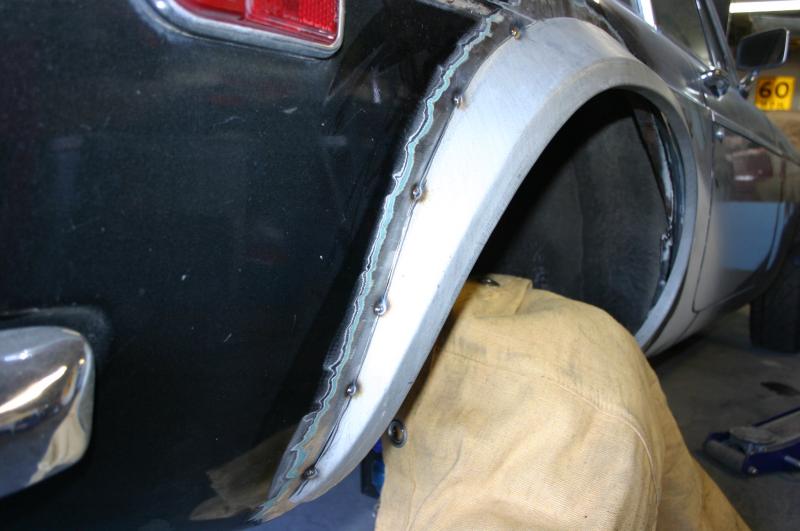
 |
|
Keith Keith Tanner Grand Junction, Colorado (92 posts) Registered: 10/31/2008 01:45AM Main British Car: For the purpose of this forum, 1972 MGB GT 5.7l Chevrolet LS1 |
Re: LS1-powered 1972 MGB GT build thread. Heavy picture content.
The first drive took place almost exactly two years after the MG went into the garage for the last time. The new book - the one that held up the car for six months or so - arrived from the printers at just about the same time. It was very rewarding to have two projects come to fruition at the same time. But I wasn't done.
Interior. Not a critical part of the build from a technical standpoint, but I couldn't let that spray paint stay. First, I fixed the small bit of rust in the passenger footwell. It was sealed with seam sealer and then the complete interior was painted with POR-15 to prevent further problems. 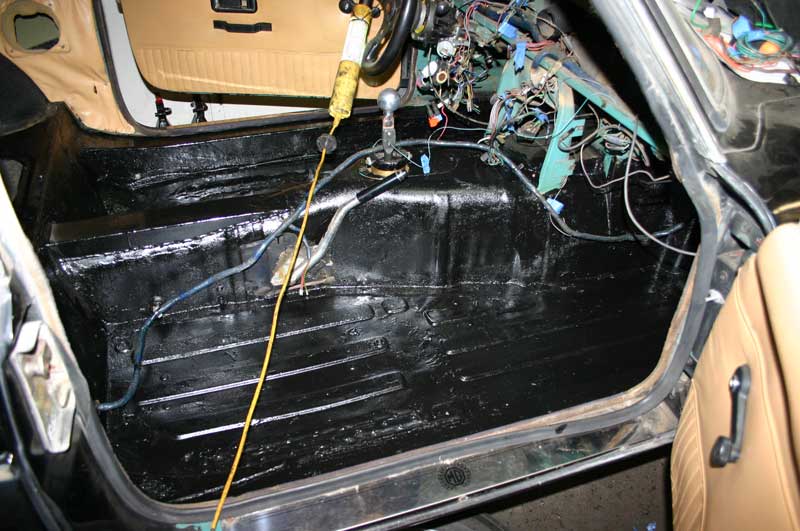
Next, a layer of Cool-it sound and heat insulation. Remember, I want this to be a comfy car. This stuff isn't too heavy, about 6.5 lbs/roll. Later, a layer was added at the top of the firewall behind the dash. There are about 2.5 rolls of the stuff in the car, and I want to put a bit more under the carpet on the rear wheel wells next time I'm tearing that area apart. 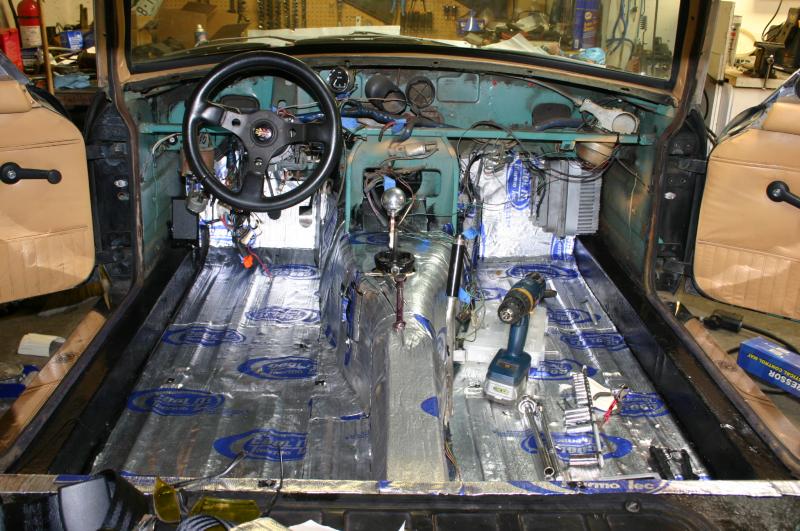
Someday, I'll refinish the dash as it's cracked at the top. In the meantime, I taped up the crack and gave it yet another coat of spray paint. Black this time, of course. MG fans will notice that the 1972 center console is gone, replaced with the 1968 part. Janel and I both prefer the feeling of extra roominess of the cockpit. Note the Miata steering wheel and column cover. The cover mates up to the MG dash perfectly - not in this photo, but when it's assembled properly it does. The column switches control wipers, headlights and turn indicators. I haven't done anything to deal with the shift boot yet. The MG one won't fit anymore due to the diameter of the Hurst shifter on the new transmission. 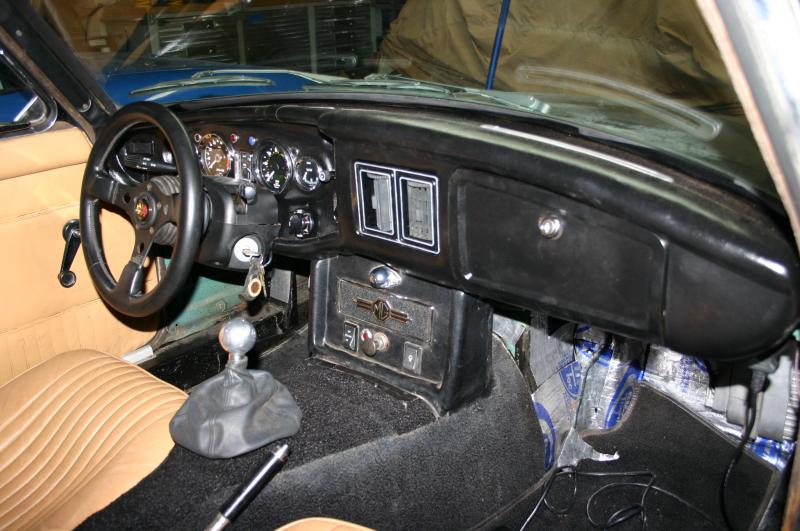
The T-56 has an electronic speedometer output. There are electric-to-mechanical converters, but I don't like them all that much and they're expensive. For less, I picked up this Smiths electronic speedometer and it works perfectly. It even matches the other instruments pretty well. 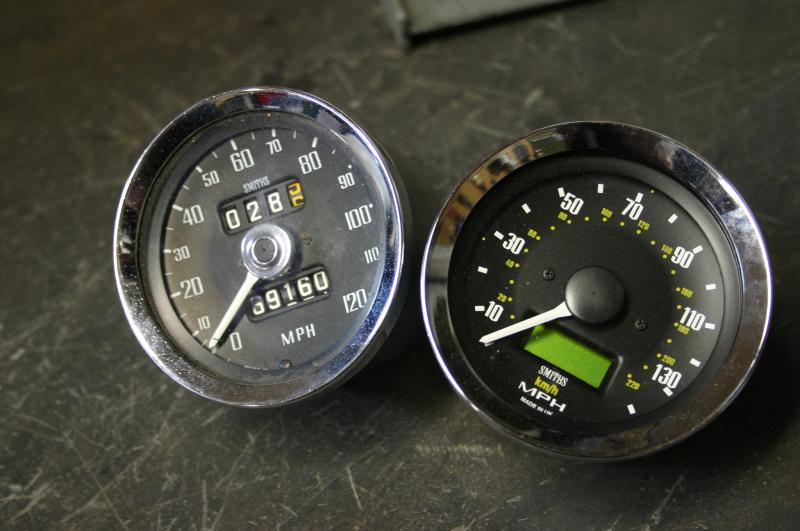
The LS1 puts out a four-cylinder tach signal, so that wasn't a problem. But the inductive-style tach used in my 1972 wouldn't work with the electronic signal. A later RVC tach solved the problem perfectly. 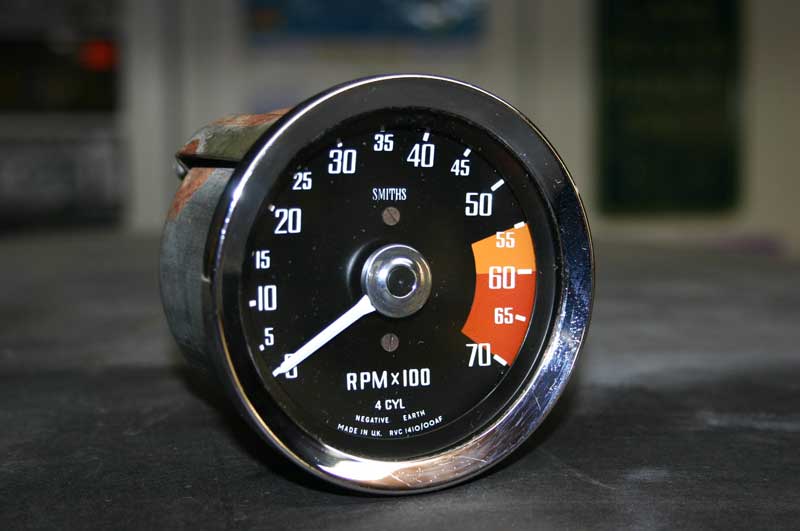
I still need to recalibrate the coolant gauge, as it only just comes off the peg when the engine's in the upper edge of its normal operating range. The oil pressure gauge needs to be hooked up as well. But right now, the interior feels like a much better place to be. I have a full biscuit GT interior ready to install when I get to the point of doing a real clean-up on the interior. After paint. I'm at the sorting-out stage right now, dealing with little things like tracking down vibrations and chasing various little gremlins. Since I never really had the chance to drive the car before the surgery, I'm debugging not only a new suspension and drivetrain, but also finding standard Little British Car quirks that existed beforehand. Edited 2 time(s). Last edit at 01/06/2011 12:03PM by Keith. |
|
Keith Keith Tanner Grand Junction, Colorado (92 posts) Registered: 10/31/2008 01:45AM Main British Car: For the purpose of this forum, 1972 MGB GT 5.7l Chevrolet LS1 |
Re: LS1-powered 1972 MGB GT build thread. Heavy picture content.
It's been a lot of fun revisiting this from the beginning, and if you've made it this far I thank you for indulging me. If there's a particular part of the build you want to know more about, please go ahead and ask. There are no secrets here.
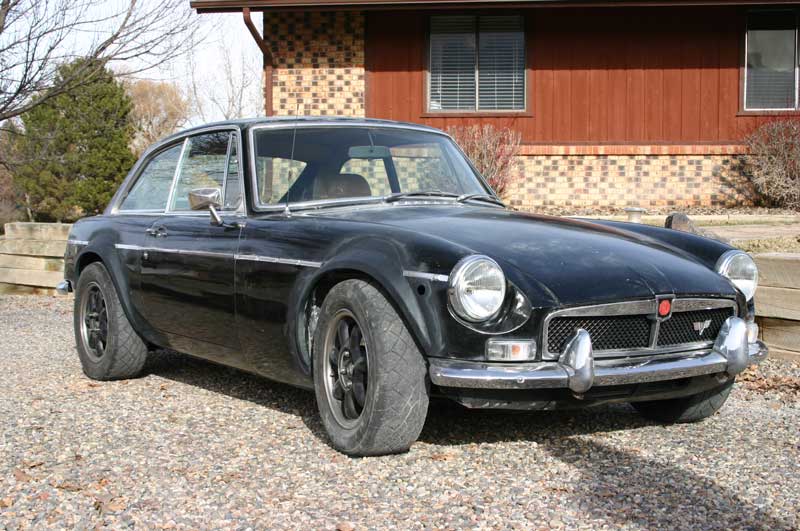
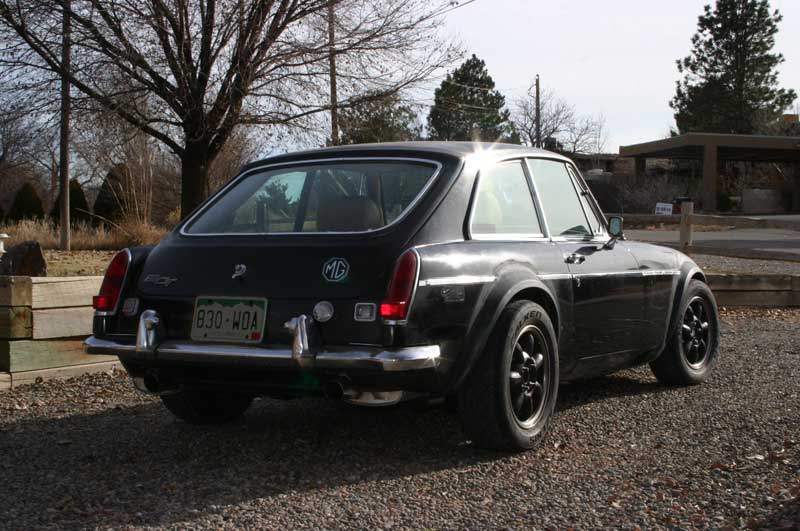
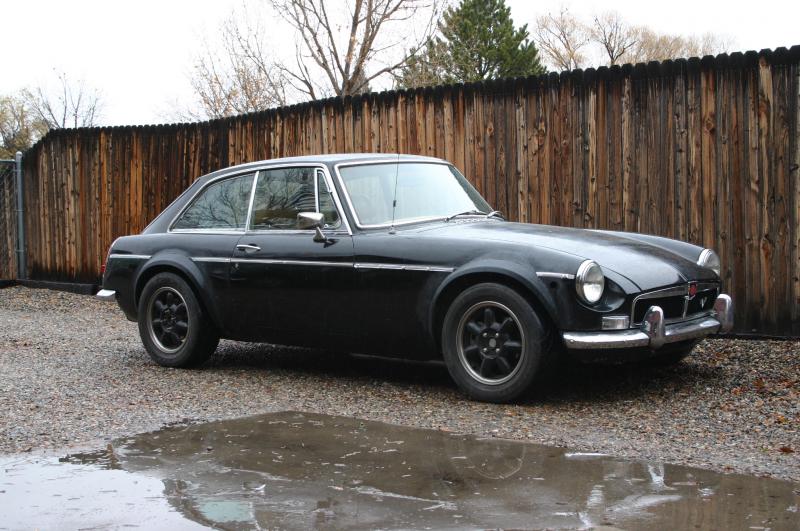
The final car weighs 2378 lbs with a nearly-full tank of fuel, and 48.1% of the weight is on the rear wheels. Power from the modified LS1 is somewhere around 350-375 hp, I'd guess. As you can imagine, it's a very quick little car. I still have to sort out the suspension, which will happen in the spring when the track thaws out. The ergonomics are very good, with a perfectly placed shifter, wheel and pedals. I always make this a priority in my builds, as I don't think an awkward driving position lends itself to good car control. I still need to continue quite a bit of debugging and deal with the repaint and associated bodywork, but here's a peek at the current state. MG fans will notice a fair bit of parts interchange with different model years - I'm picking and choosing the bits I like best from the MG catalog. The goal with this car is to build something that could be mistaken for a factory car to someone who doesn't know MGs. As for Janel's reaction? She's pretty happy with it. The first time she hit the throttle, she just laughed out loud. She kept referring to the car as "her grocery getter" as I worked on it, and we have indeed used it for grocery shopping. It's black, it's a cool little coupe and it definitely rumbles. Mission accomplished. 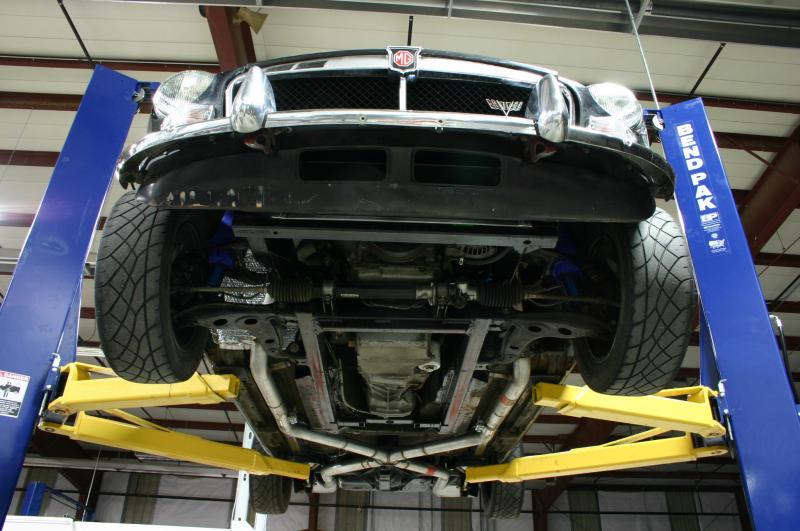

 Edited 4 time(s). Last edit at 01/06/2011 09:53PM by Keith. |
|
|
|
TR6-6SPD Ken Hiebert Toronto Ontario (255 posts) Registered: 04/23/2008 11:43AM Main British Car: 1972 TR6 1994 5.7 L GM LT1 |
Re: LS1-powered 1972 MGB GT build thread. Heavy picture content.
Keith,
A story well told! I've been following your build on the Slow Car Fast web site. Good that is. These posts here are excellent because they can give a first time reader the chance to see a real "How It Was Done",within a few hours of reading. Thanks for posting. |
|
MGBV8 Carl Floyd Kingsport, TN (4629 posts) Registered: 10/23/2007 11:32PM Main British Car: 1979 MGB Buick 215 |
Re: LS1-powered 1972 MGB GT build thread. Heavy picture content.
Thanks for spending all that time in the wee hours to bring us up to speed. Awesome project!
Hope you come to Townsend, TN for the V8 Meet to meet the rest of us loonies. ;) |
|
kerbau53 Geoff Morton Naples, FL (109 posts) Registered: 08/09/2010 10:27PM Main British Car: 78 MGB Ford 5L |
Re: LS1-powered 1972 MGB GT build thread. Heavy picture content.
Keith,
If you don't mind my asking, was your choice of cool-it insulation performance driven, price driven or both. Following you build closely. Flares look nice. Encourages me. |
|
rficalora Rob Ficalora Willis, TX (2764 posts) Registered: 10/24/2007 02:46PM Main British Car: '76 MGB w/CB front, Sebring rear, early metal dash Ford 302 |
Re: LS1-powered 1972 MGB GT build thread. Heavy picture content.
Great build Keith! Bet it's a hoot to drive. Hope to see you in Townsend!
|
|
|
|
Keith Keith Tanner Grand Junction, Colorado (92 posts) Registered: 10/31/2008 01:45AM Main British Car: For the purpose of this forum, 1972 MGB GT 5.7l Chevrolet LS1 |
Re: LS1-powered 1972 MGB GT build thread. Heavy picture content.
I chose the Cool-It for a couple of reasons. One, I have experience with it in the V8 Miatas. Second, we have it on the shelf at Flyin' Miata so I could simply go grab a roll when I needed it. It definitely works, I could notice a fair difference when I added the insulation behind the dash. I've also used a cotton-backed insulation (found at Home Depot and JC Whitney) in the past that works well, but it's much bulkier. It may not be the best insulation on the market (or it might, I don't know) but it was the best combination of price, bulkiness and availability for me!
I'm 1600 miles from Townsend. I'm not sure I can take the time for that sort of road trip this summer, as I'm hoping to run the Targa Newfoundland again and I already have a few commitments around the country for work. There's a possibility I'll be at the Mitty at Road Atlanta two weeks earlier along with a V8 Miata or two, but that makes it even harder to justify a second trip cross-country and I can't really spend two weeks just mooching around the area. So as much as I'd love to do it, I think it's fair to say I won't. I'd like to point out that I am not on the same time zone as the server, I wasn't up THAT late! |
Sorry, only registered users may post in this forum.
British V8 Home Page
Photo Gallery
Web Forum
Annual Meetings
Contact Info
Site Map
British Race Car

© 2025 British V8™ All rights reserved. Website & graphic design by:
Curtis Jacobson.
BritishV8 Forum is hosted by
SiteWelder LLC,
and is powered by a
Phorum engine.