

Triumph Sports Cars
engine swaps and other performance upgrades, plus "factory" V8s (Stag and TR8)
|
rficalora Rob Ficalora Willis, TX (2764 posts) Registered: 10/24/2007 02:46PM Main British Car: '76 MGB w/CB front, Sebring rear, early metal dash Ford 302 |
Re: 74 TR6 upgrade
It does look great. Not just the paint, but all the work leading up it too!
|
|
Phil Crawford Philip crawford Bogalusa, La (80 posts) Registered: 02/01/2013 10:38PM Main British Car: 74 TR6 07 4.8L |
Re: 74 TR6 upgrade
Rob
Thanks for the kind words. I do appreciate them. It has been fun. I think my wife would like me to finnish and do a few honey do's. Tks again Phil |

|
|
Phil Crawford Philip crawford Bogalusa, La (80 posts) Registered: 02/01/2013 10:38PM Main British Car: 74 TR6 07 4.8L |
Re: 74 TR6 upgrade
Starting to look more like a car than a skate board. 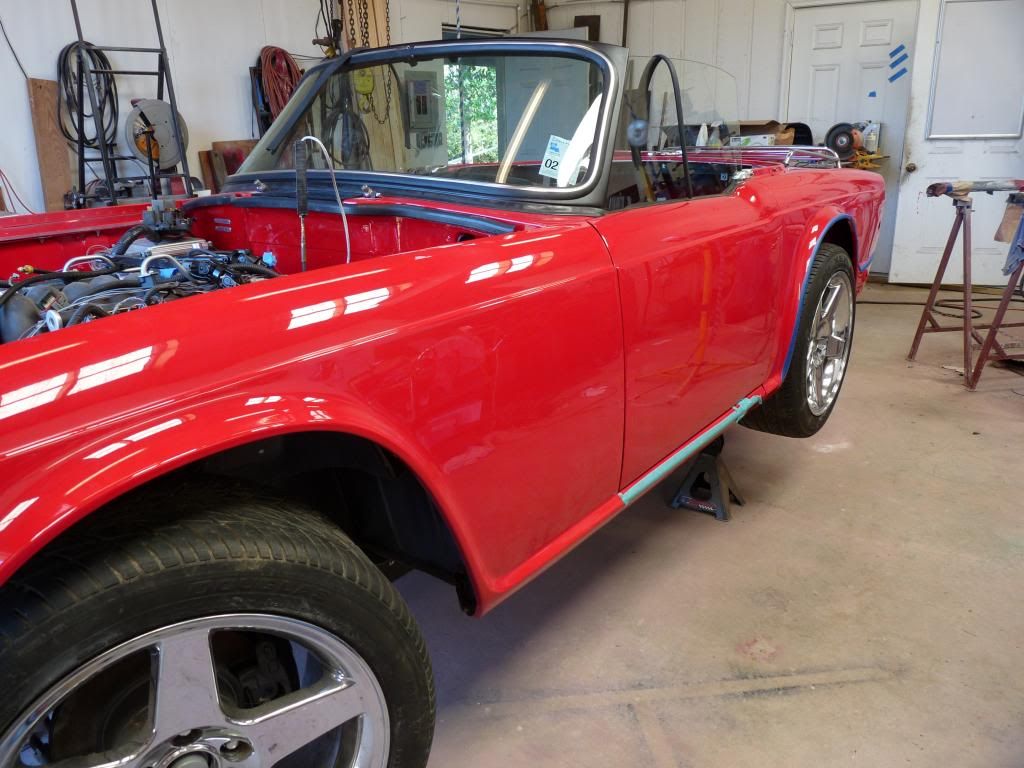
If you are wondering what the black thing with the wire coming out of it but were too polite to ask I will tell you. It is a switch box for the trans. selector to show you which gear you are in.. It didn't work so I am making another one and maybe it will work. 
Just looking 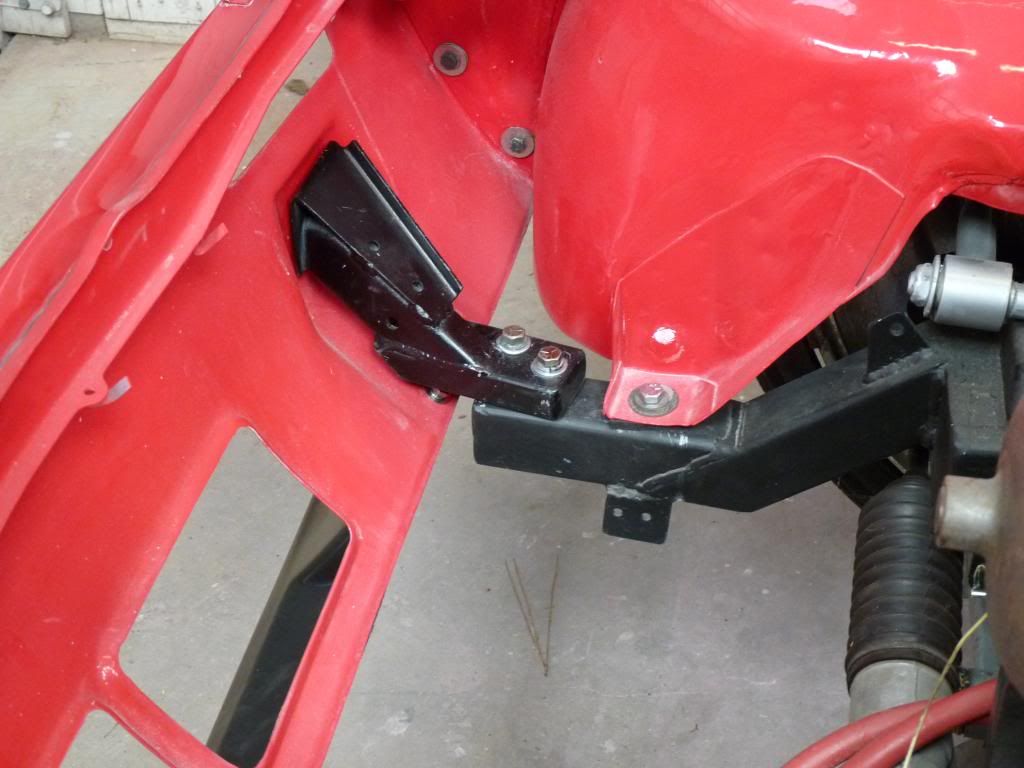
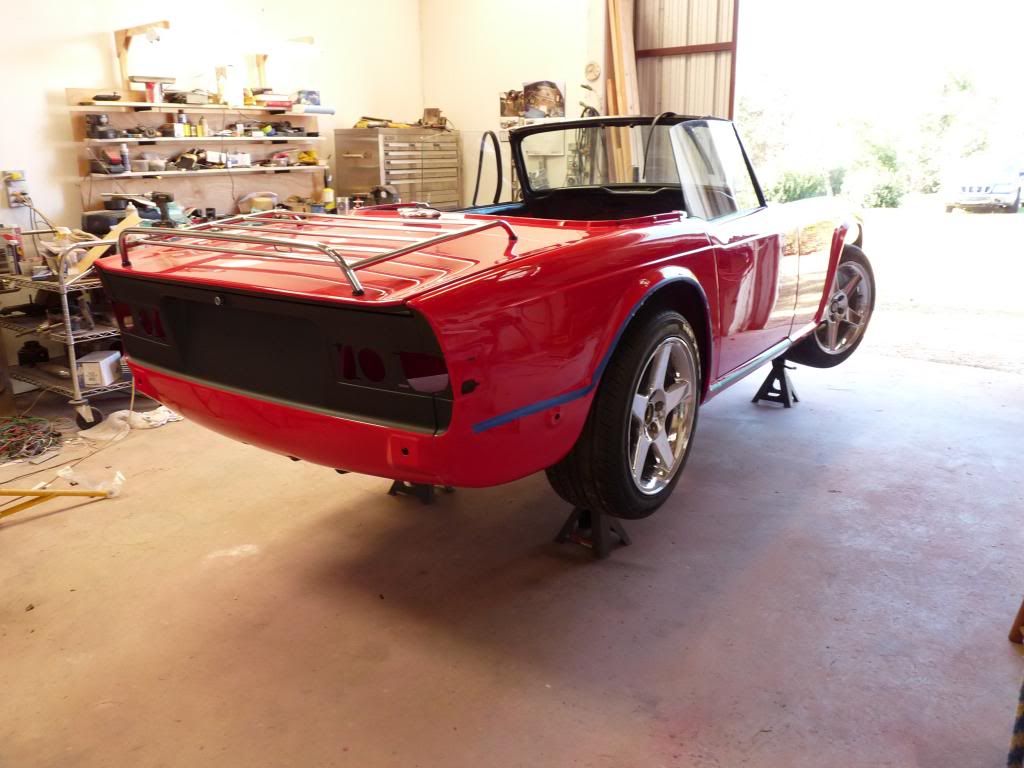
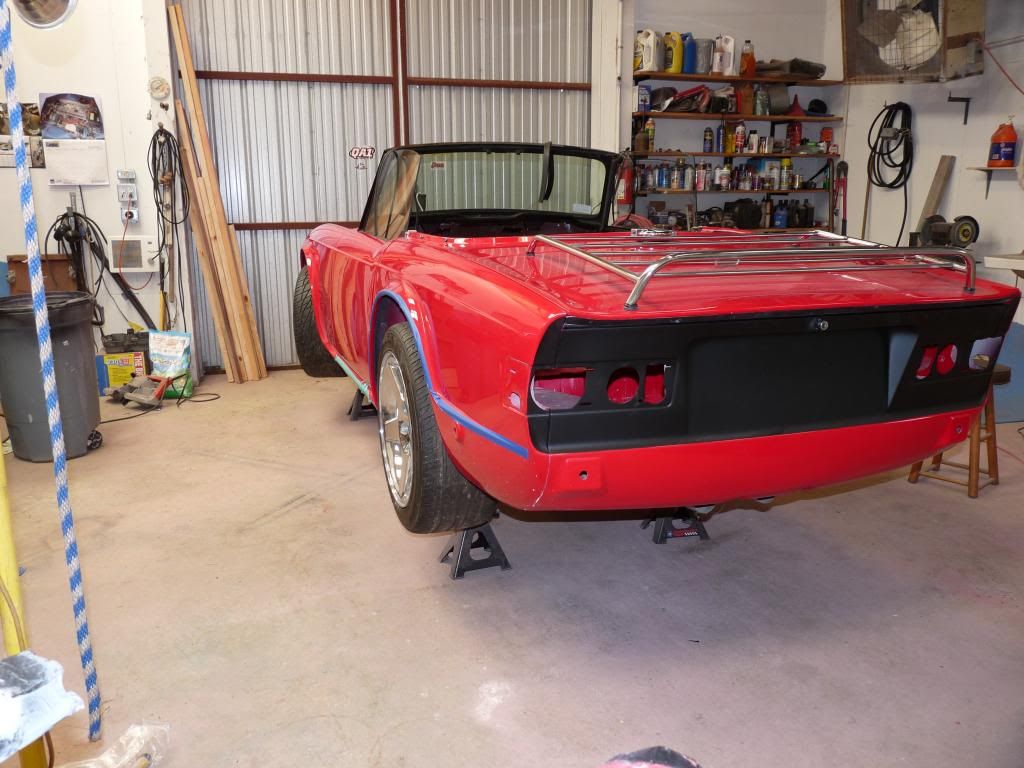
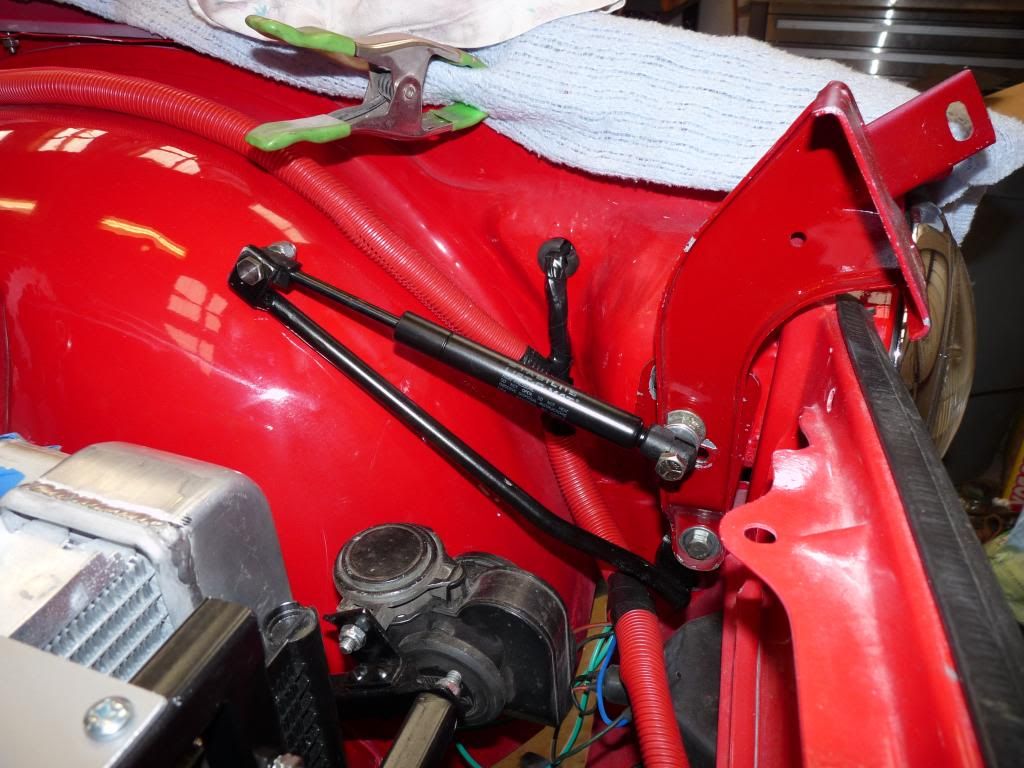
I modified the old bumper bracket to make it work. I don't think this is going to stop very much. 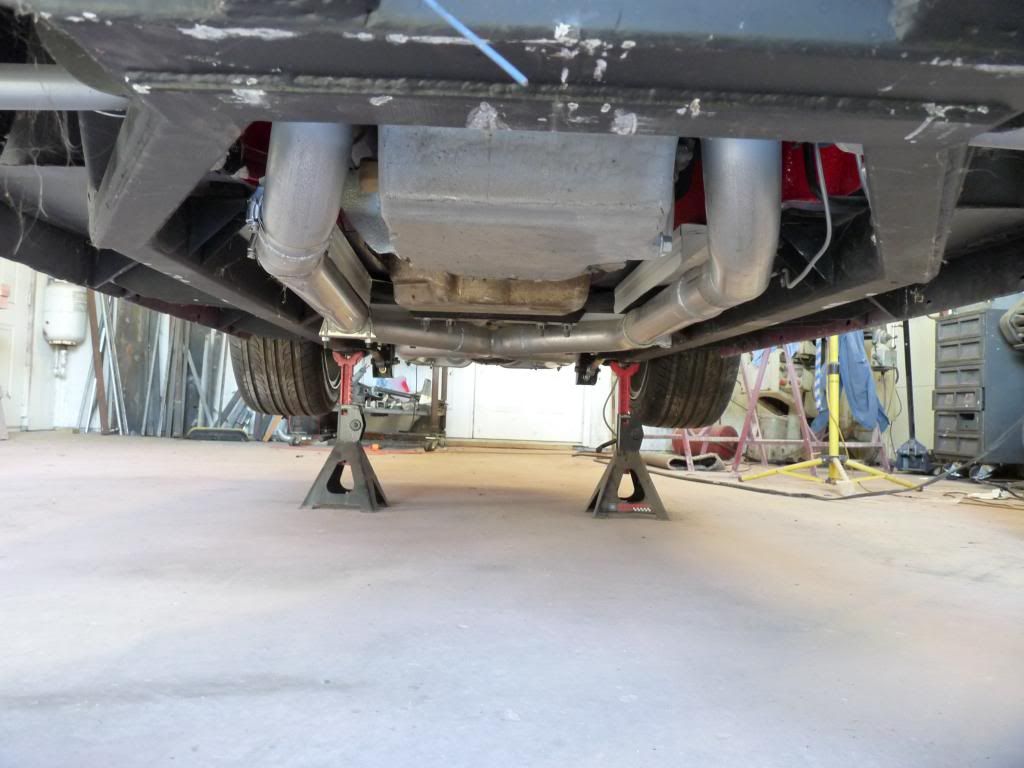
The bottom of the car really come out clean. The exhaust came out well and out of the way. You can see the bottom link and shock support below the rear axel. I used the shortest coil over I could find and it still protruded down this far. The rule is it can not be below the rim. If you have a flat you can guess the rest. 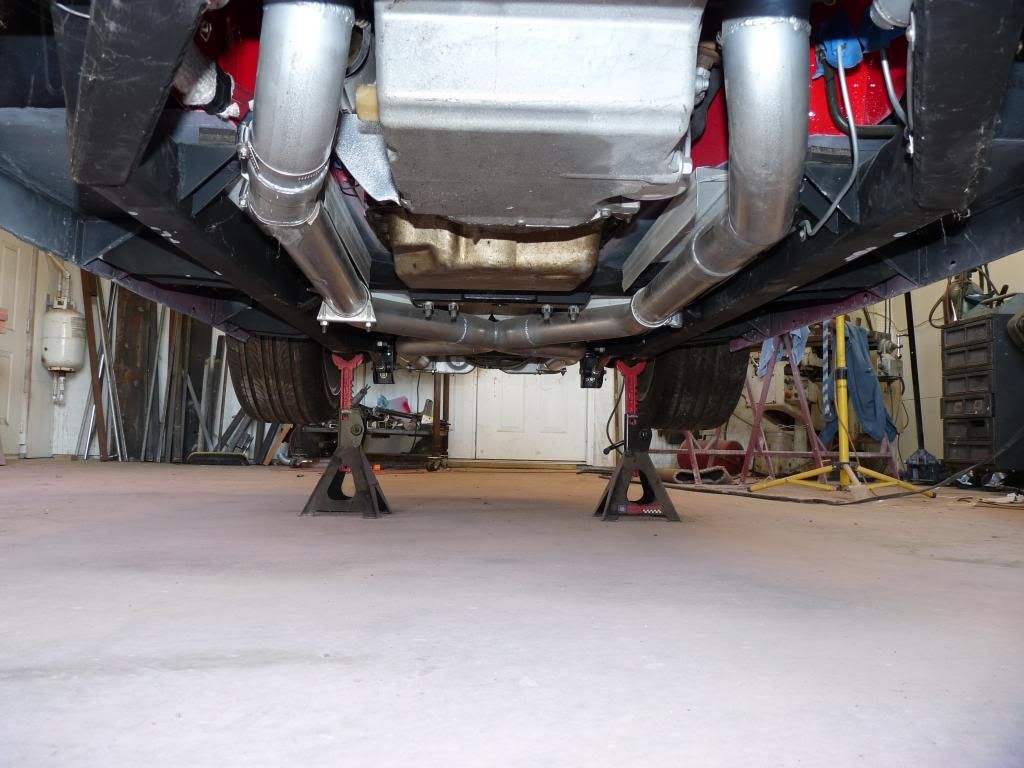
I used the flash this time. With the removable trans. mount I should be able to remove the engine and trans. out the front hole. 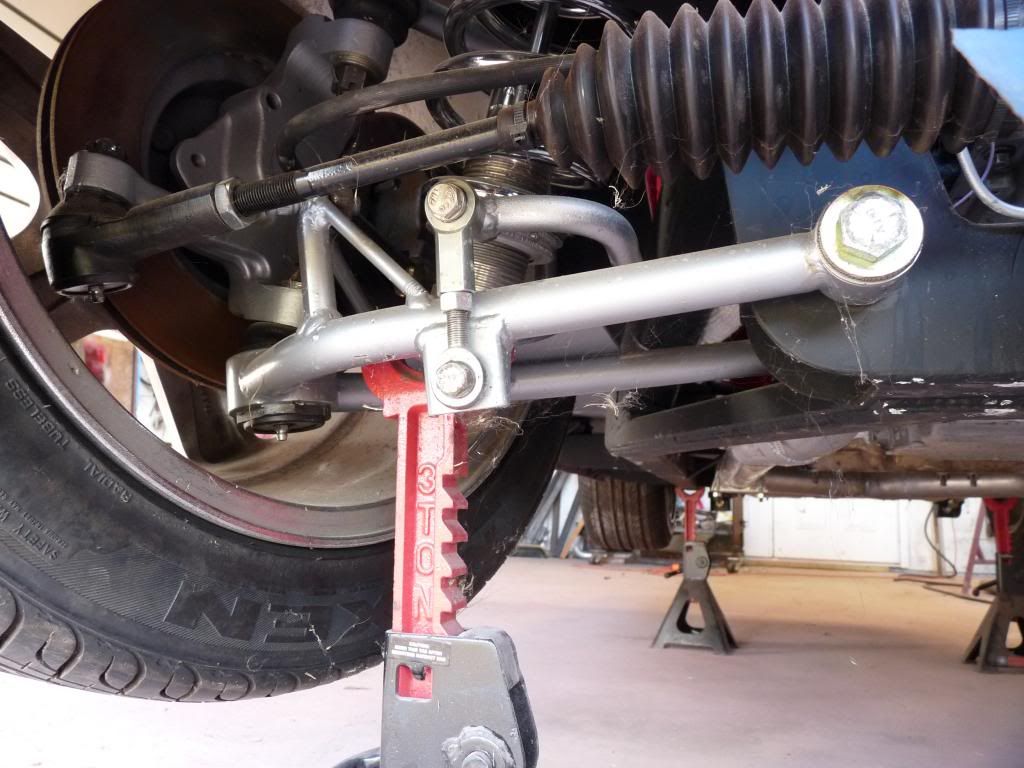
I modified the existing anti sway bar to work with this front end The triangle thing on the bottom swing arm is the spindle stop I had to make this. I had to use the old antisway bar because they didn't make one this narrow. 
This the third and I hope last mod I have to make on this mount. The plates the hiem joints bolt into had to be removed and replaced with plates with slots to be able to move the hiem joints around to get the clearance and the right angle for the universal joint. 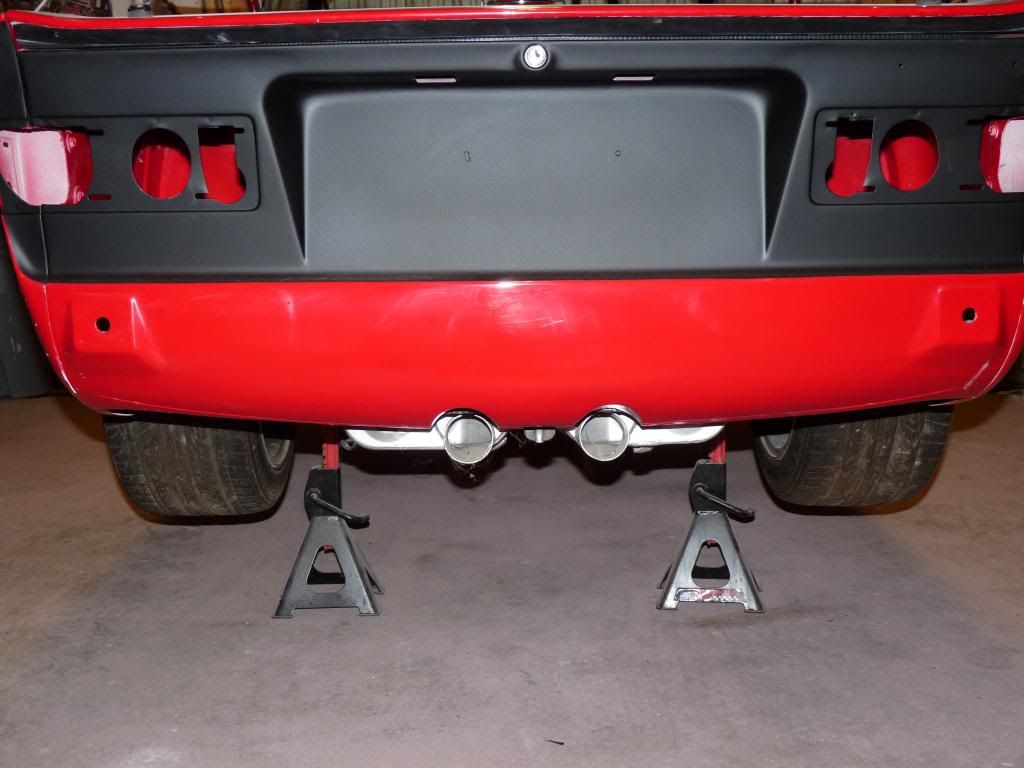
You can see how the mufflers lay flat with the exit coming down below the cross member. I believe this is the only thing visible other than the wheels that is not stock looking. 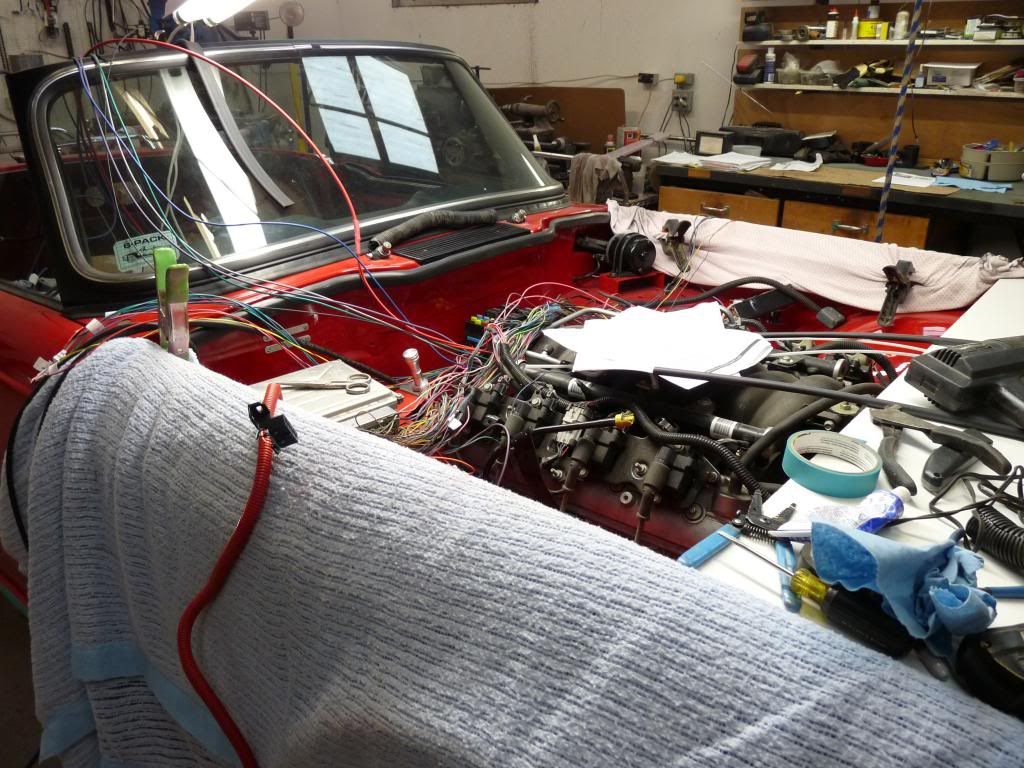
Wires wires everywhere. Trying to protect the paint is tough. 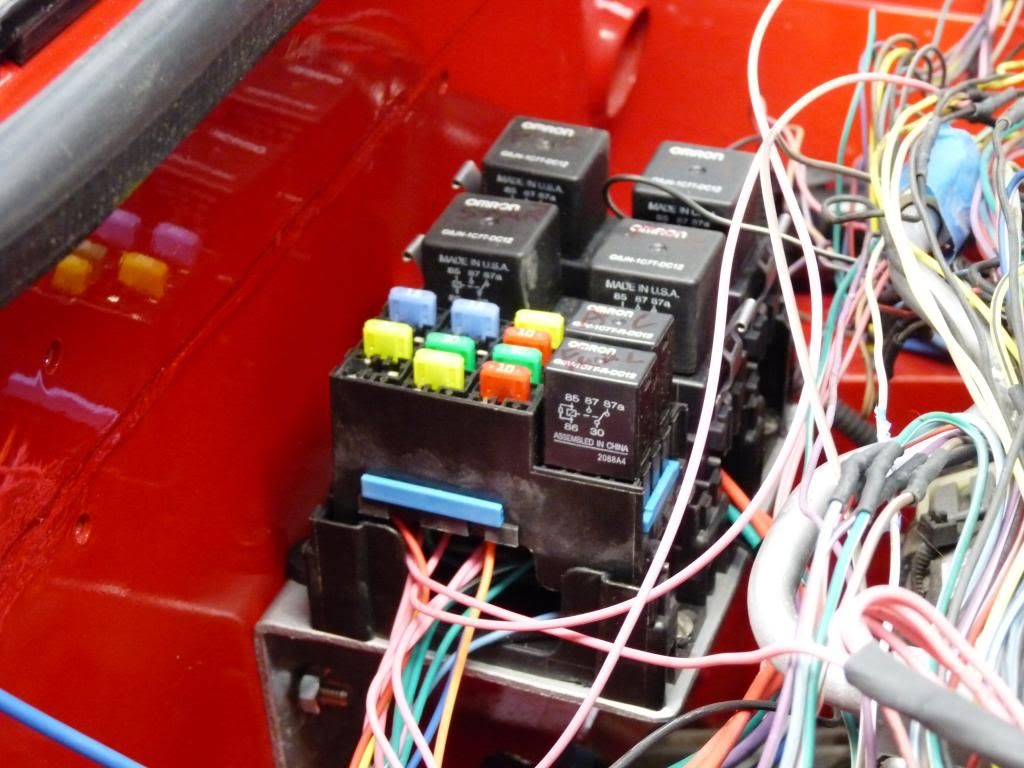
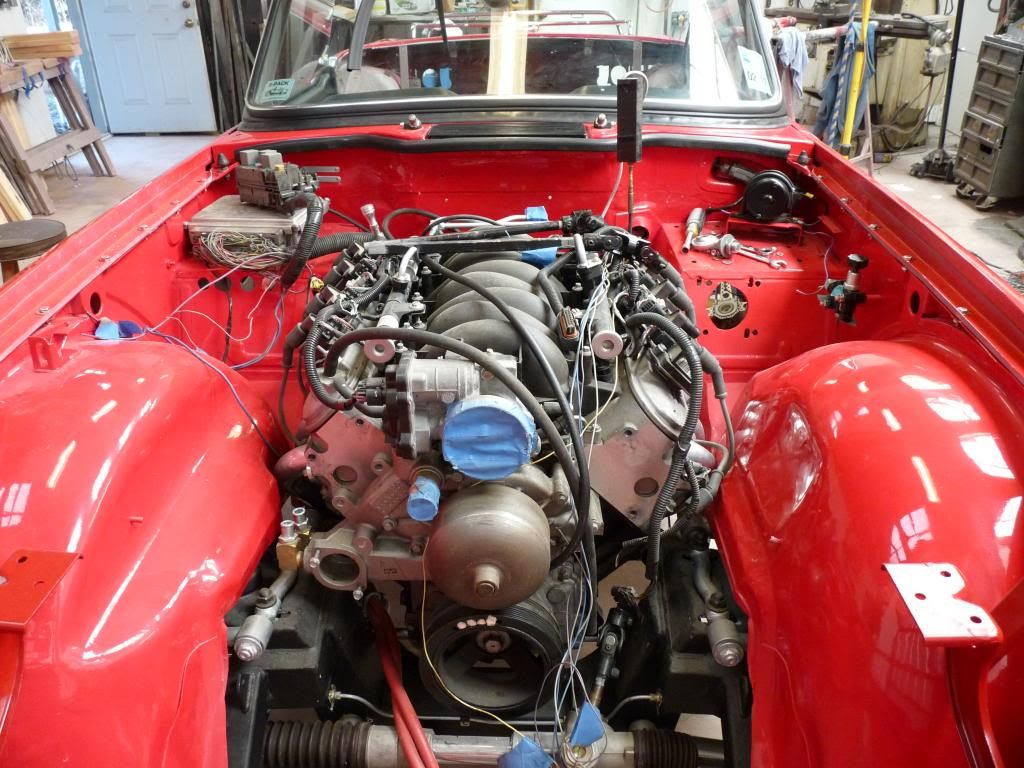
This fuse/relay box is made for the ls motors. It was reasonable and had everything you need for a stand alone motor and trans. 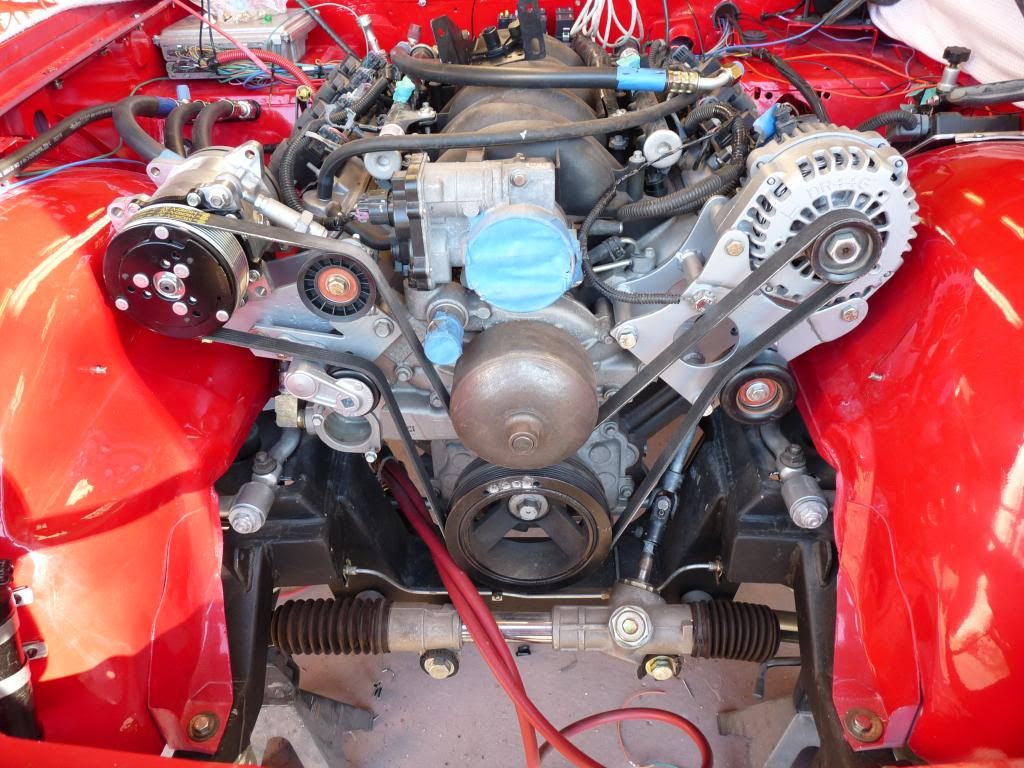
Alt. and compressor are in place. Had to make the brackets. The comp. is adjustable and it also has a tensioner. The red hose goes the trans. for cooling. They hook to the radiator. 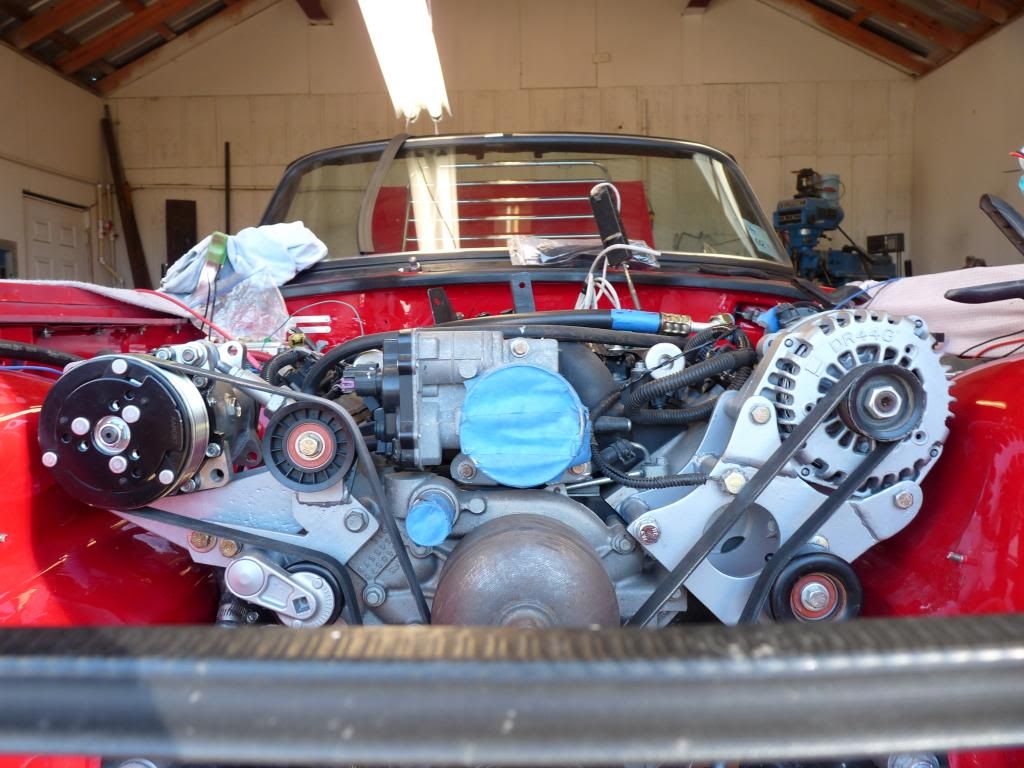
Hope it fits under the hood. 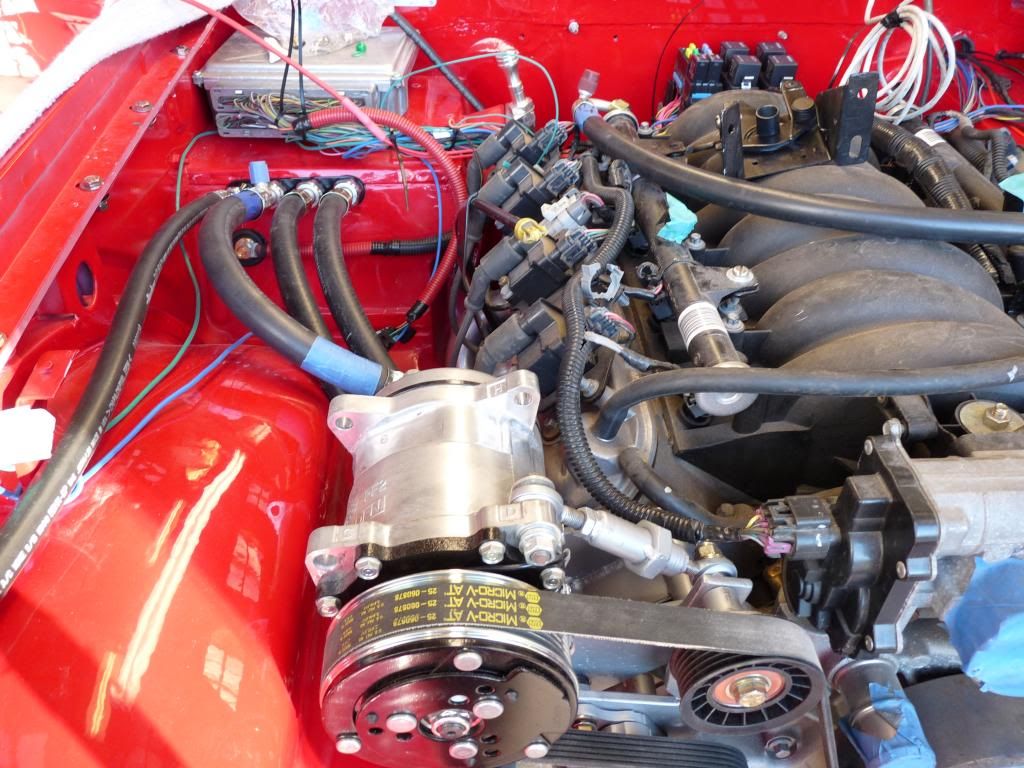
Ran the ac and heater hoses. If I had to do over again I would use solid hoses through grommets rather than these connectors.. They look good but have 8 places to leak. 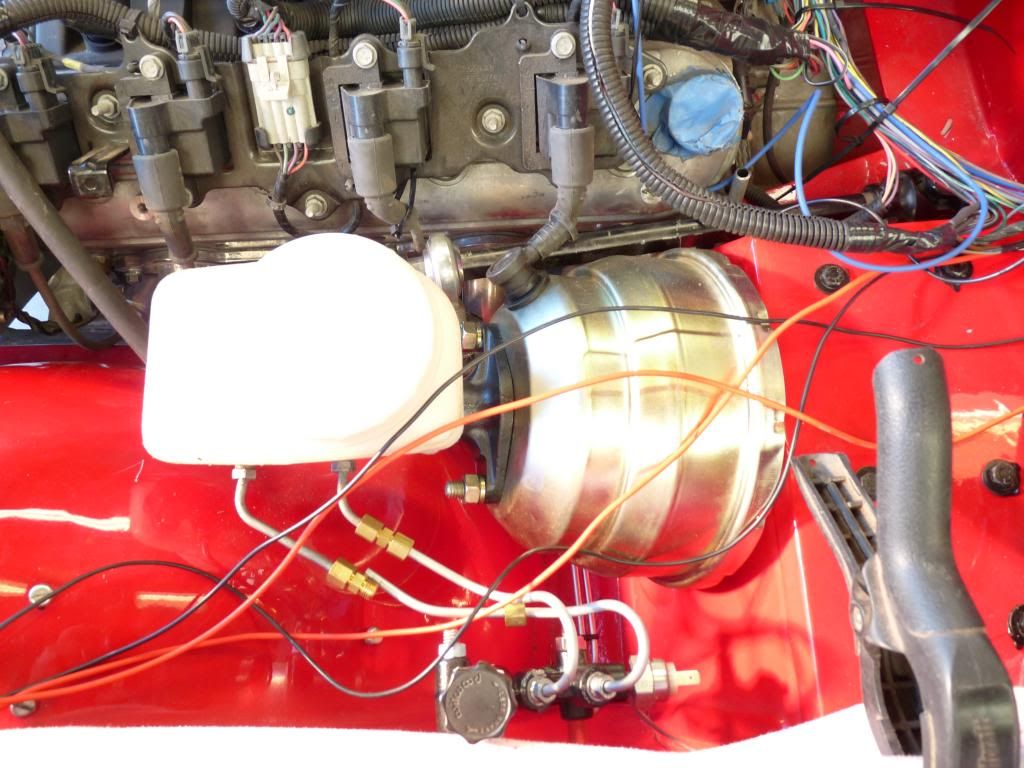
Installed the brake master cylinder and booster and tubed the cylinder. Lost a ferrel out of a fitting. Had to use the coupling instead of solid tube because the flare that goes into the master cylinder is different from the double flare that is used now so I had to use the small pieces from the car. 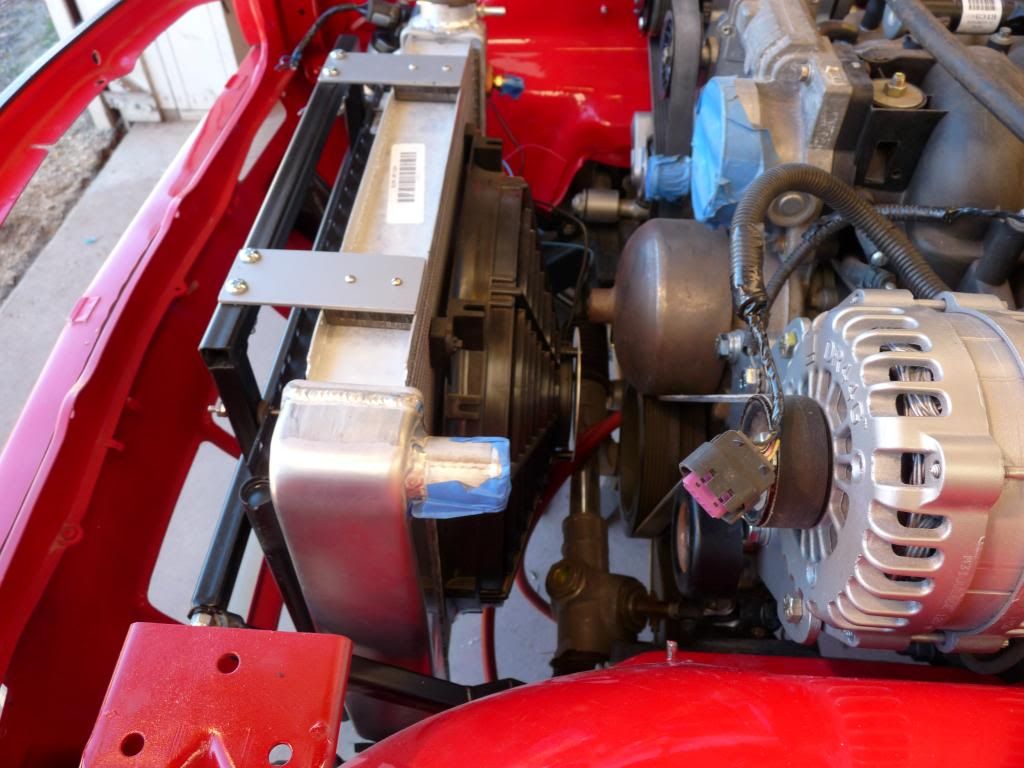
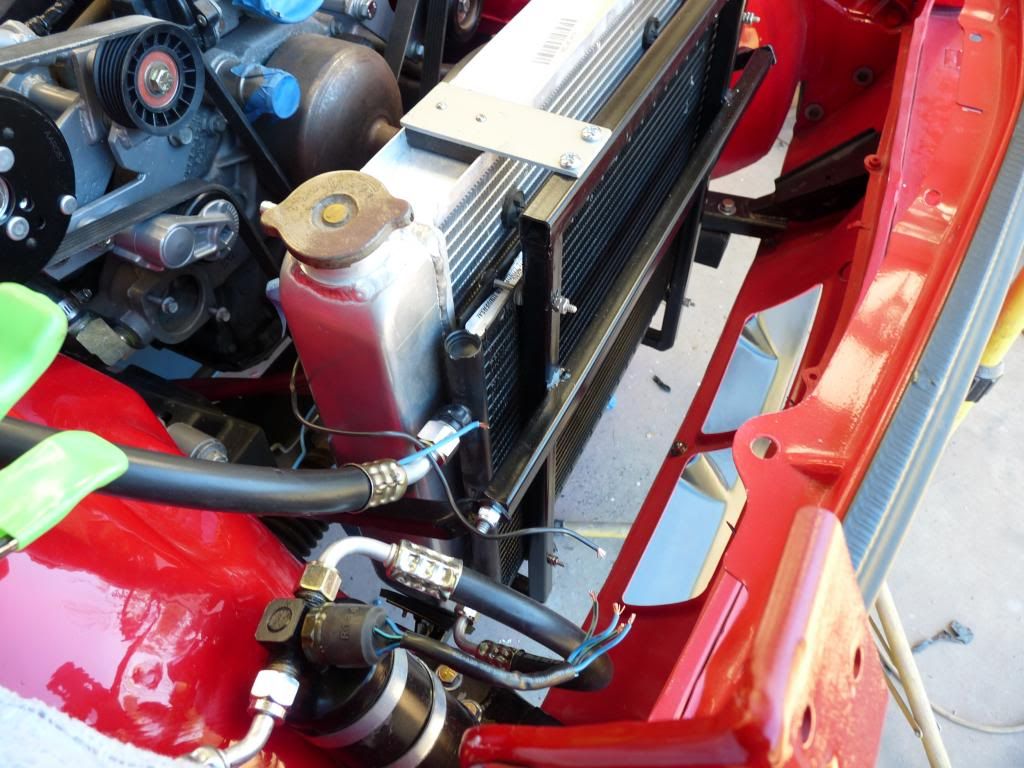
Radiator and fan are in. The fan is16" and moves 2200 scfm. I mounted the radiator to the frame and not to the body to cut down on the vibration and ultimately a broken radiator. 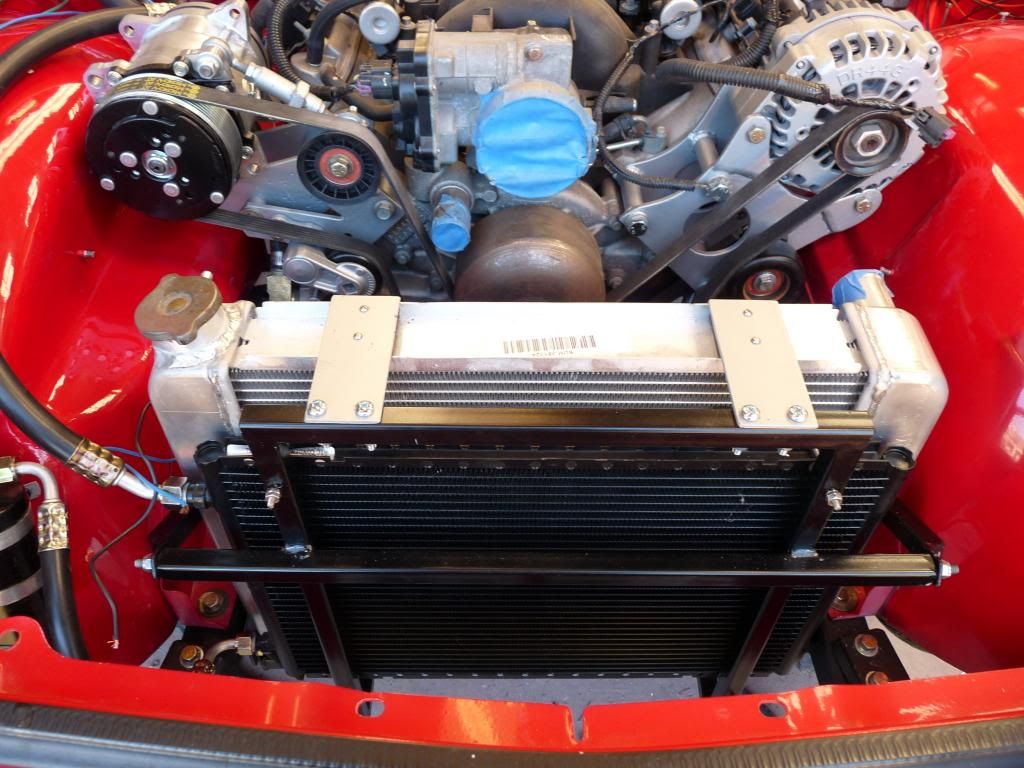
AC condenser installed. 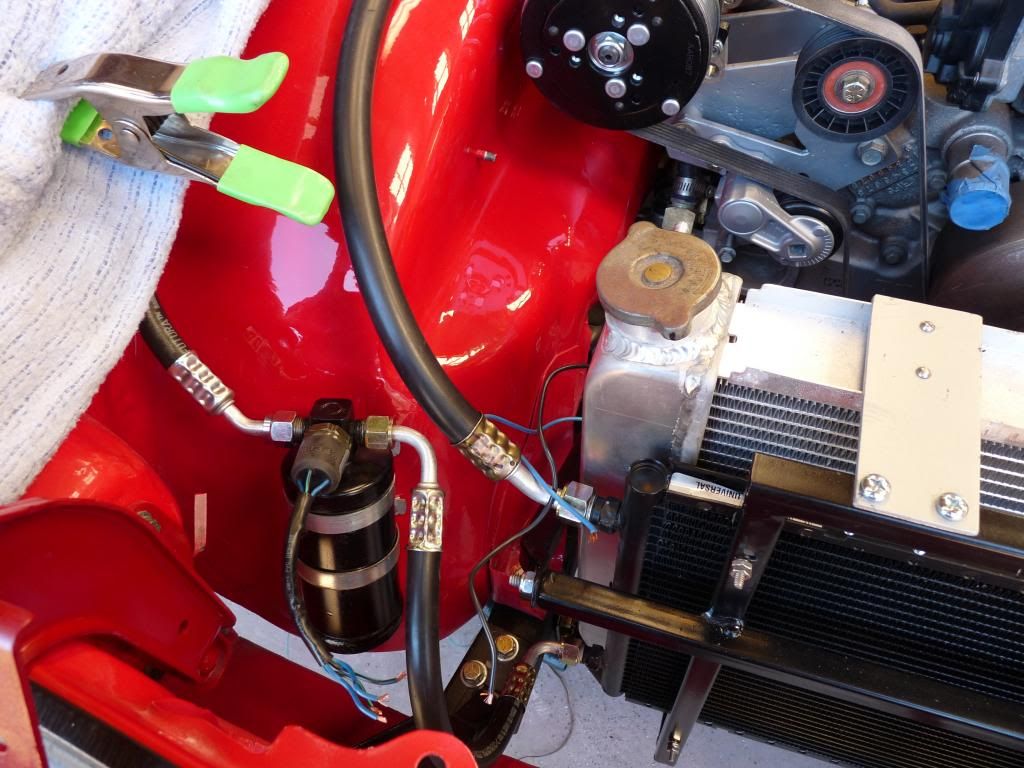
Filter dryer installed. I moved this thing 3 times because of the hood hinge. 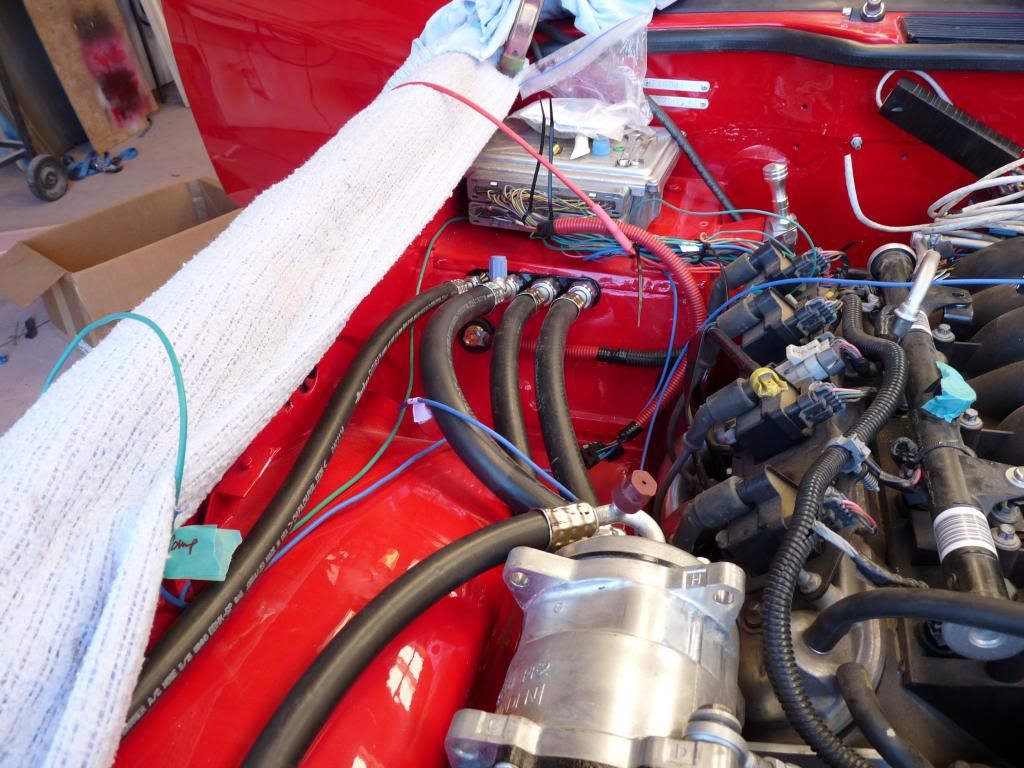
The battery wire from the trunk came through the firewall below the ac hoses. |
|
Phil Crawford Philip crawford Bogalusa, La (80 posts) Registered: 02/01/2013 10:38PM Main British Car: 74 TR6 07 4.8L |
Re: 74 TR6 upgrade
I am gradually using up all of the room. 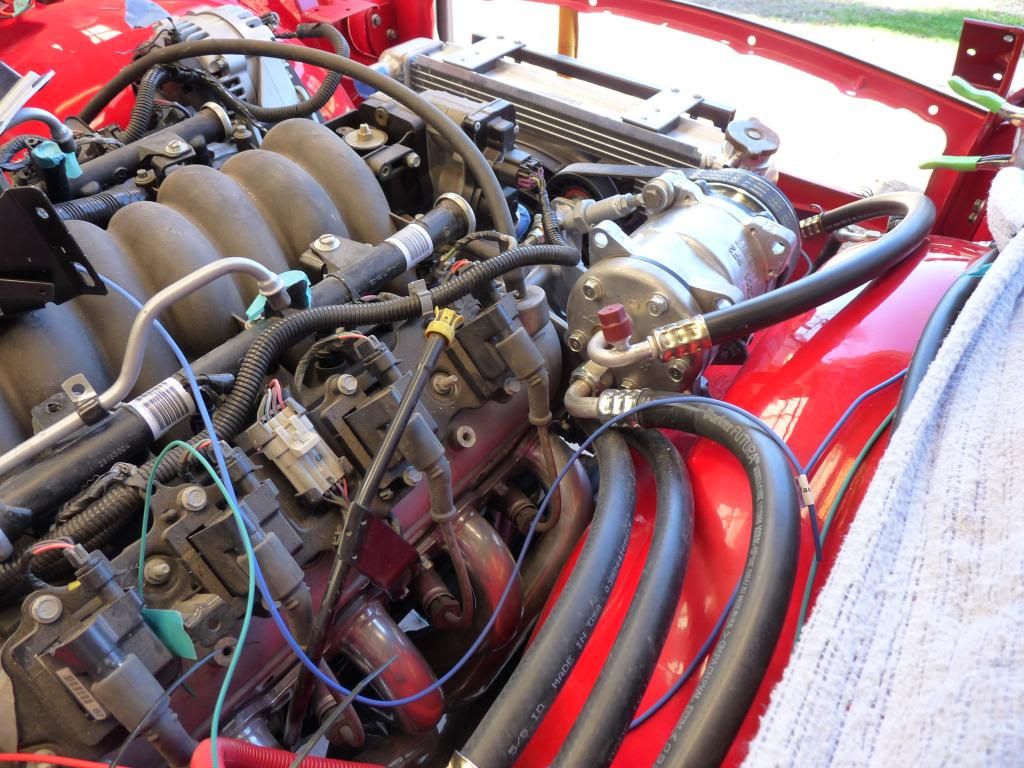
Different look. 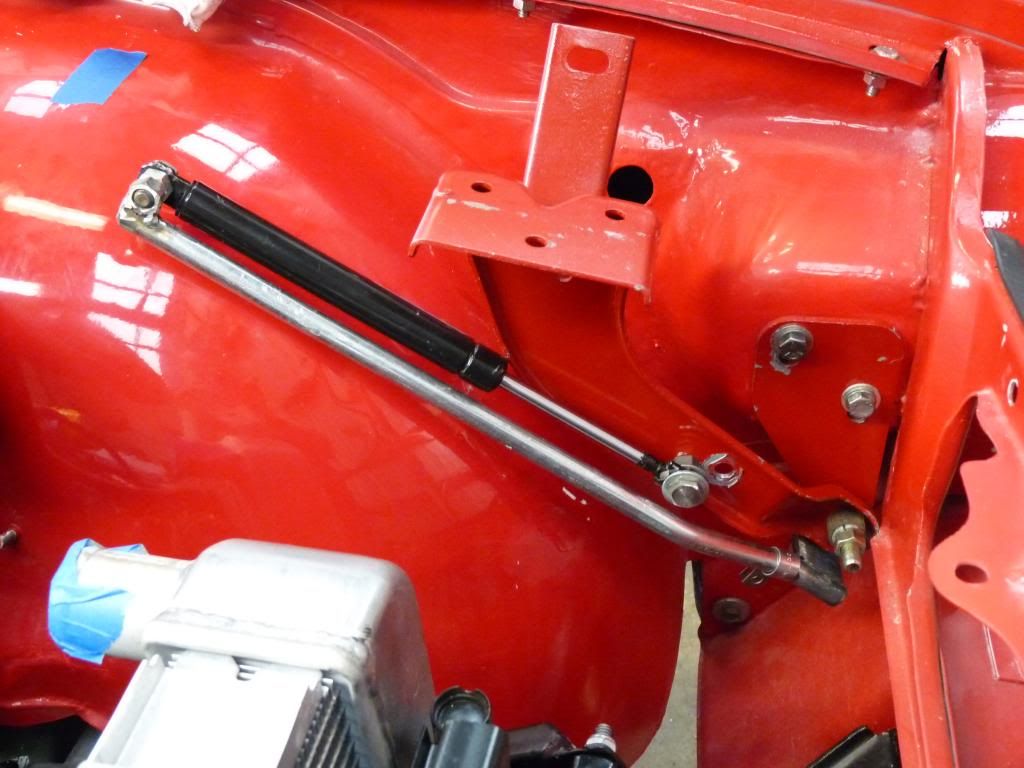
I worked on this hood support and I believe it will work. Once the hood is installed and alligned I will attach the black arm to the fender with a small clamp. The bracket takes the pressure because it works at the pivot point. 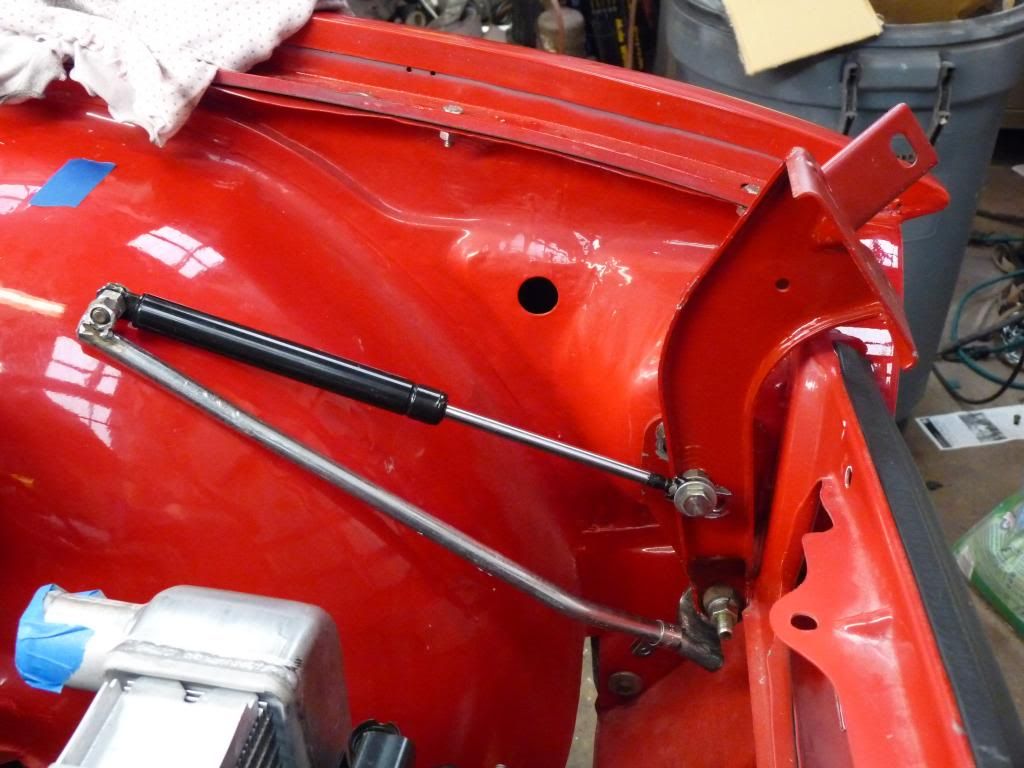
Now the hood is up. It takes a lot of force to push it down. 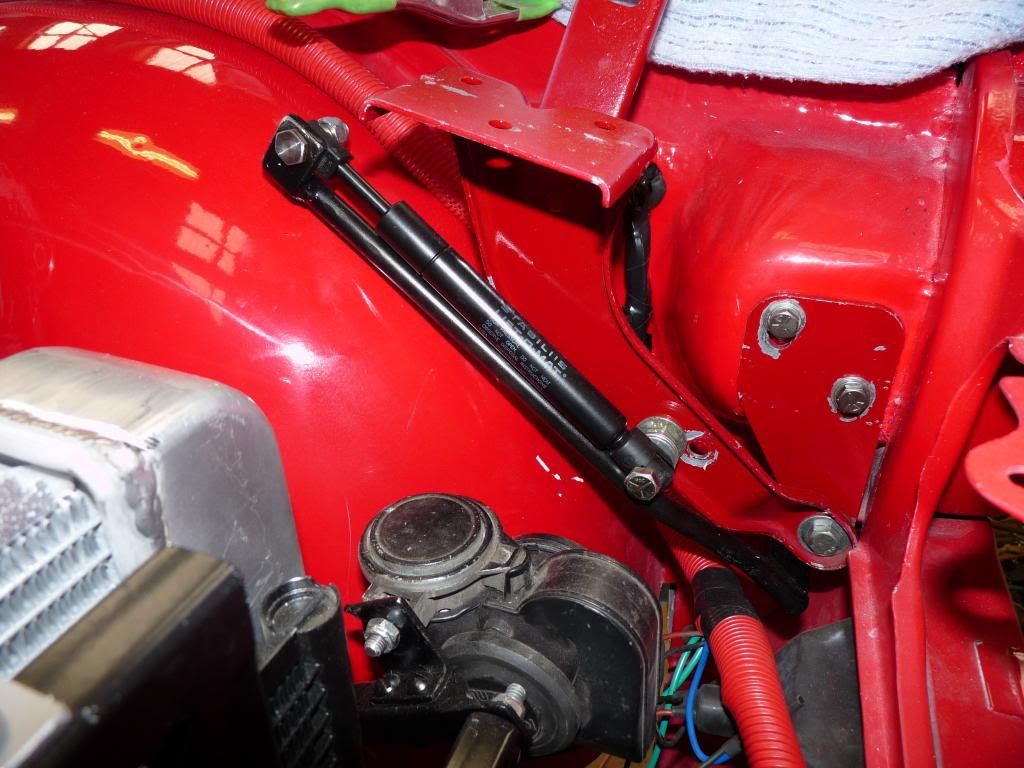
I used a shorter piston on this one because I needed the room for the air cleaner. It is harder to push down than the other one because of the up angle. 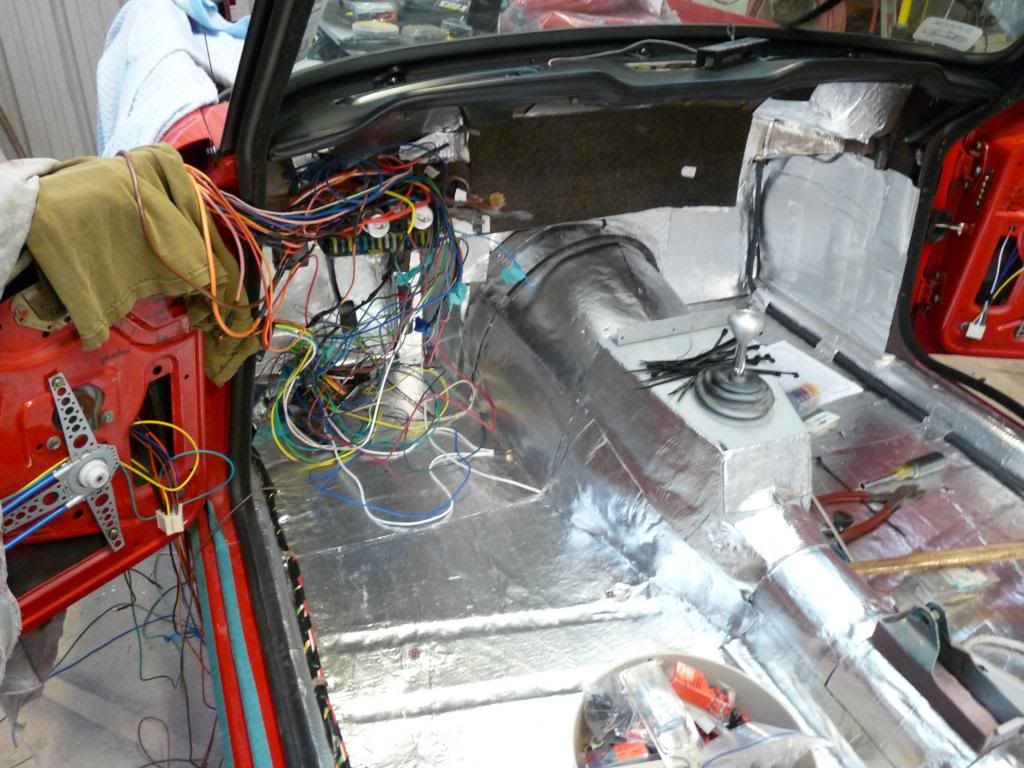
Trying to keep it quite. 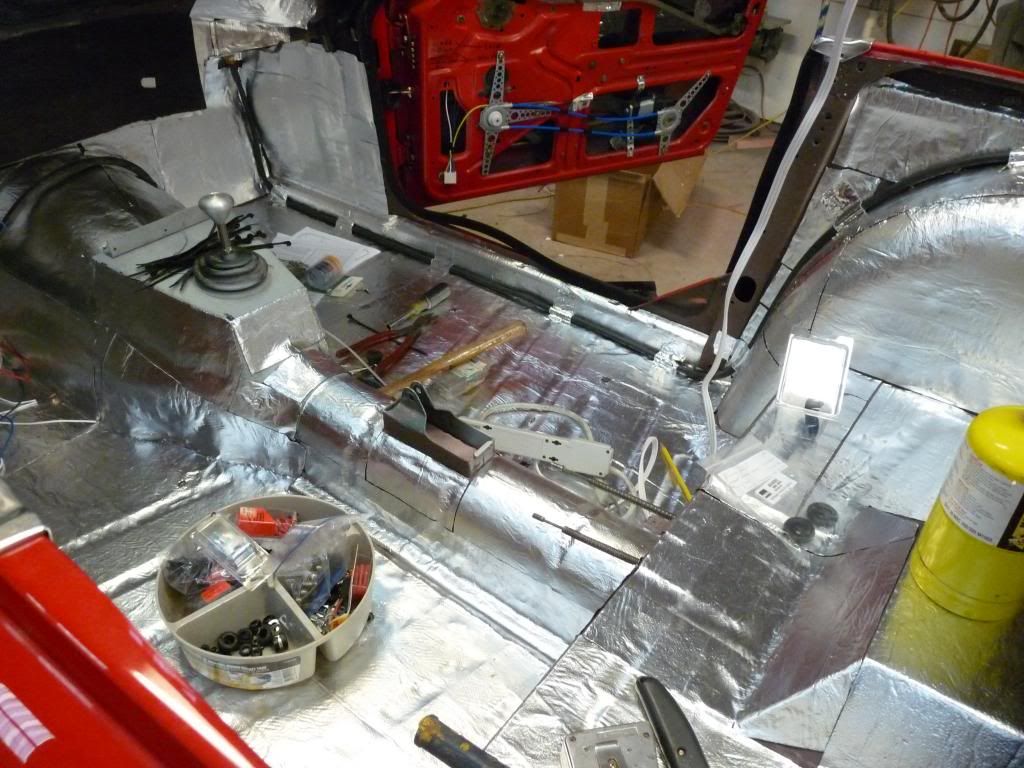
Relays for the door openers and the wireless remote control module. Thats all of the photos for now. 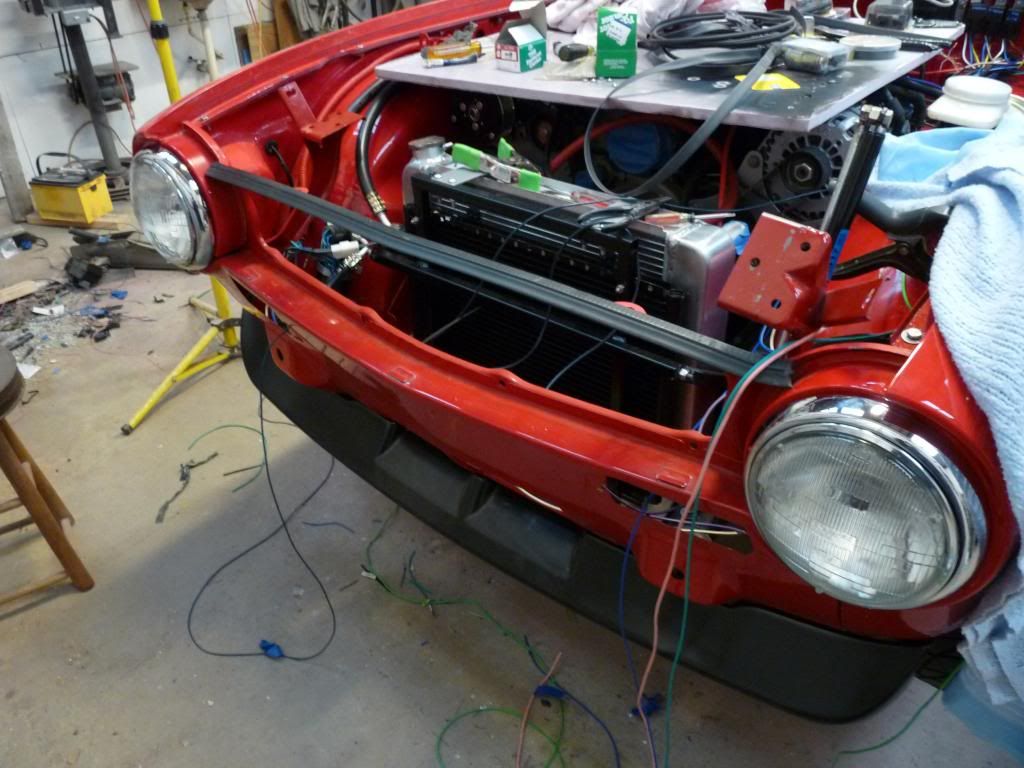
Head lights are in. Used relays for almost everything to keep the load of the switches. 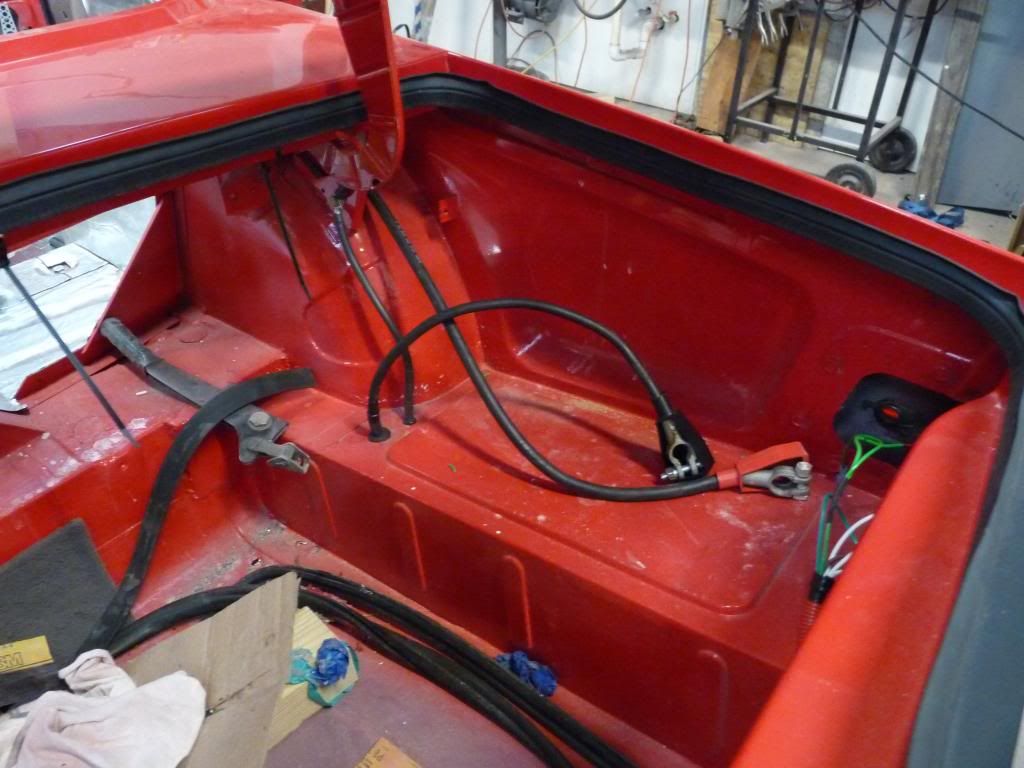
Battery cables in the trunk. Ran the ground down to the frame. Welded a bolt to the frame for the battery ground. Ran #2 cables. 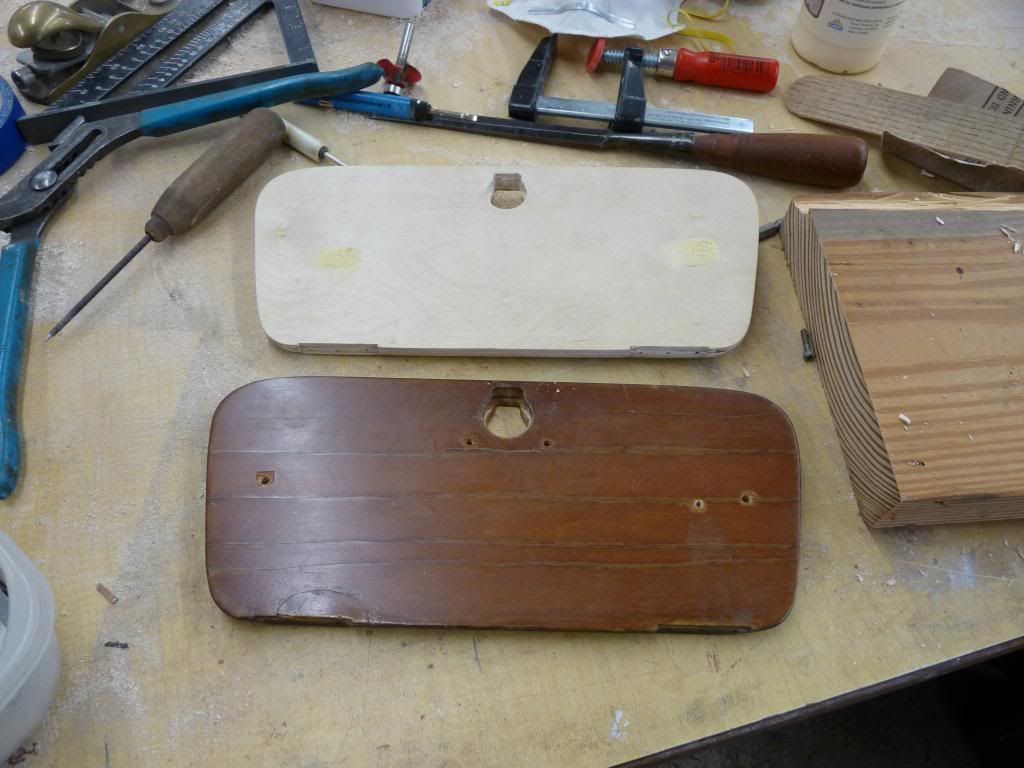
Started making the dash. Used 1/2" birch exterior plywood for the base. Covered it with South american Rose Wood veneer. 
Used the old dash as a pattern and cut it out with a formica flush cutting bit. 
Not bad. 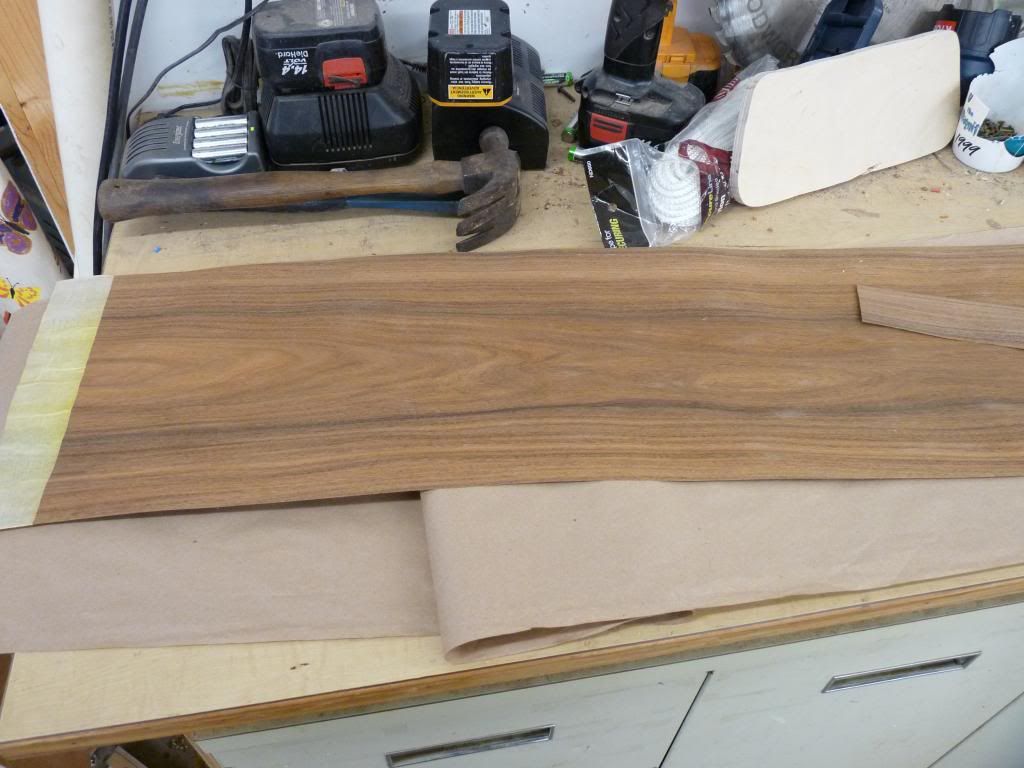
This is the rosewood veneer. 1/25" thick. 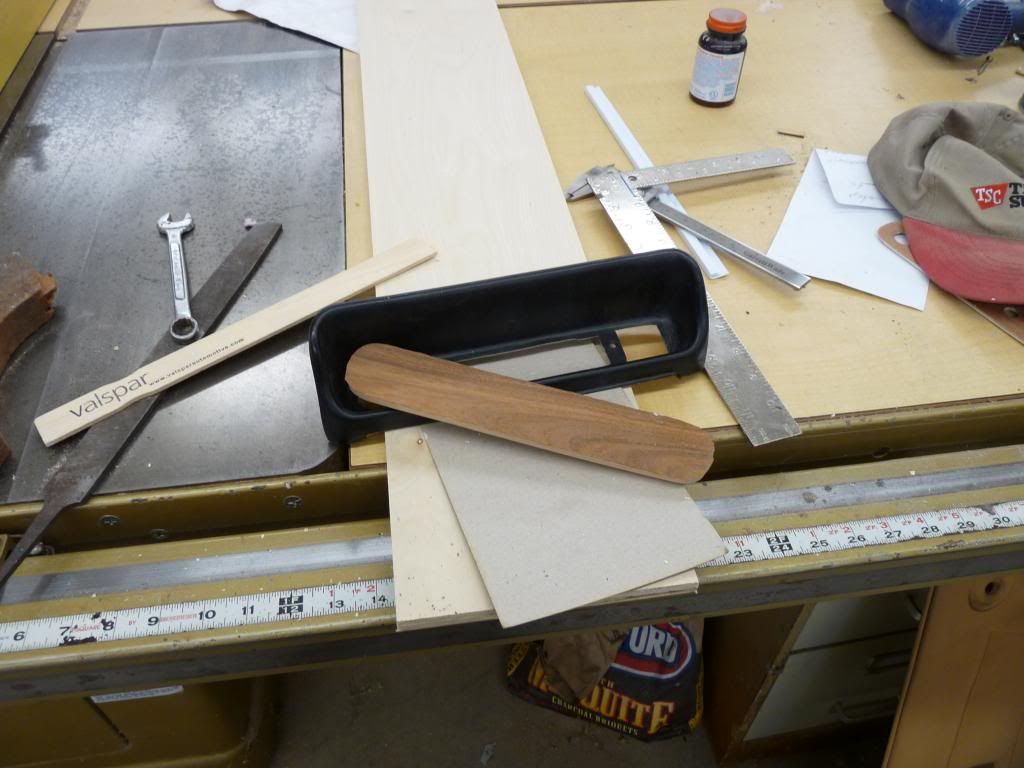
Making a piece for the ac controls and the ignition switch. 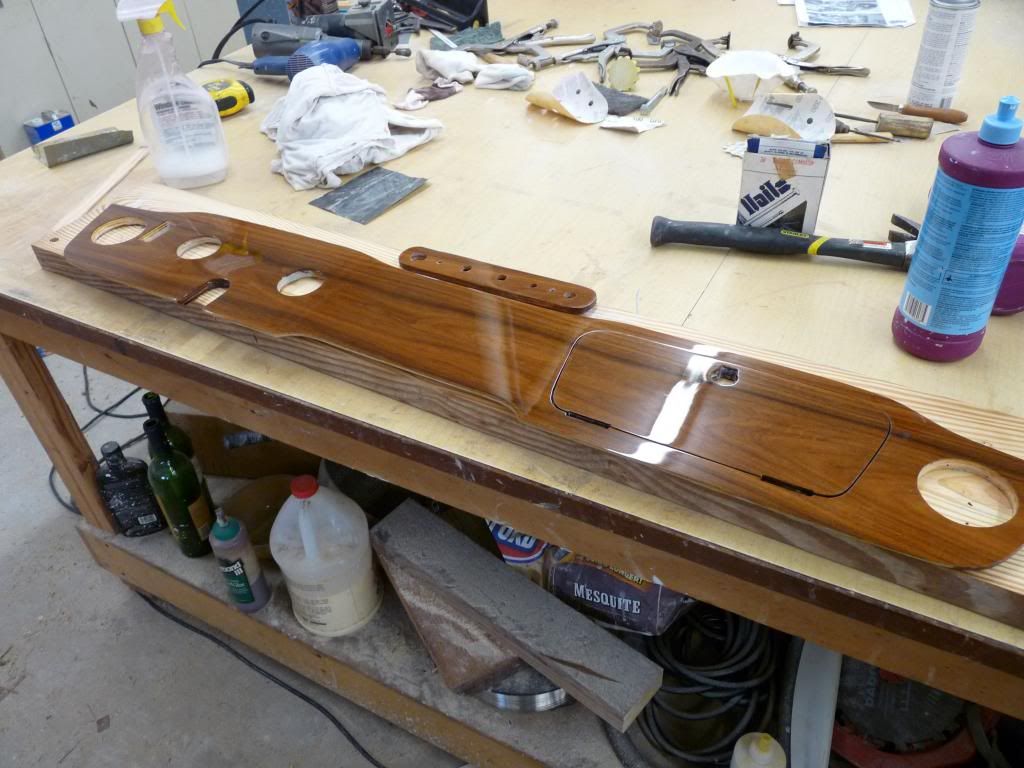
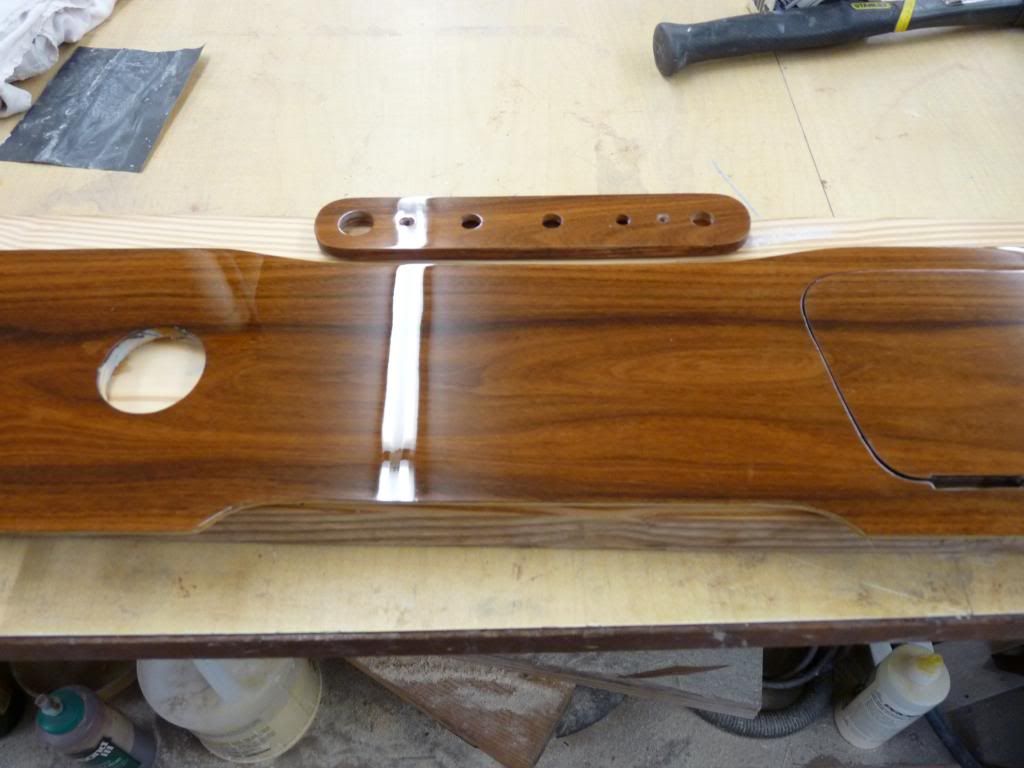
After 9 coats of sanding lacquer sanded after each coat and 3 coats of house of kolor clear, wet sanded with 1500 grit then buffed with 3 stages it looks great. Finished it today. Waiting for my gauges to come in so I can finish cutting the holes. 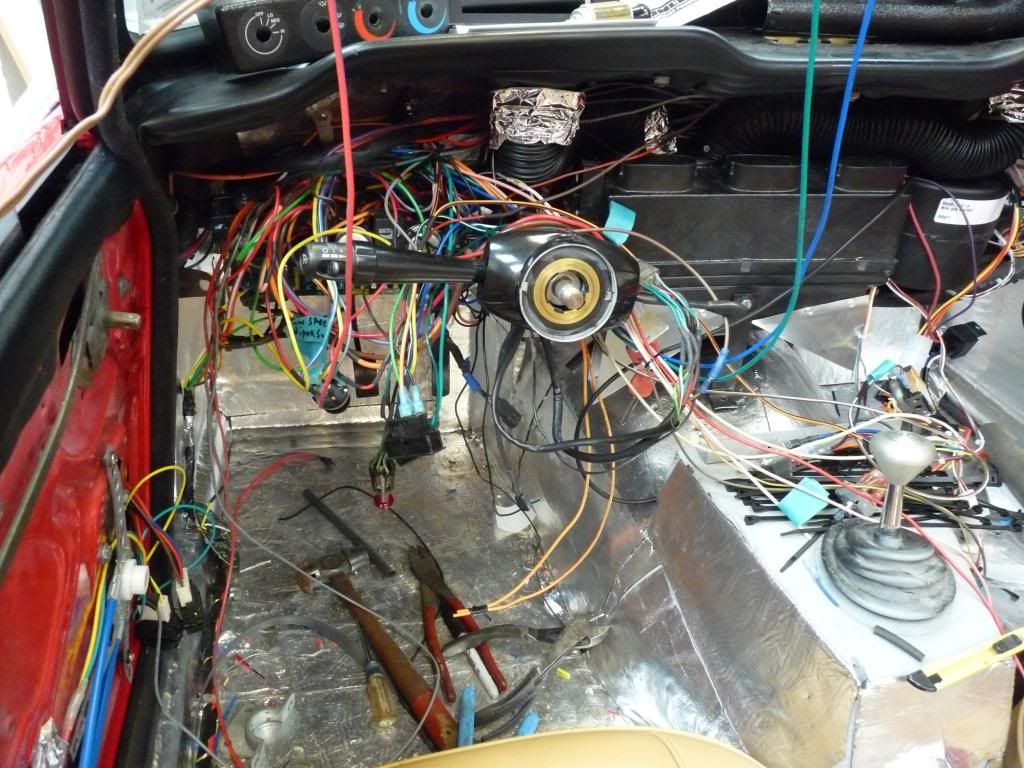
Lots of wires. Used a second fuse block with flashers and horn relay for rest of the car. 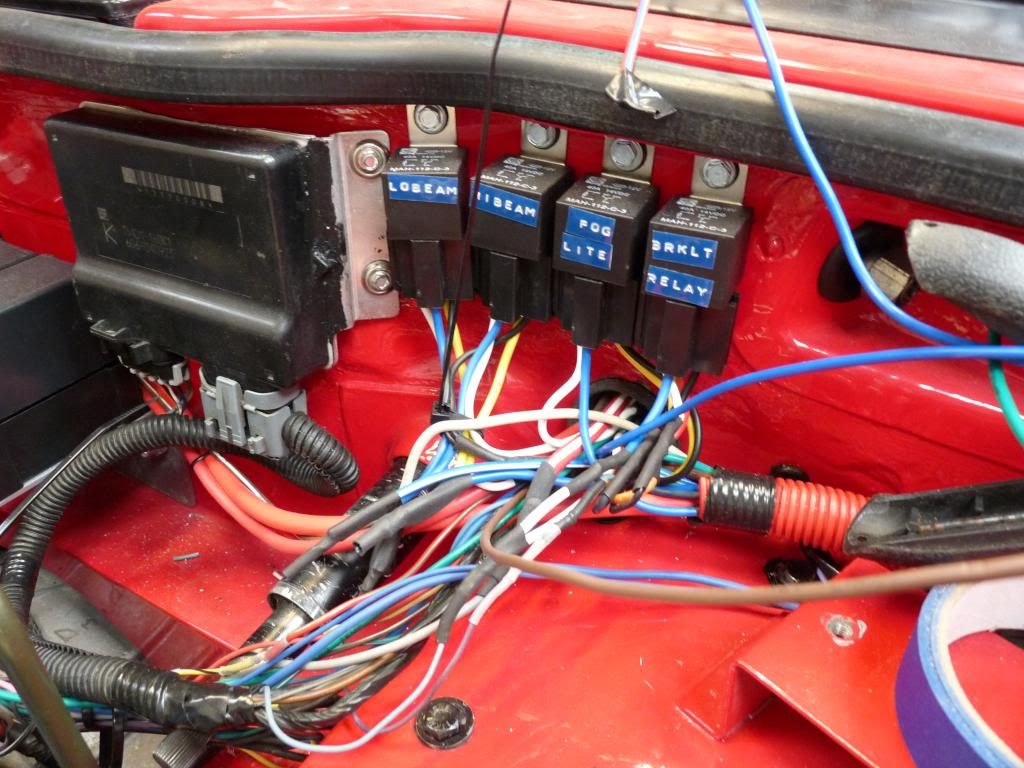
Power relays for various things. The black box to the left of the relays is the tac module for the drive by wire control. 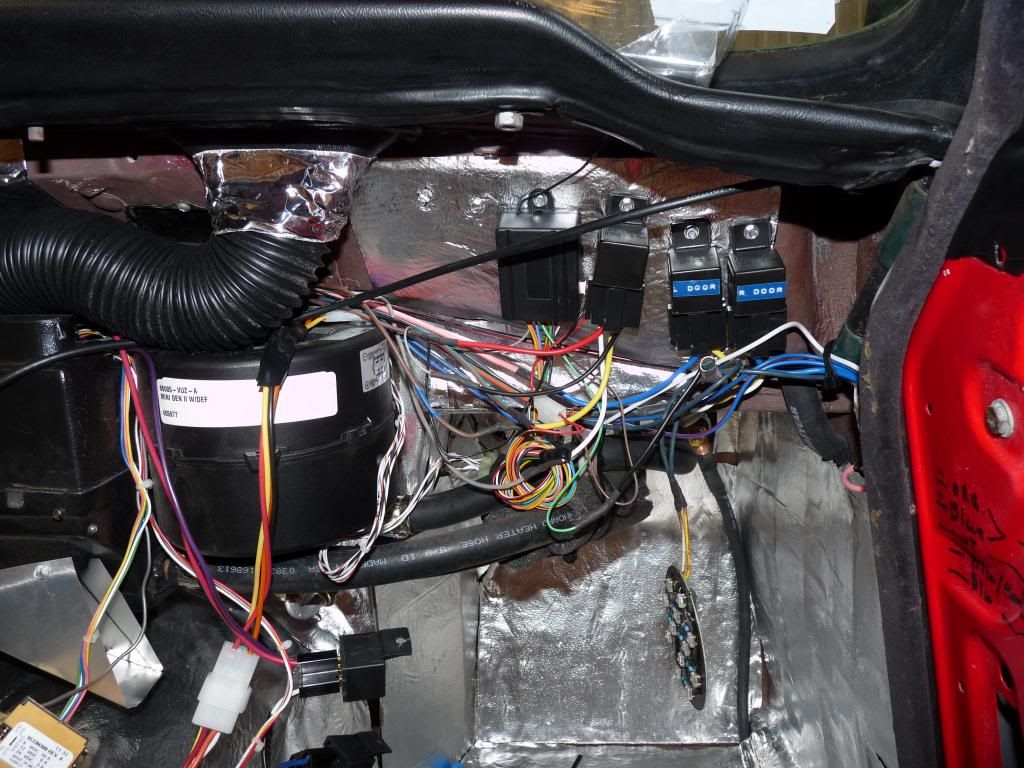 |
|
tr6turbo Dale Knapke Sidney, Ohio (169 posts) Registered: 08/24/2008 09:44PM Main British Car: 1972 Triumph TR6 Ford 2300, 4 Cyl Turbo |
Re: 74 TR6 upgrade
I really liked your hood support. Can you share the size, part number, or application and where I could get one of the same size.
A lot of great work and engineering in that car. Looks great. |
|
Phil Crawford Philip crawford Bogalusa, La (80 posts) Registered: 02/01/2013 10:38PM Main British Car: 74 TR6 07 4.8L |
Re: 74 TR6 upgrade
dale,
I am getting ready to leave town for a few days. But when I get back I will get the piston # and take some close ups of the system..It took me about a day to get worked out after a few trial and errors. I haven't tried it with the hood on yet but I believe it will easily hold up the hood. If not I will put another one on the other side. I wish I had worked this out before I painted, I still have the hook on the right fender. Phil |
|
|
|
74ls1tr6 Calvin Grannis Elk Grove,CA (1151 posts) Registered: 11/10/2007 10:05AM Main British Car: 74 TR6 / 71 MGB GT TR6/Ls1 71 MGB GT/Ls1 |
Re: 74 TR6 upgrade
Phil,
You have posted up some skill on this thread. I just envy your shop too! I have a question on your 07 4.8 ls?. Did you change out your truck intake for a car intake? I thought the truck intakes sit pretty tall? From your photos everything will fit under the hood with spare room. With my Ls1, I could have made my oil pan flush with the frame, but yours is a "custom frame". Great job...Can't wait for a write up on this ride. That 4.8 can rev up nicely with just a few mods! Calvin |
|
88v8 Ivor Duarte Gloucestershire UK (1042 posts) Registered: 02/11/2010 04:29AM Main British Car: 1974 Land Rover Lightweight V8 |
Re: 74 TR6 upgrade
Incredible. You've pretty well created the whole car from scratch, taking in various skills that most people would regard as specialist. Even veneering the dash would be a big deal to most.
I suppose now you're breeding your own beef for the leather to upholster the interior.... And when you're done it won't shout Look at Me, because it will appear almost stock. Or it could, depending what seats you choose. Be a shame to use modern buckets, just my opinion. It took me 60 years to realise I don't have the skills or the persistence to create something like this, but I certainly admire those who do. How easy is it to insure a car like this? Also getting it past whatever govt legislation might get in the way? Ivor |
|
Phil Crawford Philip crawford Bogalusa, La (80 posts) Registered: 02/01/2013 10:38PM Main British Car: 74 TR6 07 4.8L |
Re: 74 TR6 upgrade
Calvin,
The intake is off of a 2002 camaro ls1. Part of the fuel rail is off of the truck because the injectors are shorter and the plugs are different. I fabbed the fuel line from part of the old one.If I were to do it again I would use a ls1 because you have to change too many things on the motor to make it fit in a small car. I going to leave the engine stock for now and pump it up later or get me a vette LS6 or build me a used ls1. I don't know yet. Once I finish this project I think there are a few honey du's that have been waiting for a while. Got my gauges today going to put them into the dash next and try to close the dash up. Thanks for looking Phil |
|
Phil Crawford Philip crawford Bogalusa, La (80 posts) Registered: 02/01/2013 10:38PM Main British Car: 74 TR6 07 4.8L |
Re: 74 TR6 upgrade
Ivor,
Thanks for the kind words and looking at my project. I am not breeding any cows but I have a neighbor that has a few. I might just slip over there tonight and skin me one out and tan that rascal. Now that sounds like work.Ha! I hate to disappoint you but I plan to put some other seats in the car. In louisiana I don't have to do anything special to register the car because it is already reg. and licensed but will change my insurance some maybe. My father was a jack of all trades and I follow in his footsteps except I am a master of none. Tks Phil |
|
|
|
Re: 74 TR6 upgrade
Come on Phil you are not telling us the whole story!! We know that you are mining the iron ore and you are smelting it to make the steel parts for your frame. The veneer from your dash must have come from a tree that you planted when you were 2 years old!! That paint you must have surely developed it in a lab in another part of your property!!
People like you raise the level to something that us mere mortals cannot attain. We are not worthy and we bow humbly in your presence!! Seriously Phil you are a very talented guy and your humility is genuine. Cheers Byron |
|
Phil Crawford Philip crawford Bogalusa, La (80 posts) Registered: 02/01/2013 10:38PM Main British Car: 74 TR6 07 4.8L |
Re: 74 TR6 upgrade
Byron
You are killing me man. Giving away all of my secrets. Being able to fix things is also a curse. When I first got married many years ago I lived in a subdivision with lot of kids with bicycles and lawn mowers. I would walk out on Sat. morning and there would be a line of kids needing things fixed. They didn't know my name just called me Mr. Fixit.. True story..They hated it when I moved a few years later. Your car must be getting close to running by now. Hooked a battery to mine and it didn't blow any fuses and the motor turns over. I felt good about that. Don't give up just keep moving. Tks Phil |
|
Phil Crawford Philip crawford Bogalusa, La (80 posts) Registered: 02/01/2013 10:38PM Main British Car: 74 TR6 07 4.8L |
Re: 74 TR6 upgrade
Curtis,
Thanks for the kind words and taking the time to look. I know there are a lot of photo's and it takes time to look. If you have any questions feel free to ask. Phil |
|
|
|
Phil Crawford Philip crawford Bogalusa, La (80 posts) Registered: 02/01/2013 10:38PM Main British Car: 74 TR6 07 4.8L |
Re: 74 TR6 upgrade
Curtis
Thanks for the compliment. It has never felt like work. Phil |
|
Re: 74 TR6 upgrade
What an amazing build Phil! I travel to South Louisiana often for work and you seem to fit the profile of most of the people I've met; capable and modest!
I thought long and hard about narrowing a mustang II front suspension for my Hillman but I ended up not doing it because I didn't want to dig into the front frame rails. I see what I was missing now... a lathe and the ability to use it! Seriously, there are two types of diy car builders, those that can do machine work and those that can't. |
|
Phil Crawford Philip crawford Bogalusa, La (80 posts) Registered: 02/01/2013 10:38PM Main British Car: 74 TR6 07 4.8L |
Re: 74 TR6 upgrade
Ryan
Thanks for the kind words. A lot of the working people in La. are good craftsman and I think it comes from not having the money to buy things so they made it instead. I know you have most likely watched the show "Swamp people" and have seen the man Troy Landry along with a lot of other folks around Pier Part, La. I worked with Troy for 15 years and consider him a friend and I can tell you he and his buddies could build anything from almost nothing. Our summer turn a rounds were always staffed with men from Pier Part after the crawfish season is over other wise they wouldn't come. You talk about independent. Troy is the real deal and what you see is what you get. I have to tell you my machine work is very weak. I have learned to do what I need to do but nothing too fancy. I have been working on my dash today but didn't get much done. Thanks for looking Phil |
|
Re: 74 TR6 upgrade
Phil, my two boys love watching "Swamp People"! Interestingly, I deal with Raceland Raw Sugars in my work and the guys know Troy Landry as he used to drive a cane truck for them at some time in the past. They told me exactly the same thing; Troy is just like you see on the show. One of the guys I know at Raceland has shown me pics of some of the gators he and his daughter trapped that ended up on the show as Elizabeth's gators! Having lived my whole life in Nebraska, getting to travel down your way 3-4 times a year is quite an experience. I love it!
So your difficulty with using the 4.8, I assume a lot of that would be eliminated by keeping the truck intake and accessories on it? I have a 4.8 in my Tahoe and I think it would be a great engine in a lighter car. Looking forward to seeing the rest of your project! Ryan |
|
|
|
Phil Crawford Philip crawford Bogalusa, La (80 posts) Registered: 02/01/2013 10:38PM Main British Car: 74 TR6 07 4.8L |
Re: 74 TR6 upgrade
Ryan
You speak of Raceland Sugar. I built a desk out of reclaimed cyprus from the old Raceland sugar or rice mill that was built in 1850. The old wood is great to work with and has a color that is hard to duplicate. One Xmas season on a monday morning Troy came to work and was telling us about his trip to Baton Rouge that weekend. Troy is very good at telling a story. It should take about 1.5 hours to get to BR from Pier Part but it took him about 2.5 hrs. I ask him how did he go that it took him so long to get there and he replied "What you mean how I go, I don't know highway I know bayou" . Classic Troy.. I'm about 2 hrs from BR but if you get my way give me a call and maybe we can meet up somewhere. The 4.8.. To get the 4.8 in a car you have to change the oil pan, harmonic balancer, water pump and intake manifold. The intake is too high, the oil pan is too low, the water pump discharges the wrong direction and when you change the water pump you have to change the balancer because it sticks out too far. Other than that it is a great engine. The block more but that much more. I think the motor will be fine to start with. Phil |
Sorry, only registered users may post in this forum.
British V8 Home Page
Photo Gallery
Web Forum
Annual Meetings
Contact Info
Site Map
British Race Car

© 2019 British V8™ All rights reserved. Website & graphic design by:
Curtis Jacobson.
BritishV8 Forum is hosted by
SiteWelder LLC,
and is powered by a
Phorum engine.